Veritas plane kit build

UKworkshop.co.uk

Help Support UKworkshop.co.uk:

This site may earn a commission from merchant affiliate links, including eBay, Amazon, and others.

Racers

Established Member
Joined
22 Apr 2005
Messages
9,172
Reaction score
136
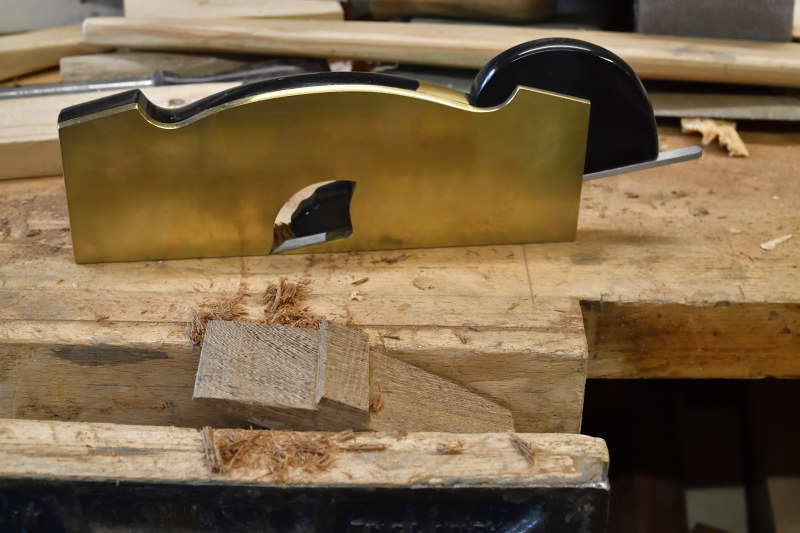
I bought a Veritas plane kit from Woodblok66 on the for sale/wanted, and promised to do a WIP.

So here is the first stage.

Wenge plane by Racers, on Flickr

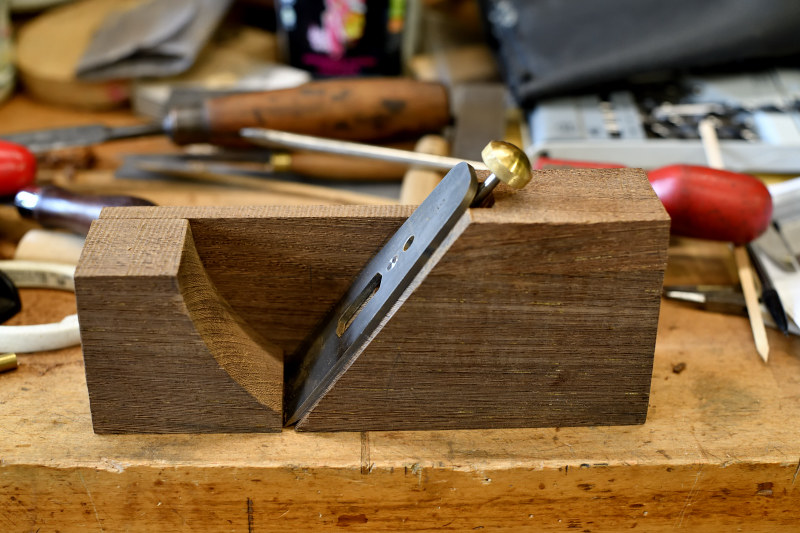
I cut a chunk of Wenge up to form the sides and body, I trimmed down the 4" square piece so I didn't have to plane as much wood, bad move as I decided to make the bedding angle 55 deg not the 45 deg in the instructions. that meant the adjuster cup would be sticking out of top, so I had to glue an extra block on.

In the picture you can just about see where the X where the cross pin will go.
I made the sides thicker so I could do some shaping so the kit cross pin was too short, I dug around and found a brass door bolt pin that was long enough so I will use that.
So the moral of the story is don't deviate from the plans unless you have a lifetime of sorting your own cock-ups.

More on this story later...

Pete
 
Love it. Nearly bought that for the screw and iron. Glad I didn't now. *hands clasped.
 
That's what won me over the PM-V11 steel Iron.

My next decision is what to make the cap from, Wenge or something lighter? some figured maple night be nice.

Pete
 
".....So the moral of the story is don't deviate from the plans unless you have a lifetime of sorting your own cock-ups....."

Ah, but there's no fun in just sticking to the beaten path, Pete.. :wink:

I made one of these kits up as a review for our local woodwork mag., & because it was a review, I did follow the instructions fairly closely, a most unusual event for me.
Kit plane.jpg


The instructions that came with my kit were a bit vague about the dimensions of the wedge-cum-lever-cap, so I had to fool about with it a bit. You'll notice the thumbscrew quite short, so that sets the dimensions to some extent. To prevent the wedge moving when loosened for adjustment, I made a deep groove for the cross-pin, which caused the wedge to be a bit flexible, so I re-made it with a more shallow groove, which was stiffer, but didn't locate it as well. :?
Lever caps.jpg

In the end, I chucked the cross-pin & made a brass lever-cap.

I notice you have cut a generous escapement for yours - good move! I was a bit skimpy with mine & it had a tendency to choke more than it should. And although the wood I chose ("Bull-oak" = Allocasuarina leuhmannii) is generally very stable, my plane seemed to do more squirming about than any other wooden plane I have & I could never rely on the set being anything like I left it a day or so ago! It was also a bit bulky for a small smoother & all in all I never came to love it as I wanted to.

By co-incidence, I ripped it apart a few months ago, and re-purposed its lever cap for another plane:
10.jpg


I'm now in the process of fitting the Veritas guts to a metal body. I've added a cap-iron just to complicate things a bit more, and I want to have a handle instead of a rear bun. Don't ask me why, it seemed like a good idea, until I realised I'd need to re-make the adjuster shaft to clear the top of the grip. So I've done that, & learnt to cut 32tpi left-hand threads along the way:
Adjusters cf.jpg


So my kit will eventually end up a long way from the original concept, with far too much scope for disaster. There may be tears before bedtime. It's proceeding slowly, due partly to committments outside the shed, so you will almost certainly beat me to a working plane.....

Cheers,
 

Attachments

  • Kit plane.jpg
    Kit plane.jpg
    112.6 KB
  • Lever caps.jpg
    Lever caps.jpg
    109 KB
  • Adjusters cf.jpg
    Adjusters cf.jpg
    106.2 KB
  • 10.jpg
    10.jpg
    102.3 KB
Thanks for the reply, it gives me lots to think about.

I was planning to do a hump/groove in the cap to locate it, I could do a brass and wood cap I have some 3mm brass sheet that might stiffen it up a bit.

Pete
 
Racers":yqw9n94m said:
.......I was planning to do a hump/groove in the cap to locate it, I could do a brass and wood cap I have some 3mm brass sheet that might stiffen it up a bit....

Pete, I didn't mean to imply the wedge won't work as designed - if you use some reasonably stiff wood for the 'lever-cap' & position the cross-bar more carefully than I did, I'm sure it'll be ok. I managed to get mine a bit closer to the bed than intended, which meant the wedge had to be thin to get under it, so it was my fault more than anything. The wedge held the blade in place firmly enough, but the flexing caused by the thin bit used up all but the last 100th of a turn of the thumbscrew. Just be careful when laying out the position for the cross-bar, perhaps using a mock-up or two & you'll be fine.

The plane actually worked well enough, and was capable of doing fine work, I think it was just the sum of minor issues that caused me not to take to it. Apart from its habit of shifting set overnight, it felt bulky & awkward in use. I think I could've improved that by re-shaping the rear to fit my hand better, but once I'd pirated the lever cap, the rot set in & the idea of a complete rebuild took over. That's the trouble with retirement, I have time to fiddle with things that are probably better left alone...... :roll:
Cheers,
Ian
 
Its actually drilled and glued up at the moment I have left a good gap under the cross pin, I will finish it and see how it works.

Pete
 
you're moving right along! I reckon your plane will be making shavings a good month ahead of mine... :)
Cheers,
 
looks good so far pete, I just pre ordered the book 'Making & Mastering Wood Planes (Revised Edition)' by Finck from classic hand tools can't wait to get it and get making some.
 
Actually, it is Ian (IWW) whose book you should be reading. He has made a great number of absolutely wonderful planes of all types - smoothers, shoulder ... and both wooden and infill. Many infills. (And not to mention the marking gauges ...!).

C'mon Ian, post a few pics here! Educate these ignorant sods :)

Regards from Perth

Derek
 
+1 the pictures hinted at some serious talent.

Pete
 
IWW":1sgn65ep said:

That's absolutely stunning craftsmanship, What timber is the infill? Walnut? I've always fancied making one just like that, I've even bought materials to make one some time ago (2 x 2 1/2" x 12" brass plates, some O1 Gauge plate for a sole and blade and some other bits) I've just never had the courage to actually go and have a crack at it.

Maybe I should dig up the materials and make a start one day!
 
Trevanion":lzzhndd6 said:
....... What timber is the infill? Walnut? I've always fancied making one just like that, I've even bought materials to make one some time ago (2 x 2 1/2" x 12" brass plates, some O1 Gauge plate for a sole and blade and some other bits) I've just never had the courage to actually go and have a crack at it.

Maybe I should dig up the materials and make a start one day!

Trevanion, the infill is figured Gidgee (Acacia cambagei), one of the denser & harder of our numerous dry-country Acacias.

You should indeed have a crack at it, most people end up discovering the metalwork isn't half as difficult as it looks. I would advise trying a parallel-sided version for your very first go, though, the coffin sides do complicate things a little, & I think moreso with a small body like that one (about 110mm long & takes a 1 3/8" blade).

The Veritas kit would suit a small rear-bun smoother, it was only because I wanted a handle that I needed to modify the adjuster shaft for the one I'm working on atm...
Cheers,
Ian
 
woodbloke66":l6q9y9nc said:
.... it never actually worked...but it looked quite good :D -

It certainly does, makes my effort look a bit ordinary!

Interesting to see the different planes this little kit inspires....

Cheers,
 
Actually, it is Ian (IWW) whose book you should be reading. He has made a great number of absolutely wonderful planes of all types - smoothers, shoulder ... and both wooden and infill. Many infills. (And not to mention the marking gauges ...!).

C'mon Ian, post a few pics here! Educate these ignorant sods :)

Regards from Perth

Derek

Whoa Derek, 'ol buddy - you make me sound far better than I am! :eek:

As I'm sure many of you know already, Derek has come up with a few good ideas himself & has certainly inspired me a couple of times. I reckon I've made many of the mistakes it's possible to make in tool making, and produced my share of miserable failures along the way, but the only way to be certain that you won't make a mistake or two is to make nothing.

The most important part of making anything is making a start, and the beauty of the interweb is that if you run into problems, you just have to ask. I'm always happy to help/encourage/commiserate with, & learn from, anyone making planes of any sort.
:)
Cheers,
Ian
 
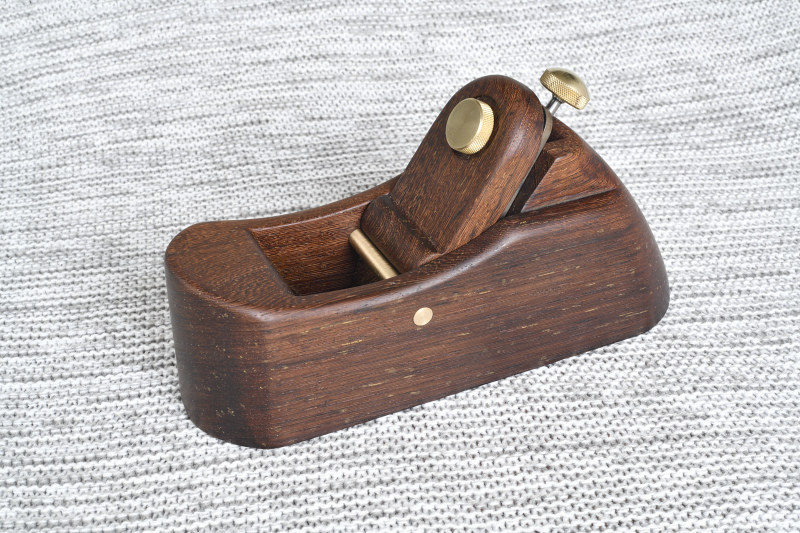
Here she is.

Wenge plane by Racers, on Flickr

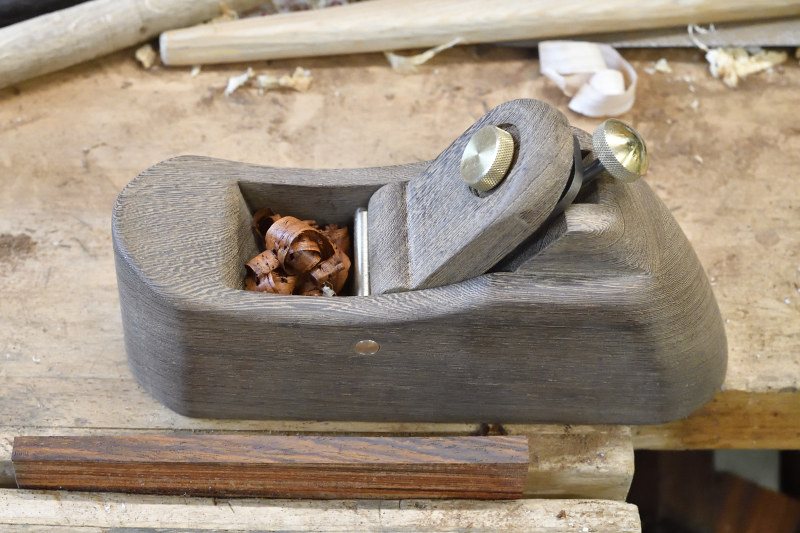
Shaped sharpened as shoved over wood.

Took a bit of fettering to get it not to jam and cut well.

Mouth full of Bubinga by Racers, on Flickr

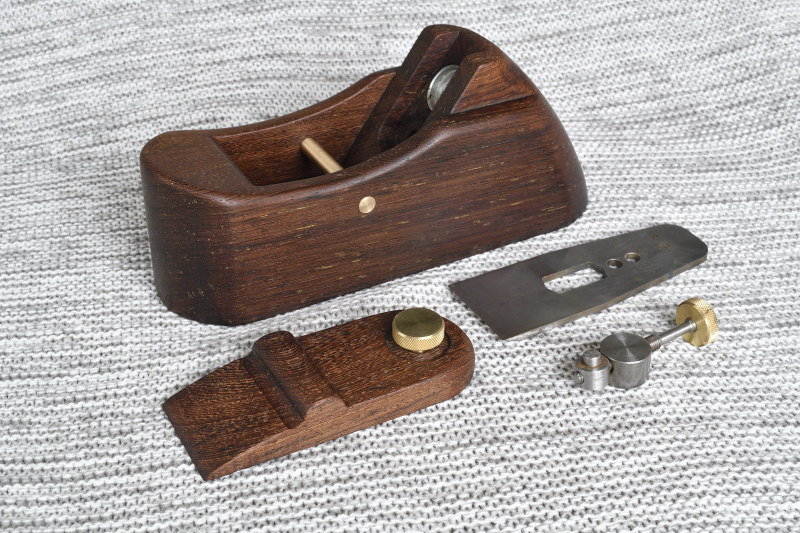
In bits.

Wenge plane parts by Racers, on Flickr

I used my home-made shoulder plane on wedge to smooth it.

Wedge and Shoulder plane by Racers, on Flickr

Its finished with Boiled Linseed oil.

Conclusions.

It's an easy kit to build if you stick to the plans.

Disavantages.

Even having a Norris style adjuster in use it a bit of a faff, a minute turn of the adjuster makes a big difference not heppled by the high angle, its sloppy and has loads of backlash, the lateral adjustment is very touchy probably because of the short shaft.
If I made another (if more like when) I will use a snecked iron and wedge.

The grove on the wedge keeps it in place well but I made it slightly deeper and ran out of length on the clamp screw requiring me to recess round it.

Pete
 
Racers":mit818ke said:
...........Even having a Norris style adjuster in use it a bit of a faff, a minute turn of the adjuster makes a big difference not heppled by the high angle, its sloppy and has loads of backlash, the lateral adjustment is very touchy probably because of the short shaft.
If I made another (if more like when) I will use a snecked iron and wedge.

The grove on the wedge keeps it in place well but I made it slightly deeper and ran out of length on the clamp screw requiring me to recess round it......

Nice little pane, Pete, & I think we've arrived independently at similar conclusions. :)

I encountered the same problem (barely enough thread on the wedge screw), as I mentioned previously. I ended up making another, slightly longer screw, which is easy if you have the gear, but not so easy if you don't.

I agree wholeheartedly with your comments on the adjuster, it's definitely no precision instrument. Mine does have a bit of backlash, but I didn't think it was excessive, maybe you've got one that is at the extreme end of the tolerance limits? I think your suggestion is correct, that the short shaft exacerbates both the resistance & the coarseness of the lateral adjustment. In my review I questioned the need for an adjuster at all in a basic kit like this - you'd be better off if they included a nice little brass-headed hammer instead, I reckon. :wink:

I'm nt a great fan of the Norris style adjuster, I fell out of love with them very quickly after a (late model) A5 came into my hands. It has a fundamental flaw, which is the tendency to slew the blade more as you advance it, if you have the lateral adjuster to either side of dead-centre (as you almost always do!). Mine also has the habit of increasing the cut slightly as the lever-cap screw is tightened, which is not a big deal. Apparently, this is a common idiosyncrasy of the type.

As predicted, you've beaten me by a country mile. My build is proceeding at a fraction of the pace, partly because I have other matters competing for time, & partly because I'm taking the opportunity to muck about with a few things this time round, since I don't have to stick to the script.
Because I wanted a rear handle on my re-make, I neded a new, longer shaft. In doing that, I got to thinking (a dangerous occupation, best avoided!), and decided to try something different. Instead of the LH/RH thread combination of the current shaft, I made both threads RH. This means the distance the travelling spigot moves per turn is the difference of the two thread pitches instead of the sum. This gives you a much finer control, but the trade-off is you need more thread to get the same range of movement.

I made a new shaft with what I calculated was the necessary extra amount of thread:
1 Adjuster.jpg


And using a mock-up of a handle, figured out the position for the pivot-point so my range of movement will give enough blade exposure as it wears, before moving to the next spigot hole in the blade:
4 Handle mock-up.jpg


It's going to be a bit tight, but I think there's enough overlap. The slot in the bed has to be even longer because I've added a cap-iron, utilising the hole in the blade meant for the lever-cap screw in a block plane (for which this blade is actually made). I'm going to have to be very careful setting the LC, so the blade assembly will actually slide in far enough before it drops into position.

I've got as far as dry-fitting the stuffing:
11 stuffing ready.jpg


Still to do: glue & rivet the stuffing in, make & fit a lever-cap, clean up & finish woodwork & metal, lap sole, & fettle. Unless it rains (unlikely) & I get a full day or two in the shed, It'll be at least another week before I make any shavings......
:(
Cheers,
 

Attachments

  • 1 Adjuster.jpg
    1 Adjuster.jpg
    90.4 KB
  • 4 Handle mock-up.jpg
    4 Handle mock-up.jpg
    132 KB
  • 11 stuffing ready.jpg
    11 stuffing ready.jpg
    98.9 KB
Nice to hear its not just me that struggles with the adjuster!

Its not that little its 8" :shock:

The play is an accumulation of play in the adjuster cup, the hole in the blade and the screw threads, 4 places in total, my Record No5 1/2 with a brass shim glued to the end of the adjuster has much less blacklash! and I don't have to slacken the levercap

If you aren't a fan of the Norris adjuster why are you making a plane with one?

That's a nice bit of wood in your infill, Sheoak?

Pete
 
I think the folks who talked up the Norris adjuster many years ago were more impressed by its ingenuity than by its actual function..... :|

Backlash in adjusters isn't something I lie awake at night worrying about. The Bailey system has built-in backlash for a reason. The cam that engages the cap-iron needs to be 'loose' 'cos it has to rotate in that little slot as you wind the blade up & down. If you make it too tight a fit it will bind & make it harder to move the blade. My advice is to just learn to live with it.

Crude as it is, I reckon Bailey's adjuster is the better system for everyday use. As you mentioned, you don't need to back off the LC to move the blade, thanks to the cam clamping mechanism. Tells you something, doesn't it? We put too much pressure on our blades with thumbscrew-actuated LCs. Some day, when I've finished all the projects I have in mind, I'm going to try & make a cam-actuated LC for an infill (but please don't hold your breath!)...

So, if I don't like it, why am I using this 'Norris style' adjuster for my plane? Good question, to which I could reply 'because it's there'. :) But there are a couple of reasons I'm doing it, one being that I won't own the plane forever, and most newbies freak out a little at the thought of tapping blades into position (I once did). Not only will the presence of an adjuster make it a bit easier to use, I hope it will save the plane itself from the sort of heavy-handed treatment I've sen dealt out to many an old plane.
If you tap the blade a bit far when setting, the cure for that on old woodies was to thump either the back of the plane or the top of the toe to retract it. A gentle tap usually retracts the teeny bit required without loosening too much. This is fine with a solid body, especially one that has strike buttons, but it's a bit more problematical with an infill - I don't much like the idea of belting the stuffing or the metalwork. So if I over-do the blade advance when setting an adjuster-less infill, I loosen the LC, reset the blade a fraction & start the setting procedure over again. If you have an adjuster, you just screw it back that teeny bit - no temptation to whack anything.

And finally, I am curious to road-test my 'subtractive' thread arrangement. Tom Norris went to a lot of trouble incorporating ultra-fine threads on his gadget to slow things down - why didn't he simply use subtractive threads? It's such an obvious thing, so lots of people must've thunk it up a hundred years before I did - where's the catch? The only obvious one I have found so far is that you do need longer thread to get a decent amount of travel (but Norris fixed that anyway, by having the second thread screw into the main shaft. There is probably some blindingly obvious reason that I'm about to discover. Fortunately, I can always revert to the Veritas arrangement in the event of failure...

And yep, that infill is Eastern She-oak (Allocasuarina torulosa). Hard as nails but makes very nice stuffing once you bully it into submission. Polished up a bit, it has that lovely tactile appeal of the Rosewoods. Not an easy wood to dry in bigger sections, it will self-destruct if you try to rush it, but once equilibrated, it is very stable & a good medium for tools like marking gauges, for e.g.
panel & regular Gs cf.jpg


Cheers,
 

Attachments

  • panel & regular Gs cf.jpg
    panel & regular Gs cf.jpg
    161.5 KB

Latest posts

Back
Top