Slowing drying of a part turned blank

UKworkshop.co.uk

Help Support UKworkshop.co.uk:

This site may earn a commission from merchant affiliate links, including eBay, Amazon, and others.

nicguthrie

Established Member
Joined
19 Nov 2012
Messages
405
Reaction score
0
Location
Elgin
Hey guys!

Not been around for a while, due to life, health and an update ruining the usability of Tapatalk, the app on my phone that I used to use for the forum.

The Wife's chemotherapy is finished, the sun is out and I have some gorgeous wood calling my name from the workshop, so I ventured out to put some time in for the first session for a while!

I've got a fantastic blank, a 12x3 inch spalted burr Lacewood (plane) piece that I just couldn't wait to get my tools into, so started it off with enthusiasm. I can only manage a short while a day due to health and needing to be around indoors for my wife, so I've hit a problem.

I knew it was only part seasoned, but I thought it would be a bit dryer than it is. I turned a basic outline the first day, went out the next day and it was back out of balance, with visible rippling around the perimeter. It's shifting scary fast - possibly because my workshop is indoors-level-dry. I'm not wanting to lose the blank through it giving up and splitting, nor to end up with it being a platter through losing too much to constant trimming of its shifting profile, so I was wondering if I could slow it's drying out with an oil coating between turning sessions? I've got both BLO and hardwax oil, and I'm not allergic to adding to my collection, if there's something better suited.

Would this help at all? I don't have a moisture meter, but in some places where there's an inclusion, leaving the wood unsupported, it's slightly spongy to the pressure of a thumb knuckle - suggesting that there's a fair amount of moisture left to dry out. I know I should turn it to about 3/4 of an inch wall, leave it the best part of a year and come back to finish it, and that's what I plan on, it's getting to that point with my short sessions and light-touch turning, without spoiling the thing.

Any help and advice would be appreciated.

Nic.
 
With wet blanks I rough turn then seal the outside only and then put it into carrier bag full of shavings. Once in a while I will check it and turn the bag inside out so any moisture on the plastic can dry out. This way helps keep the drying slow and let the piece move rather than split. Like most things this is not 100% full proof but works more times than not.
 
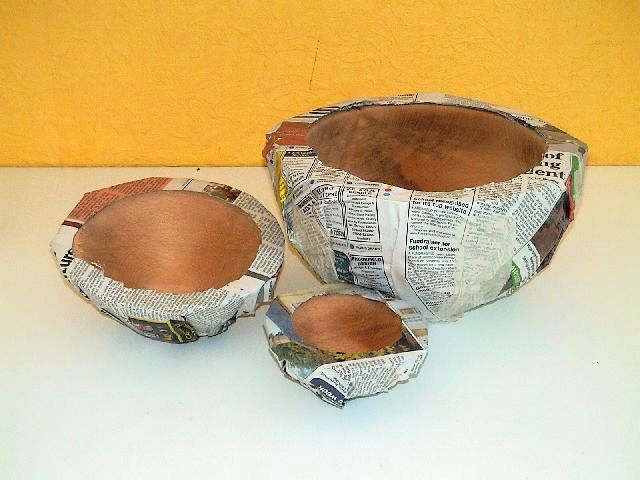
Wrap in cling film or several layers of newspaper on the outside, place face down on the wife's baking rack or spacers.
 
no help for this project nic, but why not do a bit of pen turning until you get a bit more time. nice and easy to do in short sessions!

good to hear that your wife is on the mend.
 
Thanks for the answers and help folks. I may try several of these, as I've got this one particular blank I want to keep safe, but also several large chunks of spalted beech that I have to somehow process myself, and is undoubtedly a lot greener (or at least wetter) than this stuff is.

Dalboy":s5kk0g6r said:
With wet blanks I rough turn then seal the outside only and then...

What are you using to seal them? Just he finish that you plan to use? Would the Oil I have in mind do?

marcros":s5kk0g6r said:
no help for this project nic, but why not do a bit of pen turning until you get a bit more time. nice and easy to do in short sessions!

I tried, I really did, but the beauty of this blank sort of ended up with it on the lathe and me working away at it, when I actually went out there to finish a pen! :lol:

I'll report progress if it all works out! :)

Nic.
 
nicguthrie":1yv4gai1 said:
Dalboy":1yv4gai1 said:
With wet blanks I rough turn then seal the outside only and then...

What are you using to seal them? Just he finish that you plan to use? Would the Oil I have in mind do?

.

I don't use oil as it penetrates too much and restricts what can be done later. I use a thinned down PVA white glue(not too thin) once it has hardened it can be turned away at a later date as the blank is rough turned to a larger size than the finished item
 
Hi Nic,
You sound desperate to save the blanks you have, I have a spare brand new moisture meter, if you would like it PM me with your details and I will send it to you.

Dave
 
If you are just trying to keep it from moving/cracking between turning sessions then wrap a plastic garbage bag around it and seal it as well as you can each time you stop turning for the day. As moisture comes out of the wood it will raise the humidity inside the bag until they reach an equilibrium and the moisture exchange stops. The less volume of air inside the bag the quicker it will reach equilibrium so the less movement will occur so you want to wrap it as tightly as possible. Don't leave it for long periods like days or weeks between sessions or you will likely wind up with a mould problem.

Good Luck!
Bob
 
bobham":17glwvy5 said:
wrap a plastic garbage bag around it and seal it as well as you can each time you stop turning for the day. ...... The less volume of air inside the bag the quicker it will reach equilibrium so the less movement will occur so you want to wrap it as tightly as possible
or just use cling film, then there's next to no 'air volume'.
 
I love this forum, there are so many awesome people in it! :)

Ok, now I understand what you're saying regarding wrapping it in clingfilm etc, I'd not understood what CHJ actually meant, thinking that he'd meant to store like that, to dry out after it was rough turned! Thanks for the further clarifications. I've got it sitting between sessions, with a heap of shavings, wrapped in doubled plastic bags for now.

I think I'm going to finish turning it to a rough 1/2 inch - 3/4 inch profile, then stash it in a paper bag for a few months to settle more before finishing it off. I like the idea of PVA on the outside to help slow the drying too.

My original thought was that putting oil on it would chase the moisture out from the region it penetrated, so preserving the one side (assuming I only applied it on the outside too) but I can't find any reference to this being a technique, so I'll try the PVA idea.

Dave Brookes, that's an amazingly kind offer to a total stranger, It's the random acts of kindness that I've seen on the forum, like this, that make it such a special place in my mind. I'm not sure I know how to make the best use of a meter tho, and I'd hate to see your kindness go to waste. If you could clarify, PM me and I'll sort out some form of reimbursement / thanks :D

Cheers everyone!

Nic.
 
When rough turning remember the larger the bowl the thicker you will need to leave it. When I did mine I left them about 1" and that was up to about 9"-10"
 
Yes Nic. I was referring to drying part turned pieces.

To wrap I put the bowl face down so to speak and wrap the paper over the curved base and fix with masking tape, then cut out central disc.
DSC02354.JPG


I started doing this some years ago when experimenting with various soaking methods to speed up drying but gave up soaking etc. when I had enough stock to let nature do the work on an as turned rough piece and spend the time turning instead of cooking.

But if ever I am forced to leave something wet on the lathe for more than an hour I wrap the whole thing in a plastic bag or cling film to avoid splits and warping.
Mind you this is a very rare event as I don't do a lot of green turning these days and if I do I make sure I have a long turn to completion session.
 
Back
Top