Workbench tops what material HDF?? MDF Ply

UKworkshop.co.uk

Help Support UKworkshop.co.uk:

This site may earn a commission from merchant affiliate links, including eBay, Amazon, and others.
Hi ollie - that lumber jack might be the job - I have a lumberjack morticer which is pretty good for what i use it for and how often - this would be a great started and the same price as the triton. I can keep the hitachi hand held I have and use his for the other stuff.

any one with any experience of this machine??

Lumberjack Tools RT1500 1500W Bench Top Router Table

https://www.amazon.co.uk/Lumberjack-RT1500-1500W-Router-Intergrated/dp/B00ZOYF7RS
 
Last edited by a moderator:
No need to seal valchromat.
It's far superior to MRMDF in that regard. There's a lot more resin in it. You can tell it's a harder material and I'd bet you won't get it to soak up more than 1 coat of wiping varnish at best.

I bought a sheet of the 19mm Valchromat yesterday for my workbench project. It is noticeably different than MDF I buy at the big box stores, and I am looking forward to machining it when it's time to attach to the workbench frame. The surface is very smooth and will not require any sanding to improve it. I'll experiment with a few pieces of the offcuts, but based on what I can see now, a coat of wax is all that will be required for the finish.

With VAT, the cost of a 2500x1250mm sheet of 19mm Valchromat was €81. The vendor didn't charge me to cut the sheet to a width of 1100mm so the 2500mm long sheet would fit between the wheel wells of my truck. I'll trim it to the final width of 1000mm in my garage using the track saw.
 
Valchromat makes a very nice zero clearance insert too
20201107_164150.jpg
 
I bought a sheet of the 19mm Valchromat yesterday for my workbench project. It is noticeably different than MDF I buy at the big box stores, and I am looking forward to machining it when it's time to attach to the workbench frame. The surface is very smooth and will not require any sanding to improve it. I'll experiment with a few pieces of the offcuts, but based on what I can see now, a coat of wax is all that will be required for the finish.

With VAT, the cost of a 2500x1250mm sheet of 19mm Valchromat was €81. The vendor didn't charge me to cut the sheet to a width of 1100mm so the 2500mm long sheet would fit between the wheel wells of my truck. I'll trim it to the final width of 1000mm in my garage using the track saw.
I’m sure you will be happy with it Mike
 
Ok so I have my design !!!! ot sure if i should start a new topic but here goes

workbench on wheels - Yes - No !!!??

I see lots of designs on wheels - i can do either for now - my workshop is quite small 12ft square so wheels may give me more assembly space options later 0 i intend to have a 600mm bench down one wall for chop saw morticer etc and storage underneath.

so wheels yay or nay ( if yay which ones !!)
 
Yes to wheels, but front two lockable. Then check that bench height suits you *with* wheels :)
Guess - fully loaded less than 200kg? So 80kg wheel (each) more than sufficient. Lots around. GIYF
 
I'm going to use Valchromat for all of my surfaces in the workshop. Not cheap but seems like a sensible long term option.

@tradesman I'm putting wheels on everything except the bench, as that will be the focal point of the workshop. Everything else can then be moved around it. I'd also like one unit that has very little chance of moving, even accidentally!
 
The 19mm Valchromat works well for my workbench. It took me about three hours to drill the 200 dog holes and chamfer both sides of the top. Maybe it was my technique with the first time using the Parf MK2 Guide, but the unsupported bottom of the dog holes weren't as crisp as the top and there was some slight tear out on some of the holes. The chamfer tool cleaned up most of it.

I was very pleased with the accuracy Parf guide, despite this being the first time I've done this. I checked the squareness of the hole grid using the large TSO MTR triangle and bench dogs in ten or twelve places, and the hole alignment is perfect. As soon as I fit the sacrificial HDPE strip, I'll do the 5-cut test for squareness; although, I'm confident it will be fine.

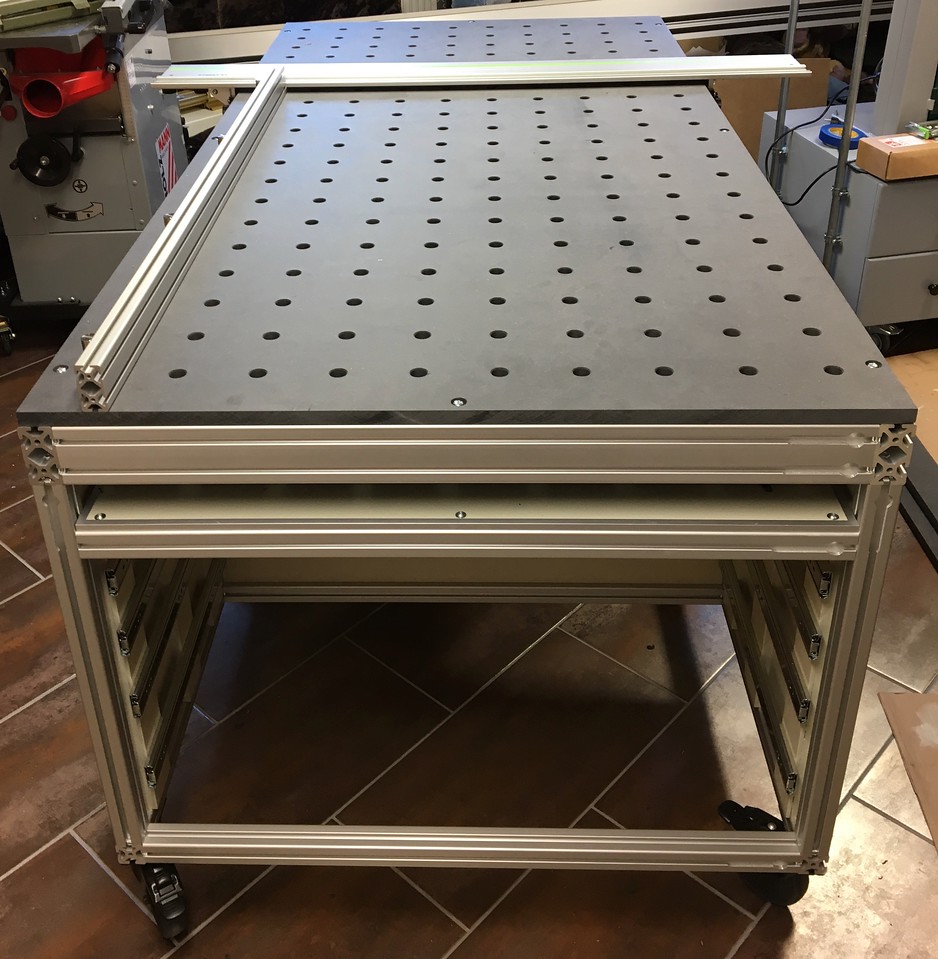
This is the workbench with the fence and FS 1400/2 Guide Rail attached.

Item24-28-X2.jpg


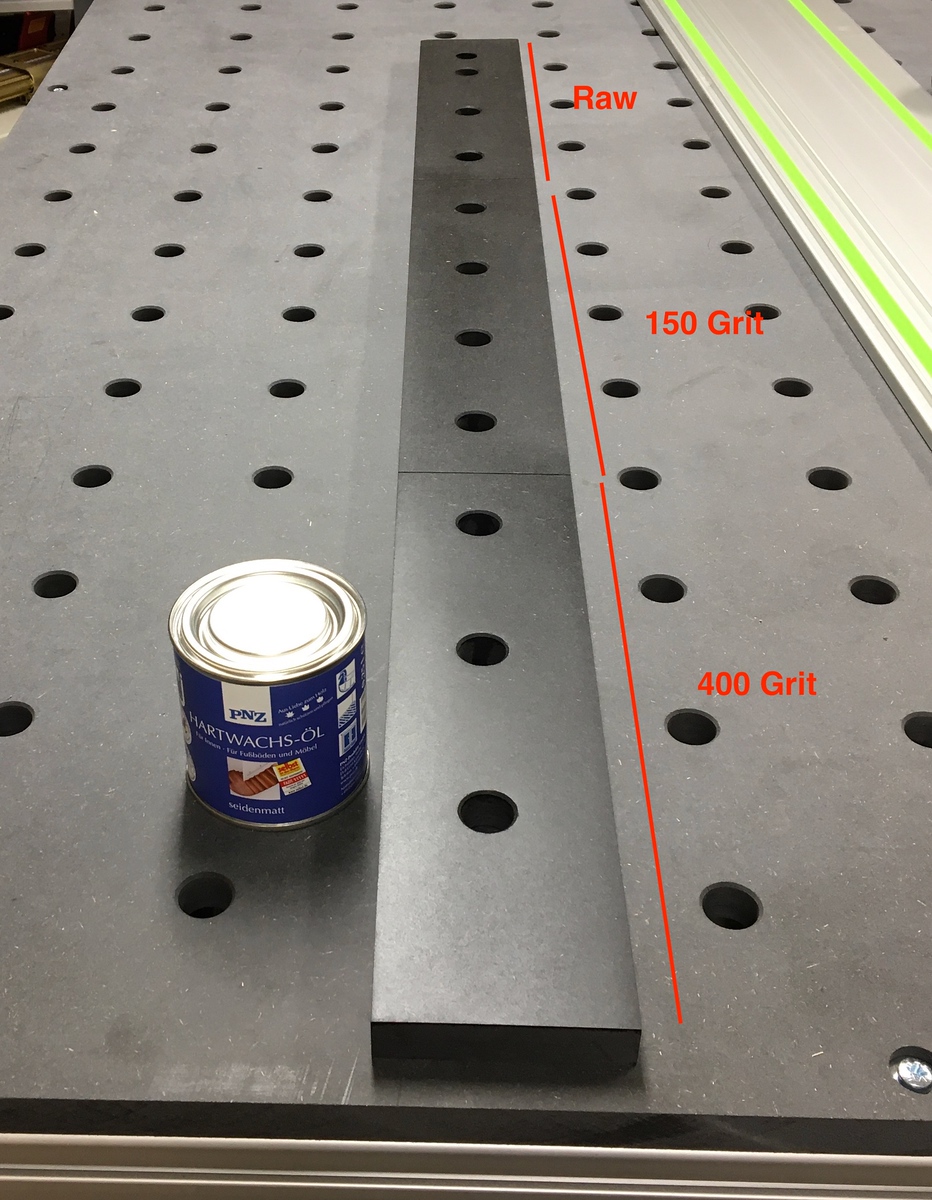
I wanted a durable finish for the Valchromat, so I used a test piece. This board has ten 20mm dog holes and one 18mm hole with the Forstner cutter to determine the cutting depth for the mounting screw and washer. I divided this board into three sections by making a shallow saw kerf to make it easier for me to remember where one finish ends and the next begins. The top kerf is not visible in this image, but it is there.

The top section, with three dog holes and the Forstner hole, is unsanded. The middle section, with four dog holes, is sanded with P150-grit paper. The bottom section, with three dog holes, is sanded with P150, P220, and P400. I then applied a thin coat of the hardwax oil to the entire board, ensuring the chamfer edges were coated. I intentionally let some of the oil dribble into one dog hole in each section. After ten minutes, I wiped off the excess and let it dry for 12 hours. When I inspected the board, there was no residue of oil when checked with a clean rag, and the dogs fit perfectly in the holes, even the ones that I didn't clean after letting oil dribble into them.

I applied another thin coat and wiped off the excess after ten minutes. This photo was taken about four hours after I applied the second coat, and it is already dry to the touch. The finish is surprisingly hard and I can feel the difference between the sections. The section with the P400 finish and two coats of oil is the winner for me.

The small 250ml can in the photo is more than enough oil to apply two coats to the workbench top. I wanted a matte finish, but after driving to four stores, the best I could find was semi-matte.

Hartwachs-1-X3.jpg
 
workbench on wheels - Yes - No !!!??

I see lots of designs on wheels - i can do either for now - my workshop is quite small 12ft square so wheels may give me more assembly space options later 0 i intend to have a 600mm bench down one wall for chop saw morticer etc and storage underneath.

so wheels yay or nay ( if yay which ones !!)

Definitely yes, but I recommend dual locking wheels on all four corners. This will allow you to lock the workbench so you can apply force in any direction. You will likely only need to lock two corners at a time, but they might not always be the same two corners each time you wheel the workbench out. The best locking castors not only lock the wheel, but lock the pivot.
 
How is the festool rail attached? Does it attach at both sides? Is that just t-slot profile? (eg 45 x 45L Aluminium profile ). I looked at costing up a bench made from this type of profile but it worked out cheaper to use 18mm Baltic birch.
 
The 19mm Valchromat works well for my workbench. It took me about three hours to drill the 200 dog holes and chamfer both sides of the top. Maybe it was my technique with the first time using the Parf MK2 Guide, but the unsupported bottom of the dog holes weren't as crisp as the top and there was some slight tear out on some of the holes. The chamfer tool cleaned up most of it.

I was very pleased with the accuracy Parf guide, despite this being the first time I've done this. I checked the squareness of the hole grid using the large TSO MTR triangle and bench dogs in ten or twelve places, and the hole alignment is perfect. As soon as I fit the sacrificial HDPE strip, I'll do the 5-cut test for squareness; although, I'm confident it will be fine.

This is the workbench with the fence and FS 1400/2 Guide Rail attached.

Item24-28-X2.jpg


I wanted a durable finish for the Valchromat, so I used a test piece. This board has ten 20mm dog holes and one 18mm hole with the Forstner cutter to determine the cutting depth for the mounting screw and washer. I divided this board into three sections by making a shallow saw kerf to make it easier for me to remember where one finish ends and the next begins. The top kerf is not visible in this image, but it is there.

The top section, with three dog holes and the Forstner hole, is unsanded. The middle section, with four dog holes, is sanded with P150-grit paper. The bottom section, with three dog holes, is sanded with P150, P220, and P400. I then applied a thin coat of the hardwax oil to the entire board, ensuring the chamfer edges were coated. I intentionally let some of the oil dribble into one dog hole in each section. After ten minutes, I wiped off the excess and let it dry for 12 hours. When I inspected the board, there was no residue of oil when checked with a clean rag, and the dogs fit perfectly in the holes, even the ones that I didn't clean after letting oil dribble into them.

I applied another thin coat and wiped off the excess after ten minutes. This photo was taken about four hours after I applied the second coat, and it is already dry to the touch. The finish is surprisingly hard and I can feel the difference between the sections. The section with the P400 finish and two coats of oil is the winner for me.

The small 250ml can in the photo is more than enough oil to apply two coats to the workbench top. I wanted a matte finish, but after driving to four stores, the best I could find was semi-matte.

Hartwachs-1-X3.jpg
That looks excellent Mike 👏
I hadn’t thought of putting an oil finish on mine but having seen your post I think I will (y)
 
Definitely yes, but I recommend dual locking wheels on all four corners. This will allow you to lock the workbench so you can apply force in any direction. You will likely only need to lock two corners at a time, but they might not always be the same two corners each time you wheel the workbench out. The best locking castors not only lock the wheel, but lock the pivot.

+1 completely agree.
 
How is the festool rail attached? Does it attach at both sides? Is that just t-slot profile? (eg 45 x 45L Aluminium profile ). I looked at costing up a bench made from this type of profile but it worked out cheaper to use 18mm Baltic birch.

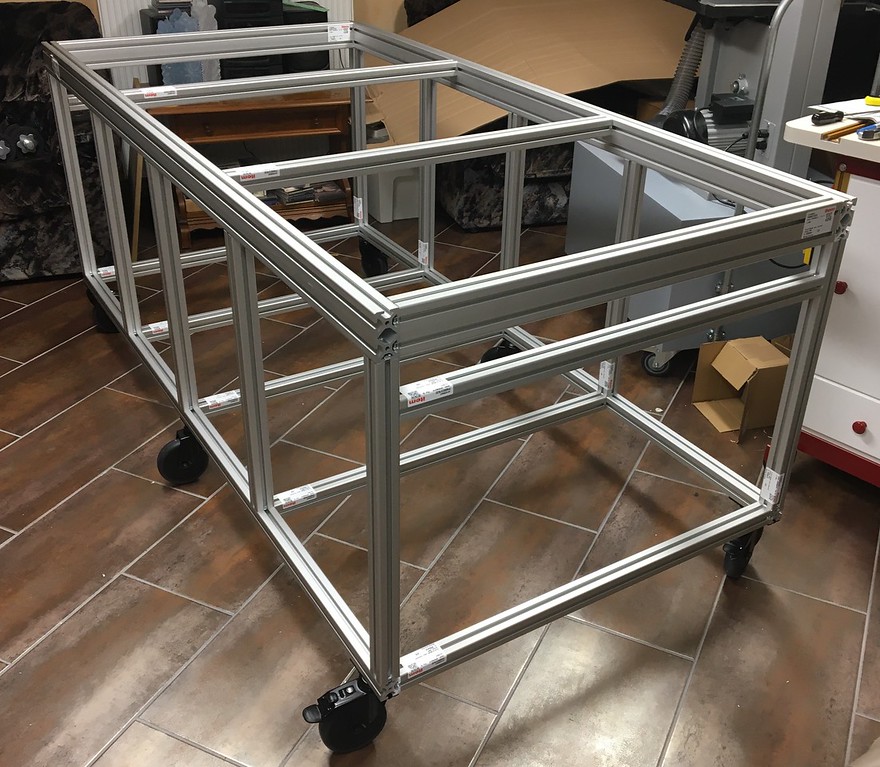
I'll make a project thread for this bench when I'm finished, but here are some of the details now. I kept all of the receipts so far, and this is not an inexpensive table; however, I can't find a similar table for sale. I considered buying two of the Festool MFT/3 tables, but I would not have any storage or additional capability that I have with my workbench.

This is not my design, but one I adapted from AtomicRyan on the Festool Owners Group and his YouTube channel The Garage Journal. Ryan's workbench used a full 8x4 sheet of 19mm MDF, but my basement shop is too small to accommodate this size, so I reduced it to 1x2 meters.

Using angle aluminum for the frame should work well, as will the baltic birch top as long as you take your time boring the dog holes. If your goal is to make a work surface, any choice in a sturdy frame is good.

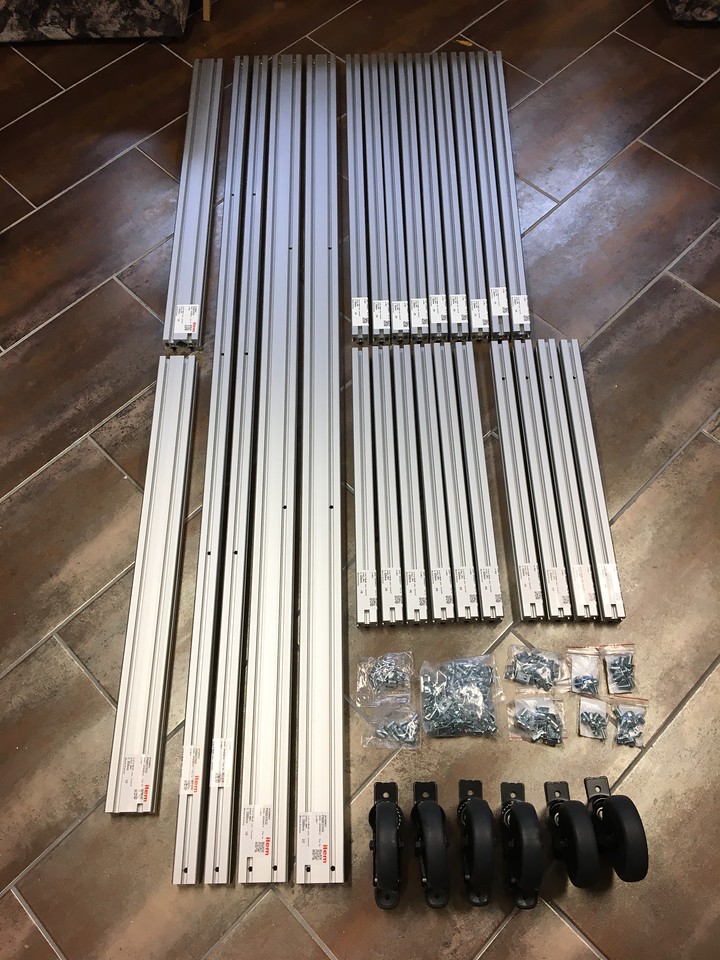
The aluminum extrusion is from a German company, item24, but it appears to be similar to the 8020 product in the U.S., and other extrusion products in the UK (item24 has a UK branch). I used Series 8 profile for my workbench, with 40x40mm for the main frame and 80x40 for the top rail on the four sides. I wanted dual T-track slots for the top rail. The T-slot is 8mm wide and the Festool clamps fit perfectly in the slot, as does an M8 carriage bolt head.

Here is the order I received from item24...

Item24-2-X2.jpg


...and here it is a few hours later completely assembled. I have since added two more top cross pieces and spaced them evenly to give more support to the 19mm top.

Item24-3-XL.jpg


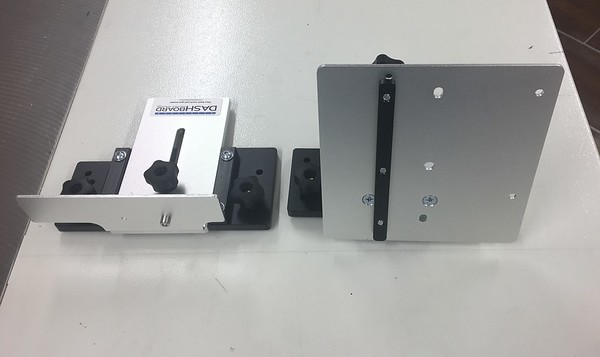
The Festool guide rail is attached to the extrusion with the Dash-Board Guide Rail kit

Dashboard-2-M.jpg


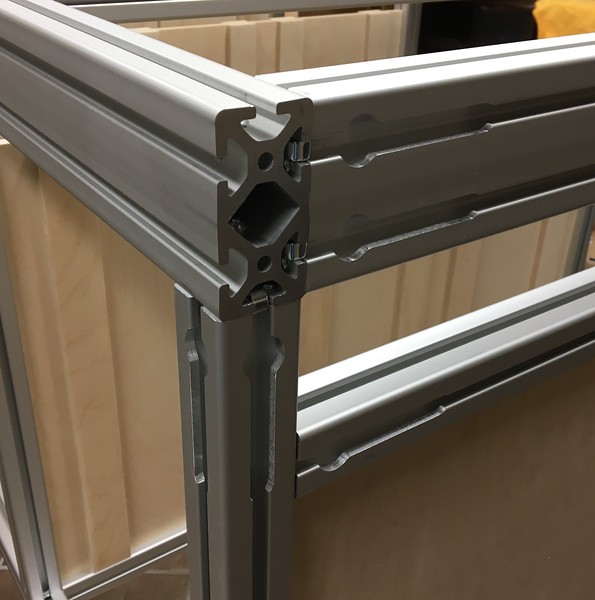
Every piece of extrusion can be used with the Festool clamps or custom holders using the M8 carriage bolts. I milled these slots into each piece using a four-flute carbide cutter and my router. I made a template from scrap 12mm plywood to mill two pieces, end to end, at a time. The keyhole slot allows the M8 bolt head to fit into the slot and slide down the track. The Festool, or Bessey, clamps fit in the wider area and slide down the track.

Item24-10-L.jpg
 

Latest posts

Back
Top