WIP Brazillian Hemlock Coffee Table (Completed 31/08)

UKworkshop.co.uk

Help Support UKworkshop.co.uk:

This site may earn a commission from merchant affiliate links, including eBay, Amazon, and others.

joiner_sim

Established Member
Joined
7 Jun 2007
Messages
1,751
Reaction score
0
Location
Staffordshire
(Firstly may I add, this is my first proper woodwork project on my own in my own workshop at home)
Today was the first day I actually started work on what had been put down on paper, the timber has already been machined to size for me in the commercial workshop, and is now back at my private workshop. Here is the timber waiting to be put away until needed.
27082008093.jpg

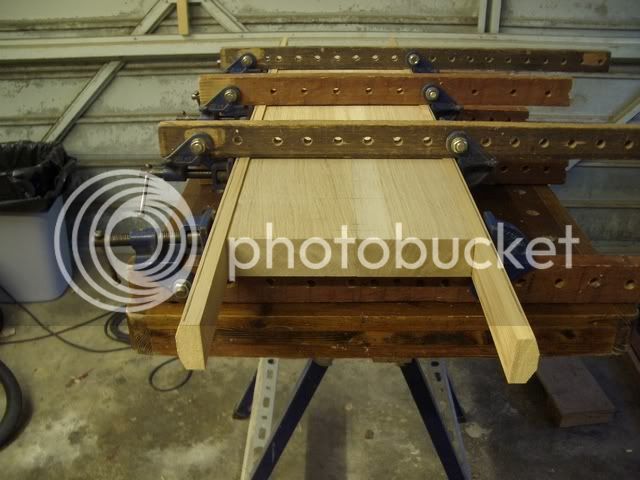
After putting the rest away into storage, I got to work on jointing the top of the coffee table, which may I add is going to be cut into an oval, so I had to cramp up the boards first and work out the size of the oval so I did not put my dowels (which I'm using to join the top together) on the line of cutting. Now first time dowelling, as I'm more used to biscuit jointing, but seeing as i dont have a biscuit jointer, I've went and brought a reasonably priced dowelling jig. So had a quick practice using it and then straight down to business on the table top. I am using four planks to make up the table top, this is one of the end planks so only three 10mm dowels in this one, but for the middle joint I have put in four dowels as its a bit longer.
28082008094.jpg

Obviously as this is the first time using the jig, I quickly checked after I had done the first joint that it all lined up correctly, luckily it did! Then I checked every joint as I did them just to be on the safe side. After all the joints were done, I cramped it all together dry making sure it pulled up nicely. Again it all did, so no problems so far! This being all on an evening after working all day (doing achitectural joinery) I was getting a bit tired and my workshop lighting was doing its best to lighten up the place, I wanted to call it a night, having got so far already I decided to glue up, so I did'nt have to wait tomorrow evening. I hate gluing up knowing it could become a bit of a rush because its getting late, but I did anyways, took my time and, as you can see it all went nicely!
28082008095.jpg

Well then I called it a night! You can see above where i have marked the oval to be cut on, this is only for reference with the dowels, and I'll remark it again so the lines line up after they moved slightly. The picture above is the underside of the table top. The picture below, after wiping all the glue off on both sides, is showing the top of the table, the better side!
Thats it for today, hopefully will report here again tomorrow, with what will be a nicely shaped oval table top.
28082008096.jpg


:arrow: Comments, Suggestions & Questions are welcomed as always :)
 
Looking good, Joiner-sim.

Just one observation - I notice that you are not using any cramping blocks under the heads of your sash cramps. Most sash cramps tend to bend a little and I find that if you use blocks and shape them, as in the picture below, it helps to direct the pressure of the cramps at the centre of the edge of the boards, leading to closer fitting joints

Competition20.jpg


Cheers :wink:

Paul
 
Good point Paul, although he has got clamps top & bottom so any tendency to arch should be counteracted. I always clamp a pair of solid boards across the endgrain at both ends when edge-joining boards, to make sure it stays flat whilst drying. Poor old JS is running out to his workshop as we "speak" to adjust his cramps!!

Anyway, as I have never even heard of Brazillian Hemlock, I am looking forward to watching progress on this.......

Mike
 
I have used a similar system before, mainly when lipping hollow core and fire doors, as you said it gives a better pressure. Luckily the pressure of the cramps pulled it altogether. I'm not sure how the blocks would stop the sash cramps bending though?

I would run out to the workshop but had a couple of beers! And i reckon the glues probably set by now :lol:
 
joiner_sim":26ecp4x8 said:
I'm not sure how the blocks would stop the sash cramps bending though?

The blocks being triangular(ish) in profile make the cramp bend irrelevant as the cramping force is directed to the workpiece through the point / pinnacle of the pointy block. Pau'ls cauls / blocks aren't as pointy as some I have seen. But I'm sure they do the job just as efficiently. Point being that that cramps can bend all they like but the cramping force is directly point to point and ignores the banana shaped metal work. Its particularly useful technique if you have cheap sash cramps.

Cheers Mike
 
Exactly right, Mike. I think it was in one of David Charlesworth's books that I first saw the idea of using pointy (technical term :wink: ) cramping blocks. They really work.

As you say, you can make them a bit more pointy, but it's not that critical - depends on the thickness of the boards you are cramping.

Cheers :wink:

Paul
 
Hello Paul
DC's book here also.
Have to say the concept has made my cheapie Axminster sash cramps as effective as any of yer Bessey things. :)

Cheers Mike
 
Looks like it's coming along well, Simon. I've got one of those Wolfcraft jigs as well. They work okay if you take care with them. The biggest problems seems to be that you have to press them tight against the edge/face of the timber as they won't lock in place like some other jigs. But, as you've discovered, they are capable of accurate results. :)

How did you joint the edges in your home workshop? Jointer plane or, were they good enough out of the machine?

Paul, I wasn't aware of that tip either, so many thanks indeed. :)
 
the dowelling jig from wolfcraft is great as long as if you take your time.

The edges came out of the machine at work good enough just to cramp and glue up. The dowels were just there to make it a better and stronger joint.
 
Well, after last night's successful glue-up, I couldn't wait to get home from work today and start working on it! The table top so far looks fine after taking the cramps off. First of all I had to flatten the four boards so had a nice flat surface to work with on the bandsaw. The picture below shows me in the middle of it.

29082008097.jpg


Obviously after cleaning up both sides with the belt sander I lost my original lines for the oval, as to miss the dowels. But I still had my nail marks and string to re-mark it out again, so here's a shot of how I marked out my oval shape for cutting. Two nails, coming in a couple of inches from what you want your overall length to be, nailed into the underside of the table top & in the middle. Then get a piece if string wrap it around the two nails and make it longer to your desired size, then tie a know in it and then use your pencil to mark it, the picture below shows this better then I can really explain in words.

29082008099.jpg


Now, I thought I had taken a picture of where I had to put my bandsaw to be able to cut this large table top, obviously not! Well, had to carry the bandsaw outside and setup on the patio, and then just went for it and cut the oval! Here is the cut straight off the bandsaw.

29082008100.jpg


I don't think anyone can cut perfect rounds on a bandsaw with having even just marks off the blade, and even if they could, it would still probably need smoothing. So, I cleaned up my edges with a belt sander, which I was a bit dubious about, especially when I can't afford to mess up the table top, but I am experienced so thought it would be okay, luckily I was right, I managed to get nice clean edges on the table top with the belt sander, as you can see...

29082008102.jpg


Very pleased with this result, I have now left the table top with a belt sanded finish for now, I will be orbital sanding it later on, but for now I want to concetrate on the rest of the coffee table. So firstly I worked out what size framing I would be able to make under the table top, wrote the sizes down, and got to work marking out the legs, and top and bottom rails. (3 pictures)

29082008103.jpg

29082008104.jpg

29082008105.jpg


Once I had marked every out, back onto the bandsaw, luckily this time I could use it inside as the parts are only small. I used the bandsaw to cut the tennons...

29082008106.jpg


I managed to get 3 and a half of the bottom rails tennons cut on the bandsaw, and then my nightmare, I had been hoping wouldn't happen..... DID HAPPEN! Yes! The band saw blade broke! With another bottom rail and 4 top rails still left to cut I was annoyed! Also it being a Firday will have to wait til monday or tuesday for delivery of new ones! So had to cut the rest by hand with my tennon saw, which was a pain in the ass if nothing else! I even took a picture of this for you all! Lesson learnt...... stock up on your bandsaw blades!

Iamge can be found here as it is too big for this page, don't know why?http://www.freewebs.com/simonswoodwork/WIPcoffeetable/29082008107.jpg

Right now it is getting late, but I'm in a mode where I must get to a finish point I'm happy with! So to start cutting the mortices. I'm using my Ryobi One+ cordless drill with a 12mm flat bit in. This removes most of the mortice for me.

29082008108.jpg


Once the mortice is drill, I then clean up using my chisels, to form a nice square cut mortice hole.

29082008109.jpg


I then tested one of the bottoms rails in its mortice (not the mortice in the picture above). I am fairly happy with how neat it pulls up, obviously I'll know more when the whole frame gets put together, but just want to see for myself, so I could sleep better tonight!!!!

29082008110.jpg


Now just to end todays pictures I have taken a picture of one of the table legs with its four mortices in, the leg has not been cut to length yet. I hope you have enjoyed todays work-in-progress pictures! As always, comments, suggestions & questions are always welcome! Well, except for sugesting I stock up on my bandsaw blades!

29082008111.jpg
[/url]
 
Simon,

I like the look of the top oval shape and thanks for sharing the pics and opening yourself up for comments.
I looks like you are using parallel sided legs. This can make pieces look a little heavy.
Usually it is the inside surfaces of the legs that are tapered so possibly too late to do those. I can't visualise what it might look like if the outward facing legs were to be tapered though.

Bob
 
Well so far, so many pictures! I hope you are enjoying readin this if you are checking up on the progress. Just so you have an idea of how much hard work I've had to put into this..... I started work at 6.30am this morning in the commercial shop, where the money gets made, worked there til about 10.30am. The picture below is nothing special but gives you an idea of how different the coffee table is to what I do for money.

30082008112.jpg


Well, back home now started working about 11am after I had cleared all the rubbish out of the workshop, something I have to do before and after working every time. I started today by haunching all my tennons I had cut yesterday, once I had done this is kept checking to make sure they joined up okay, when then did the joint got labelled on the mortice and tennon, to make sure they went back in the same place!

30082008113.jpg


All the joints went up well, and so then I started cutting the legs to size. I don't have a chop saw, and seeing as my bandsaw is out of action its got to be done by hand. To make sure every cut was perfectly straight, I pulled out my old mitre box I made back in the training college in 2003!!! Cramped in up on the workbench, put the leg inside it and then to hold it firmly cramped it with a G cramp. My hands were then completley free to just cut away.

30082008114.jpg


Once all the legs were cut, I was left with no choice but to start thinking about how I was going to do the strapped bottom shelf.... Mortices? No that would mean they wouldn't be level with the bottom rail. Nailed straight on top? No! I have worked to hard on this to finish it off shabbily! It will have to be visible housing joints! So I marked them all out like so:

30082008115.jpg


As you can see, once these housing are cut out, the little bits left in between aren't much. So at this point I was wondering wether or not I had done the right thing? Too late to regret now, with big gouge marks on the timber for the housings! So I started them off by using my tennon saw to cut the bits I could. Then chiesled the rest out. The picture below shows the result.

30082008116.jpg


Pleased with that I decided the glue-up wasn't far away now, so to get rid of the square edged timber and to make it look a bit more smarter! Out comes the router, hadn't used it for about a year so was happy to find out it was still working!!!! At this point I only decided to router the table legs and table top. I would then decide later on what else could be routered and where. I am using a trend 45 degree bearing guided cutter.

30082008117.jpg


After routing what I can and being happy with the results, I then did a dry assembly to make sure everything was looking OK. In the picture below, the table top has not yet been centered and is only on top to have an idea of the finish.

30082008118.jpg


While the table was like this, no better time than now to be able to cut the slatted bottom shelf in and then have a complete dry assembly. The picture below shows the slats cut in.

30082008119.jpg


Overall I am plased with this, and it was at this point that I realised how satisfying hand cut joints can be! (compared to the commercial workshop, where most of the joints are machine done)
Excited to get gluing up, I had to still do things in a methodical order, which meant everything needed sanding before any glue was even thought of! The picture below shows all the components after being sanded with 80 grit sandpaper. I plan on sanding the bits I can get to after the glue-up again, with a 120grit and then I have brought some grey silicone carbide sandpaper, which in the machine mart catalogue says it is great for finishing off timber, I will be testing it first though.

30082008120.jpg


With the workshop full of dust after sanding everything, I took a break to let it settle a bit!
It was then time for the glue-up. So just as practiced in the dry assembly, I put it together the same way, and everything worked out fine in the end. I used a damp cloth to clean off the glue like the bottle said and it seemed to work okay. I eventually finished today with a glue-up at about 8.45pm, starting at 11am, but being working since 6.30am in the commercial shop. Good hard day's graft!!!! At least the end result was pleasing!

30082008121.jpg
 
Simon,

looking good! I was worried by the straight legs, but the chamfers sorted them out.

Are you going to chamfer the underside of the table-top's edge? It makes a big difference.

Finally, instead of using a sander to finish this, why not use a scraper? You will get a more polished finish. Sanding is essentially a scratching process, whereas scraping is more of a cutting process, and you will certainly notice the difference.

Mike
 
Looking very good and I like the chamfer on the legs, inspiring me to get my table finished. My only comment and it's a minor one, when you cut your mortices did you clean up the ends with a chisel but pivot the chisel away from the mortice rather than into the mortice? It's just that the top edges at each end are rounded over. Not a major thing but you can lose a little strength/rigidity in the joint, cosmetically not a big thing as that part will be hidden by the rail.

What finish are you going to put on it?
 
I haven't used a scraper to finish, used a sander. But I feel I have achieved a really nice clean surface using silicon carbide paper. (pictures to come in a bit). The straight legs, now this was something that I wasn't sure about what to do when designing. Do I go against the idea of me having a little workshop and turn the legs on a lathe at work? Or router them like I have! Glad they look okay!

Now about the mortices! The ends of the small bottom rails mortices were slightly rounded as they will be covered, but I rounded them when I was just cleaning out the surface of the stub mortice. One thing I haven learn't on this first furniture project is that unlike when I make windows and doors, much more care and attention is required when it comes to using a chisel!!!! Gentle taps, cleaning off the edges slower, and so on!

The finish is being done by the client. I had offered to do it but they wanted to, luckily I know they have finished off furniture before.
 
After a late night glue up last night, I took it easy today being a Sunday. Had a nice bacon and sausage sandwhich and sat around resting until about half 11. Then decided to get a move on and get cracking? (Are you feeling peckish?) After a successful glue up last night, the table's frame and top are completley glued up and sanded with an 80 grit sandpaper. Obviously this is too coarse to be left as a finish, so today I got the 120 grit out first and sanded up everything I could get the sander onto. Now 120 grit is smooth, but not the best finish. On reading the sandpaper section of the machine mart catalogue, I decided to use a different type of sandpaper, to the aluminium oxide I have been using and am used to using. I got some silicon carbide sandpaper, 180 grit. This sandpaper is described as being for finishing only, I obviously tested this sandpaper on an offcut first just to make sure it was going to do a nice job and not wreck what I had already done. Very satisfied with the smooth finish, I proceeded to do the whole table again. Here is the end result of the sanding...

31082008122.jpg


At this point, may I point out the orbital sander I used was makita and costs about £300, luckily I borrowed the one I use at work!!! The next picture shows the different sandpapers I have used. As I have alreay said what grits I used on the orbital, I don't need to go thru them again. But I do need to mention the belt sander. Its a CLARKE belt sander, brand new, brought it for this job for £30. It did an okay job, but probably not as good as the makita I have back at work. I used the belt sander to get the table top level, using 80 grit belts.

This image can be found here as it is too big for the page http://www.freewebs.com/simonswoodwork/WIPcoffeetable/31082008138.jpg

After sanding up, all was left to complete the job was to attach the table top. My original idea was to put corner braces in each corner of the top rails with screws. I even thought about gluing and dowelling!!!!!!!! After talking to members of UK Workshop, i realised gluing the table top on, was definatly not an option, as the timber needs to be able to expand and shrink freely! A member had suggested using buttons, which ideally, is the best way to attach a table top. But it would of been best to prepare for this before gluing up the frame, and also the buttons really needed to be cut pretty acuratley, and my bandsaw doesn't have a blade anymore! So...... my first idea of using corner braces was my only option in my opinion. The picture below shows these been fitted into place attaching the table top. (As you can see I have signed the underside of the table top, just incase im famous in woodworking in years to come!!!!!! HaHa!)

31082008123.jpg


The next picture shows the table top fixed completley...

31082008137.jpg


And now at this point, I was over the moon, my first ever piece of furniture, made & completed. And best of all, I had the satisfaction I had done all the joints myself using no more machines than a bandsaw and a drill and hand tools! I see why people like this as a hobby, like I do too! I'll let the next two pictures do the talking for themselves. Enjoy...

31082008125.jpg

31082008127.jpg


Right, now you've seen the overall finished pictures, I am going to show you the joints a bit more closely! First up, is the exposed housing joint, for the slotted bottom shelf. Now I did have many thoughts wandering through my mind on how to joint the slatted shelf into the bottom rail. At the time this was what I came up with, and I don't regret it, as I have a feeling this is something unique to my piece. Don't quote me on that though! I'm sure other furniture makers would of had better ideas and they are welcomed.....

31082008131.jpg


The next picture shows the detail of the chamfer on my table's legs. It also shows the small bevel on the underside of the table top. And central to the whole photo is the stub mortice and tennon joints for the top rails.

31082008132.jpg


The next photo shows the close-up of the bottom rail joint (stub mortice & tennon) and also the slatted shelf again (exposed housing joint).

31082008134.jpg


The next picture shows you the oval table top and the routered chamferred edge, in a close-up. I did clean up the routered chamfer with some sandpaper.

31082008136.jpg


I am really chuffed with this piece, which is relatively simple to make, for those who are experience furniture makers. But as a first furniture project, i have even suprised myself with my own ability! The only problem I have had is, once the project was started, it was hard not to finish! So 20 hours and 2 plasters later, it was complete!

Oh and look the next picture is what all of this started from!

27082008093.jpg


I am sorry about all the pictures if they've caused your pc to freak out while loading :lol: but just thought you would all like to see the WIPs in detail. :!:

:?: Now, what do you all think of this piece? Comments, suggestions and questions are all welcomed as always :) :?:

:arrow: I will try and get a photo posted on here after the client has put their own finish on it. :roll:

Simon 8)
 
Nicely executed piece, what do you do at work? I can't belive you haven't made something like that before?

Aidan
 
At work I am a bench joiner. I have an NVQ Level 2 in Carpentry & Joinery. At work I make mainly bespoke windows and doors. But what makes the company I work for bespoke, apart from sizes, is the variety of the work. Arches, bays, shopfronts, garage gates, arched doors/gates/casements etc... We also do a variety of windows. Conventional, Espagnolette, Traditional Sliding Sash, Spring Loaded Sash, Stormproof, Pivot....
At work though, time is money and so profit is the key goal. We hve machinists who machine the timber, mould the timber, mortice and tennon the timber. One of the machinists (the guy wo does all the tennoning) used to be a bench joiner, so he marks out everything for us.
Then I get the jobs that have come thru. Most of the time its just the tennons that need haunching or something else that needs cutting. And then it is time for glue-up. This is how money is made and is very different to the furniture making experience I have had in the last four days.
Before I made this coffee table I had only worked with plywood in my private shop, making fence hanging flower boxes and a shop pavement sign.
I now have a few orders for more working waiting to be started. An alcove shelving system that slides in and out. A small set of steps that lead up to a trampoline. A budget priced table, made from ply to be lipped with timber on the edges. Also after making the shop pavement sign, I have been offered site work hanging doors and stuff in some rented properties that the shop owner owns. Work is good right now :)
The same applies for the commercial shop at the moment, we currently have enough work lined up tp last us until January 2009.
 
Looks good, Simon.

Just make sure that you are charging enough for your work, even if it is just a sideline at the moment. The time could well come when you decide to give up the day job and fly solo - far better that you are charging rates that give you a decent hourly wage from the start. It's difficult to hike them later!

You mentioned on another thread that your boss charges your time out at £40 per hour. In your shoes I'd work on £20 ph for private jobs.

I'm a bit worried about the way you've fixed the top to the frame. You say you've made allowance for movement in the top but I can't see how you've done it. At the very least make the holes in the corner brackets into slots running across the width of the table, so that when the top shrinks (which it will!) the screws can slide in the slots.

Buttons as suggested by Paul in your other thread would have been better.

For future reference you don't make buttons on a band saw. Simply machine a length of the correct profile on your router table using a rebate cutter and then saw pieces off to make the individual buttons.

Cheers
Dan
 

Latest posts

Back
Top