Wine Barrel Restoration: Looking for Plumbing Tips

UKworkshop.co.uk

Help Support UKworkshop.co.uk:

This site may earn a commission from merchant affiliate links, including eBay, Amazon, and others.

wcndave

Established Member
Joined
5 Oct 2008
Messages
1,130
Reaction score
7
Location
Truden, Italy
I've been restoring a really old wine barrel, for some months now, and finally got it into a decent shape.


IMG_20210727_115854__01.jpg


IMG_20210727_115854__01__01.jpg


I want to use it for a water barrel on a downpipe, and as the original was not watertight, put a plastic barrel inside.
I wanted to make as much use as possible of the space, and the only options were a barrel that just fits with the bands off, or one that was about half the diameter, so I went for the former.

This means I can't see any of the plumbing between the inner and outer barrels.

IMG_20210802_123438.jpg


Sadly, I have some leaks somewhere, and water slowly drips out. It's not enough to change the water levels really, but it does come out brown, and the constant wetness could shorten the life of the barrel.

There was a large opening in the barrel which made fixing the tap slightly complex, and also the space between the two barrels is much larger at the middle point.

I have a tap like this


1627905539538.png

which is too short to reach the inner barrel, so goes into an adaptor like this - using PTFE tape
1627905578220.png


IMG_20210802_123353.jpg


which has no connection for the plastic barrel, so is taped to the connector part of this

1627905404588.png


using some "special" tape
IMG_20210802_124018.jpg

Which is then connected to the inner barrel with a nut and two rubber washers.

So the side view is something like this - which feels like I went down a rabbit hole somewhat...

Connection A has the PTFE tape, connection B has the plumbing tape above, connections C/D are using rubber washers.
Yet I seem to have some leak(s) somewhere, and I can't actually get visibility to see where...

1627905384373.png


I am wondering if there's some sealant or something that could be used, or whether I ought to redo this part with a better solution....

Any thoughts?

Thanks! Dave.
 
This is why I never do plumbing. Complete nightmare. (I'm always plumbing, and I hate it)
:)

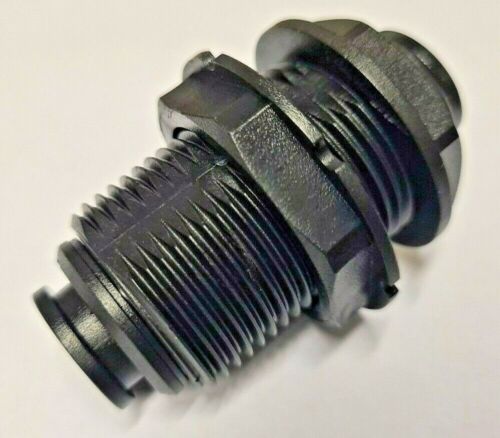
I would expect to use a bulkhead fitting, but not anything like you have. A straight piece of plastic pipe with external thread, and a washer and nut on either side of the barrel - something like this:
s-l500.jpg

Your problem is probably using bodge tape and hope rather than fittings designed to be watertight. How you get to join things inside a void is the fun part, but would press fit be an option? I can't seem to find straightforward external threaded pipe, which you could use to make an extra long bulkhead fitting, so I'm not helping much, but you need to avoid a join in between the barrels.

I can find iron or galvanised steel pipe like this, which you might be able to use: https://www.ebay.co.uk/itm/Black-ir...8-1b16-4212-8b73-e18d2c990c8b&redirect=mobile

Another bodge might be to use a long flexible connector like this: Basin Hose Pipe Flexible Tap Connectors Flexi Tails Monobloc Mixer Tap Pipes | eBay

I would drop in on my local farm supply shop and have a rummage through their irrigation fittings section, but I don't know what sort of things you have in the UK - almost certainly not as extensive as here in greece.
 
when you say that it wasnt watertight, have you filled it full of water (and topped it up as necessary) and left it for a couple of weeks to swell up? as they dry out they do shrink a bit, often the bands slipping off as a result.
 
This is why I never do plumbing. Complete nightmare. (I'm always plumbing, and I hate it)
:)
Tell me about it, same here....
I would expect to use a bulkhead fitting, but not anything like you have. A straight piece of plastic pipe with external thread, and a washer and nut on either side of the barrel - something like this:
s-l500.jpg
I'm not sure how that's different, how would I connect that to the cone shaped piece, or even to the tap? It looks like it just has some kind of lip at the end...
Your problem is probably using bodge tape and hope rather than fittings designed to be watertight. How you get to join things inside a void is the fun part, but would press fit be an option? I can't seem to find straightforward external threaded pipe, which you could use to make an extra long bulkhead fitting, so I'm not helping much, but you need to avoid a join in between the barrels.
Yup, it's a bit of a bodge right now.
I can find iron or galvanised steel pipe like this, which you might be able to use: https://www.ebay.co.uk/itm/Black-ir...8-1b16-4212-8b73-e18d2c990c8b&redirect=mobile
The gap inside the void between the type of fitting you posted above, and the end of the tap is about 3cm..
Another bodge might be to use a long flexible connector like this: Basin Hose Pipe Flexible Tap Connectors Flexi Tails Monobloc Mixer Tap Pipes | eBay
again, these are likely to be too long for a 3cm gap...
I would drop in on my local farm supply shop and have a rummage through their irrigation fittings section, but I don't know what sort of things you have in the UK - almost certainly not as extensive as here in greece.
I'm in Italy, and struggling to find any parts that seem suitable - I know a lot of farmers as I live in the mountains, however they all use those standard square containers with fittings that won't really work...


when you say that it wasnt watertight, have you filled it full of water (and topped it up as necessary) and left it for a couple of weeks to swell up? as they dry out they do shrink a bit, often the bands slipping off as a result.

Yes, I tried that first. The problem is that the barrel is very old, and was weathered in the Italian sun + the mountain winters (about -10c for 4 months a year), and was also wet in winter, so it was just too bad to be made watertight again.


Did you take it completely apart? You may have put the staves back together in the wrong order and that's why it's leaking

Yes, and I numbered everything, so it's definitely in the right order. It just wouldn't fit back together again nicely, and going for the barrel inside seemed best.

I really just need a way to connect a standard 1/2 or 3/4 tap to what was described above as a bulkhead fitting, however I searched for a long time before coming up with my bodge...

Thanks for the feedback so far!
 
I would have been tempted to cut the hoops vertically and hinge the barrel so that it is a cover for the plastic barrel. Then you could have gotten a good barrel tap with extension attached to the plastic and closed the wood barrel around it. Your tap could be located closer to the bottom to allow more of the water to be used. As it is now you can only drain off half of it.

Pete
 
Would it be feasible to use a heavy weight plastic bag rather than the inner barrel? It would conform to the shape of the inside & might make it easier to seal.
 
A piece of quality pond liner, your choice of fittings,you could even use the same tap secured in the same way but thinner so it can fit between either the first or second bands, a older style tap would set it off nice imho. Punch out a very snug fit hole in the liner to suit your fitting, make a couple of sealing patches from a old inner tube but make them a generous couple of inches bigger all round, say around 4" square. Again punch out a snug fit for your chosen fitting, use good waterproof contact adhesive ( bike repair stuff would do at a pinch) ,glue the patches which will also act to strengthen the area either side of the liner and let dry fully. Pop it into the barrel and put your tap in place,tighten well but don't over tighten, fill with water or wait for it to rain and you you should be good to go. Couple of tip's are to allow yourself plenty of spare pond liner that can be trimmed of later when everything settles down and fittings that have flanges as wide as you can get but still fit in with the curvature of the barrel giving a better seal over a wider area , give the adhesive plenty of time to cure, last one roughen the areas of both the liner and tube patches with a bit of sandpaper to give a better surface. OK it's a bit of a faff about but it works and is cheap to do :)
Your local garden center if they do ponds will have a good selection of fittings and the liner (y)
 
Last edited:
I would think you would want a decent tank connector with a 1/2" BSP threaded end, then depending on the length of section you need between the tap and the inner barrel hopefully a 1/2" BSP socket which should suit your tap. If one socket is too short to reach the tap you could weld 2 sockets together or one socket and a half socket together to get the length about right.
Ideally stainless sockets so can be welded and not rust.

I'm assuming that's a 1/2" threaded end on the tap?

To assemble you would need to fit the tank connector then wrap the end in PTFE tape, then drop the plastic barrel into place. You would then need to assemble the tap and socket arrangement and then offer whole lot up through the oak barrel and tighten into the end of the tank connector already in place.

You need to allow extra length for thread joints 13mm for 1/2" and if its 3/4" then allow about 15mm.
 
I've been restoring a really old wine barrel, for some months now, and finally got it into a decent shape.


View attachment 115185

View attachment 115186

I want to use it for a water barrel on a downpipe, and as the original was not watertight, put a plastic barrel inside.
I wanted to make as much use as possible of the space, and the only options were a barrel that just fits with the bands off, or one that was about half the diameter, so I went for the former.

This means I can't see any of the plumbing between the inner and outer barrels.

View attachment 115189

Sadly, I have some leaks somewhere, and water slowly drips out. It's not enough to change the water levels really, but it does come out brown, and the constant wetness could shorten the life of the barrel.

There was a large opening in the barrel which made fixing the tap slightly complex, and also the space between the two barrels is much larger at the middle point.

I have a tap like this


View attachment 115194
which is too short to reach the inner barrel, so goes into an adaptor like this - using PTFE tape
View attachment 115195

View attachment 115196

which has no connection for the plastic barrel, so is taped to the connector part of this

View attachment 115193

using some "special" tape
View attachment 115197
Which is then connected to the inner barrel with a nut and two rubber washers.

So the side view is something like this - which feels like I went down a rabbit hole somewhat...

Connection A has the PTFE tape, connection B has the plumbing tape above, connections C/D are using rubber washers.
Yet I seem to have some leak(s) somewhere, and I can't actually get visibility to see where...

View attachment 115192

I am wondering if there's some sealant or something that could be used, or whether I ought to redo this part with a better solution....

Any thoughts?

Thanks! Dave.
Problem is PTFE tape isn’t very good in lots of applications, I wont use it at work unless it’s absolutely necessary. We use Loctite 55 now which has a solvent in it and sets. It is in string form which you wind into the thread. When you are using parallel threaded fittings you will need to also wrap between the fitting and the face of the barrel or part you are trying to seal against. This will create a grommet of ptfe which squashes against the faces and seals. If using purge tape on parallel thread it probably won’t seal as it’s now so thin it’s practically useless.
 
If using purge tape on parallel thread it probably won’t seal as it’s now so thin it’s practically useless.
Why does it matter how thin it is? If you put enough turns on it will still seal - or at least it always has for me.
 
I had a quick rummage through one of my (many) spare plumbing bits crates, and pulled out what are all labelled as 3/4" standard irrigation fittings, which are all manufactured in Italy :)

The left hand bit is the bulkead fitting - it is supposed to have a rubber washer and nut to go on the other side of what in this case is a molded part, but I couldn't find them; probably in one of the other boxes.
20210804_084654_copy_1024x768.jpg


Please excuse the mankiness of everything - it has all been used at some point, and then thrown in in a crate for years. The tap has a terminal drip, but I'm keeping it (and several friends) just in case I have a tap crisis on a Sunday.

So what we have is a bulkead fitting (60mm in length, which will put roughly 30mm on the outside of the barrel), followed by a female/female reducer because the tap (which I believe is the same as yours) is half - inch.

So that's how I would have done it, anyway. Hopefully you can find these bits locally - I'm happy to post them for you, or even buy new and post those, but I'm sure you can come up with with a similar solution, given that these things are manufactured locally to you.

One tip - always buy more of whatever fittings you are getting, so you have extras. Not only does this mean the one you need won't immediately break because you have a spare sitting next to it, but you will slowly build up stock of everything useful. A man can't have too many plumbing fittings :)

Or clamps.
 
It would be worth checking for a stress crack in the blue barrel they are not always easy to spot. I recently had one in a 18 month old water butt which was supported on a slab, could see no reason for it. This crack was on the edge at the bottom.
 
I would have been tempted to cut the hoops vertically and hinge the barrel so that it is a cover for the plastic barrel. Then you could have gotten a good barrel tap with extension attached to the plastic and closed the wood barrel around it. Your tap could be located closer to the bottom to allow more of the water to be used. As it is now you can only drain off half of it.

Interesting idea, although I think there would be a number of challenges that would make that a much bigger project (and it already took months to just sand/restore the hoops and staves). The hoops hold it all together, so as you opened the barrel, everything would fall apart. So the staves would all have to be joined to each other, and to the hoops. The weight would make hinging hard. I don't know that it would change much, as what I need is what you said, a good barrel tap with extension. The inner barrel only extends 2/3 down, and the tap has to be high enough to get watering cans under, so the loss is unavoidable. However I can take the top off quickly and dip the can in anyway!

Would it be feasible to use a heavy weight plastic bag rather than the inner barrel? It would conform to the shape of the inside & might make it easier to seal.
A piece of quality pond liner, your choice of fittings,you could even use the same tap secured in the same way but thinner so it can fit between either the first or second bands, a older style tap would set it off nice imho. Punch out a very snug fit hole in the liner to suit your fitting, make a couple of sealing patches from a old inner tube but make them a generous couple of inches bigger all round, say around 4" square. Again punch out a snug fit for your chosen fitting, use good waterproof contact adhesive ( bike repair stuff would do at a pinch) ,glue the patches which will also act to strengthen the area either side of the liner and let dry fully. Pop it into the barrel and put your tap in place,tighten well but don't over tighten, fill with water or wait for it to rain and you you should be good to go. Couple of tip's are to allow yourself plenty of spare pond liner that can be trimmed of later when everything settles down and fittings that have flanges as wide as you can get but still fit in with the curvature of the barrel giving a better seal over a wider area , give the adhesive plenty of time to cure, last one roughen the areas of both the liner and tube patches with a bit of sandpaper to give a better surface. OK it's a bit of a faff about but it works and is cheap to do :)
Your local garden center if they do ponds will have a good selection of fittings and the liner (y)

Also an interesting idea! If I was starting over I might do that... I am not sure though how the tap would connect to the liner. the tap has a metal 1/2 threaded connector which doesn't reach inside the barrel, so I'd need an extension, and also some way to hold the tap in place, a bracket or something, so I am not sure it's totally straightforward, but if all else fails, I'll look into it, thanks!

I would think you would want a decent tank connector with a 1/2" BSP threaded end, then depending on the length of section you need between the tap and the inner barrel hopefully a 1/2" BSP socket which should suit your tap. If one socket is too short to reach the tap you could weld 2 sockets together or one socket and a half socket together to get the length about right.
Ideally stainless sockets so can be welded and not rust.
What is a decent tank connector? I searched on line through thousands of pages looking for something, and they were all ICB or what I have...
To assemble you would need to fit the tank connector then wrap the end in PTFE tape, then drop the plastic barrel into place. You would then need to assemble the tap and socket arrangement and then offer whole lot up through the oak barrel and tighten into the end of the tank connector already in place.

I can't "drop in" the barrel, as the top is smaller than the inner barrel diam. if I could have bought a 58cm diam barrel I would have, however they're all 60 or else far too small.

Problem is PTFE tape isn’t very good in lots of applications, I wont use it at work unless it’s absolutely necessary. We use Loctite 55 now which has a solvent in it and sets. It is in string form which you wind into the thread. When you are using parallel threaded fittings you will need to also wrap between the fitting and the face of the barrel or part you are trying to seal against. This will create a grommet of ptfe which squashes against the faces and seals. If using purge tape on parallel thread it probably won’t seal as it’s now so thin it’s practically useless.

I'll look into 55. Are you suggesting to use the 55 between the fittings rubber washer/face, or saying that the tape would actually be ok for that?


It would be worth checking for a stress crack in the blue barrel they are not always easy to spot. I recently had one in a 18 month old water butt which was supported on a slab, could see no reason for it. This crack was on the edge at the bottom.

I think it's ok, as when the water is below the level of the tap, it doesn't drip.

I had a quick rummage through one of my (many) spare plumbing bits crates, and pulled out what are all labelled as 3/4" standard irrigation fittings, which are all manufactured in Italy :)

So what we have is a bulkead fitting (60mm in length, which will put roughly 30mm on the outside of the barrel), followed by a female/female reducer because the tap (which I believe is the same as yours) is half - inch.

So that's how I would have done it, anyway. Hopefully you can find these bits locally - I'm happy to post them for you, or even buy new and post those, but I'm sure you can come up with with a similar solution, given that these things are manufactured locally to you.

Thanks for that!

It looks like the bit in the middle is the part I couldn't find.

I live in the mountains, so don't have easy access to lots of plumbing/gardening shops, and rely mostly on online purchases.
I couldn't find that middle section, but apart from the connection I have between the barrel tap adaptor and the bulkhead fitting, it seems similar and would still require sealing those joints... Also without the adaptor, not sure how the tap will be "secured" as the hole it's protruding through is about 7cm diameter....

Thanks once again for your kind offer to send me things!! I will continue to rummage around locally for now.


Damn right!
 
A 15mm tank connector ideally the type with the nut inside the tank to make it easier to tighten and sealed with a nylon washers.
15-mm-tank-connector-uk-compression-6_min_9034_P_1.jpg
short bit of 15mm pipe and an 15mmX1/2"fbsp adaptor for the outside to screw your tap into.
image_2021-08-08_125930.png
This can then be assembled and then fitted through from the outside with the locking nut tightened from inside the barrel, I would probably fit a non rusting plate inside the barrel to make it more rigid where the flange comes through, the only drawback with this is if you turn the tap to hard you may loosen the locknut.
This would stop that happening and replace the 15mmX1/2"fbsp adaptor .
33291.jpg
 

Attachments

  • conn.jpg
    conn.jpg
    45.1 KB
The bit in the middle that trainee neophyte has in the middle is called a "long screw" connector if you google "long screw BSP" you will find some otherwise you will just get long screwnails. These are not that common anymore. I would get a brass/ bronze or stainless tank connector with a bsp thread to suit - either 1/2" or 3/4" BSP. The other bit you may need is a pipe socket with BSP female threads in both ends. If you try and do it with compression fittings (ie kuterlite or similar in UK terminology) then I think you will struggle to get joints tightened. Other bit that might do instead of a long screw is just a barrel nipple, which is effectively just a short bit of pipe with a thread on each end.

Jimmy
 
Back
Top