wadkin bandsaw restoration

UKworkshop.co.uk

Help Support UKworkshop.co.uk:

This site may earn a commission from merchant affiliate links, including eBay, Amazon, and others.

wallace

Established Member
Joined
13 Feb 2011
Messages
2,130
Reaction score
274
Location
county durham
Hi all, so here we go again. This time its a wadkin DR.


I decided to strip as much off the bandsaw whilst it was outside because the pallet it came on was dropping to bits and I didn't fancy it falling on me. After removing the table I found my first horror, the casting that the table pivots on had been smashed at some point and then welded.


This is how it looks after a couple of hours, a lot safer to move around


Heres all the parts put inside ready to assess


It still amazes me that bolts come out so easily with shiny threads even after been left outside. And being 70 years old


This is the sliding mount that holds the bearings for the upper wheel


The wheels came off pretty easily, just a couple of lengths of wood at each side and levered.


I took the doors off in one piece

 
I look forward to the following wip and finished article.
I have seen other machines you have refurbed and posted on here, and I have to say I have been very impressed.
Thank you for posting this.
 
There is a bit of casting that will need repairing This has bigger brake shoes than my landrover I was really impressed by the size of the bearing housing for the top wheel
 
I spent a couple of days preparing the frame by using a flapper disc and then using car bodge. It then got a couple of coats of zinc primer followed by several coats of quick drying enamel. The weather has been perfect for applying the paint.


That was the easy part, now comes the hard bit because everything is very rusty. I was thinking of getting the doors sand blasted because they are really crusty and it will take forever by hand.

Mark
 
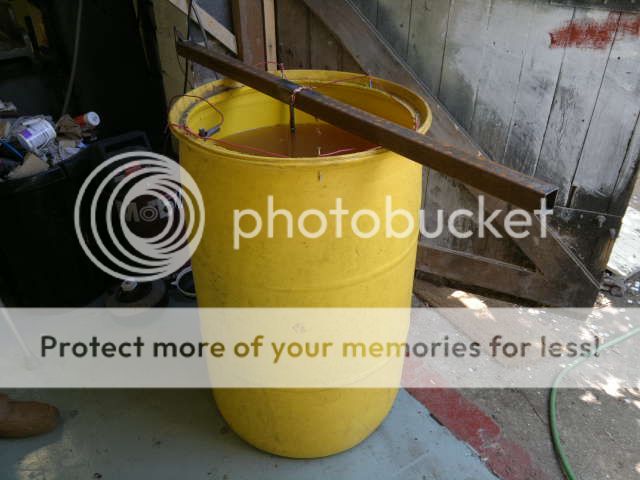
Not looking forward to hours of wire wheel work I thought I'd try abit electrickery. I put one of the blade guide assemblies into the solution at 6 last night and this is the result 15hrs later


This is the piece when it came out with just a bit of a scrub


This is the sludge that's created


Since it worked so well I thought I would scale things up abit :D This will save me a whole load of mess and effort


Mark
 
I am finding that the wider the 'face' of steel exposed (as the positively charged anode) ... the quicker the results, even at 1 or 2 amp draw.

So rather than threaded rods, I'm using a few of these now. Just a thought.

820.jpg
 

Attachments

  • 820.jpg
    820.jpg
    112.7 KB
Thanks for that, on my first attempt I used an old garden fork chopped up. So if I use some box section it will work better.
 
More progress, I'm getting to like this electrickery thing. This is the table trunion after a night in the barrel


This is the table before going in


And after just 2 hrs


Next I spent some time with blade guard. Its cast ali so I will be polishing it.


I used a grinder with a flapper disc then a DA sander, I will finish off buffing it


Mark
 
Did a bit of polishing on the lathe


This is the tin work for the dust shoot, I might make some new in brass. I'll see what there like after a soak in the magic barrel


This is the handle off the brake


And after sanding and polishing


Mark
 
A little more work done, this is one of the guide strips and you can still see the hand scarping marks that were done 70 years ago.


I managed to weld the broken cast part by heating it up and then welding with my mig, I don't know if its anygood time will tell.


This is the door to the electrics after a little while in the electrolysis barrel.


I'm really surprised at how many parts their is in this machine. I have kept each assembly in its own box so nothing gets mixed up. Heres bits cleaned and ready for spraying or polishing.


Mark
 
That is looking superb, mine went to the scrap yard in the end but i still have the wheels off it, they are 30" dia & were retired with polyurethane any good to you?
 
Hi Keith, my wheels seem ok but rusty. I plan on putting them on the lathe to clean up the tyres and re-crowning them. Thanks for the offer, I'll get back to you.
thanks Mark
 
I like that saw and think you are doing a good job putting it back to life ....... but I think a DC stick welder with nickel rods would have been more appropriate for welding cast iron.
 
Andy I'm quite pleased how it came out of the electrolysis tub, if I'd wire wheeled it I probably lost some of the nice detail.
 
Thought I'd better start spraying because some parts were starting to rust. A couple of coats of my usual zinc primer then a few coats of enamel


Back
Top