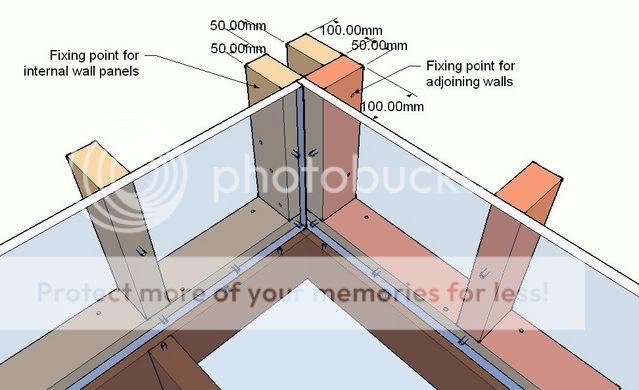
W/shop corner construction

UKworkshop.co.uk

Help Support UKworkshop.co.uk:

This site may earn a commission from merchant affiliate links, including eBay, Amazon, and others.

garywayne

Established Member
Joined
21 Jun 2005
Messages
744
Reaction score
0
Location
Bideford, North Devon
Just a quick question about shed corner construction.

In this picture I am using 6" X 4" floor joists and 4" X 2" wall studding. To get support for the floorboards at the edges I have put a 1" gap between the two outer joists. Am I doing this wright? Also, I have put a piece of wood to space out the two uprights on one wall to make it wider than the adjoining wall, so that there is somewhere to secure the interior boards.

This all sounds confusing to me, so I don't expect it is very clear to you either. So, anything your not sure about, just ask.
Workshop.jpg
 
Ummmmm...... not sure that picture or the phrasing of the question helps to make it clearer.

You're using 6 x 4 laid on side for floor joists ? If that's right I think It could be a bit OTT, not to mention expensive. The last freestanding workshop I built was 25' x 12' and the framing was from ex' 6 x 2 ripped to produce a 3 x 2 section - as far as I'm aware it's still there 10 years later. The floor though was concrete.

Chris.
 
Why don't you frame the floor--all joists including the rim first. Lay the floor over the joists and build the walls on top. I think you can see it in this drawing.

shedframe1.jpg
 
I agree with Dave this is how I assembled mine. I laid 6"X2" joists and then placed the flooring on top to the edge and then built the wall plates on top of the flooring, much easier that way. Not sure what you mean about the spacing of the uprights?
 
The only change from Dave's drawing that I would do, is build up off the joists rather than the floor sheet. I needed to replace a sheet in my shed and had used Dave's method. It became a far bigger job than if I had laid the floor to butt up to the studs.
 
Not sure you need the extra upright as you could glue and pin a piece of 18mm MDF to the orange upright to protrude and hold the internal panelling.
Much cheaper.
 
Scrums- Sorry. The joists are in fact 6" X 2".

I am trying to do this so I can take it away with me when I move. I thought I would build it on piers, rather than leave behind a great big lump of concrete when we go.

Dave- The reason I want to but the floor up to the walls is as Freetochat says, (ease of floor repairs).

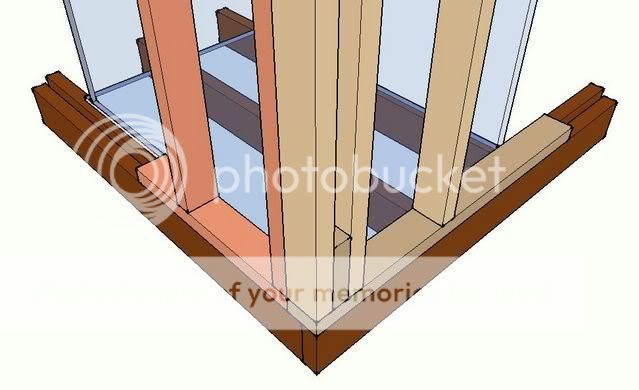
Mailee- I have attempted to insert another picture. This one shows the inside corner. The space between the two tan uprights is created using blocks to create a wider upright to accommodate securing the adjoining wall, (orange), and the internal wall panelling. If the inside tan upright wasn't spaced out, there would be nowhere to fix the end of the wall panelling.

Workshop-b.jpg


I hope this is a bit clearer.

If I have this totally wrong, would someone like to draw a plan on how to build and join the walls, and floor joists at the corners.

As you can tell. I really do need as much help as possible. Please keep the comments coming.
 
Your second drawing makes sense for the corner. Nice presentation, too.

As to the floor, if you are worried about repairing it, lay down a second layer after the walls are up. You'll end up with an easy to build arrangement and a stiffer floor.
 
I think mailee's idea is sound.

When I come to build my workshop (16'x8') I will construct it in approx 8'x8' sections, as I think this is probably as big as I can lift or move on my own (and can be transported).

You don't need to build it on piers. You can lay it on a bed of slabs, and then your joists don't need to be bigger than 3x2 or 4x2, which you can take with you if you want.
 
Sorry for the delay guys.

Gee, :oops: thanks for the complement Dave.

Dave said:-
As to the floor, if you are worried about repairing it, lay down a second layer after the walls are up.

Sorry Dave. I'm not sure that I understand what you mean. Are you saying put down the floor joists, then lay the floor, then build the walls, then lay a second floor?

Shultzy said:-
You don't need to build it on piers. You can lay it on a bed of slabs, and then your joists don't need to be bigger than 3x2 or 4x2, which you can take with you if you want.

When you say a bed of slabs, do you mean cover the whole area, or place them in position for the joists?

How should I lay the slabs. Should I level the ground first, than lay a couple of inches of sharps sand before laying the slabs?

Once the slabs are laid do I lay a damp proof coarse in between the slabs and the joists?
 
That corner detail is correct,all stud built houses in the usa are built like that.

I also think,joists,subfloor,walls,& eventually finished floor is correct as well,giving a more firm floor.

Not an expert at this but i have installed many cabinets & fitted furniture in new constructions,so have seen them first hand.


regards shivers
 
Yes sorry Gary I have just got back to the computer. yes the drawing is much clearer now and it is spot on mate. That is how you should make the uprights on the frame corners facilitating somewhere to nail your paneling as you say. :wink: Just an extra thought, My own workshop is 24'x13' and I used 6"x2" joists set on blocks on top of concrete piers. This was done as there is a lot of weight there and I didn't want it subsiding or bending in the middle. Yes I did also place membrane between the blocks and the joists too. :wink:
 
Sorry for the confusion Gary. Shivers basically said what I intended to say. ...subfloor...finished floor. Lay down a layer of plywood on the joists to the outside edges of the rim joists. Put up the walls, sheath the inside of them if you are going to do so and add another layer of plywood or tile it or whatever you want to do. The finished floor can them be replaced or repaired as needed.

Is this shed to be your workshop?

I've been pondering something for a shop floor if I were ever to build one. I've been thinking that if I could identify permanent locations for the "stationary" tools, I would surround them with rubber horse stall mats. My sister in law owns a doggie daycare. she and my brother laid down these mats wall to wall in all the rooms where the dogs run so they don't have to run on the concrete. Better for their tootsies. The mats are caulked so there's no worry about foreign matter getting under them.

The mats are pretty nice to stand on and they come in large enough pieces that I'd only need a few.
 
Shivers and Dave.

I am sorry if I am being a pain, but I don't understand why I need to lay two floors.

If I build the joists on slabs and blocks like mailee suggests, with noggins and supported along there length, then surely the floor will be stable enough to lay just a single floor without there being any flexing.

I am not questioning you, I am just trying to understand.

Shivers said:
[
quote]That corner detail is correct, all stud built houses in the USA are built like that.

I also think, joists, subfloor, walls, & eventually finished floor is correct as well, giving a more firm floor. [/quote]

:?: :? Shivers, you have totally confused me there mate.
 
Gary, in a shed, the only reason to lay the second floor is so that you can protect the subfloor which you said was a concern. The shed I built doesn't have a second floor, only the "subfloor". I have no worries about having to repair or replace it. It is for garden tools, the snow blower in the summer, bicycles, etc. The floor in my shed is treated tongue and groove plywood.

If I ever changed my mind and decided to fix the floor I would be able to lay another layer down over the first. I don't anticipate needing to do so however.

The construction method we've been trying to push you toward as some benefits, too. It'll be faster and easier to build.

There will be less waste. For example, my shed was built 8' x 12' The reason for this Is I could use 3 sheets of plywood for the floor without having to trim them. I bought 12' long 6x2s for the long rim joists and 7'9" ones for the short joists (the "2" isn't 2 over here.) so there was no waste in constructing the floor. I just started banging the frame together. I levelled the rim joist, installed the other joists using joist hangers, nailed down the floor and on to the walls. The walls were built to 8' high as well for the same reason. I only had to cut studs in way of the door and window.

I hope that helps make it clearer.
 
Quote - garywayne said "When you say a bed of slabs, do you mean cover the whole area, or place them in position for the joists?"

If this is only going to be a temporary shed I would construct the base in the following way.
This method assumes you don't want to dig any ground out.

Peg (about 9" long) out an area 2' wider and 2' longer than your workshop (or bigger if needed).
Put the pegs on the inside of the rectangle.
Look at the area within the pegs and estimate the highest point.
Put a peg (datum) in if the highest point is not a corner.
Lower top of peg to be about 3 1/2" above ground (2" sharp sand, 1 1/2" slabs).
Level all the other pegs to this datum (put in intermediate pegs equal to the length of your level or every 3').
You should now have a rectangle of pegs all with the tops at the same level.
Using wooden battens (I used 3"x1" from old pallets) surround the rectangle of pegs.
Place new pegs at the back of the shuttering (reusing the internal pegs).
You should now have a rectangle of timber level and of the right internal dimensions.
Fill any gaps with further timbers.
Make a long beam (from old pallets) about 2" wider than the width.
Cut out a notch at each end equal to the thickness of the slabs.
Fill area with sharp sand in 1/2" layers if you hand compact, or 1" if you want to use a wakker plate rammer.
Drag beam across sand to make it level.
Lay slabs on top.
Place Engineering bricks every 12" in joist positions.
Cover with strip DPC
Make floor from 4"x2" @ 16" ctrs with hardboard on underside with 4" polystyrene or fibreglass infill and 5/8" t&g floorboards
Fix walls on top.

When you move you can take all of this with you, cost permitting.
When you come to make a more permanent base, dig out a further 4" depth and fill with hardcore, bricks or type one.
 
dblFloorJoist.gif


heres a detail,obviously ignore the foundation.a second protective flor can be layed if needed.

the corner detail you have drawn is fine.

shivers.
 
Dave, Shultzy, and Shivers.

Thank you all for your step-by-step explanations, and diagrams. That is the sort of thing I need because I have difficulty visualising what people are trying to explain to me.

I would like to thank everyone your time and patients. Thank you.
 

Latest posts

Back
Top