Using the gouge sharpening jig

UKworkshop.co.uk

Help Support UKworkshop.co.uk:

This site may earn a commission from merchant affiliate links, including eBay, Amazon, and others.

tinytim1458

Established Member
Joined
23 Feb 2011
Messages
411
Reaction score
0
Location
Stonehouse, Gloucestershire
Hi I have a question for everyone that has used a Fingernail Profiler Arm like the one that Tormek and Robert Sorby and others use.

if you alter the angle of the jig from 120deg either up or down and or move the stop ring on the end of the rod of the Fingernail Profiler Arm what are the grinds like are they better or worse from your perspective.
I have tried once or twice and certainly get a different grind but as to if they are better or worse I still don't know and that is why I need your input.

Just have to regrind the tool as the front of the bowl gouge its 1mm lower than the side as something went wrong.

Tim
 
The selection of tool shape is down to your own turning preferences, if you refer to the Tormek angle/form guides they will give you the recommended settings for a particular shape.

But these are only a guide as your personal setting of jig location settings, wheel diameter/height in relation to jig mounting all affect the profile.

Some info. Here

And if you can find a copy of Tormekinstruction_bgm-100_en.pdf that gives more detailed information.
 
If you increase the angle, you lengthen the grind and if you decrease the angle, you shorten the grind. It's a case of finding what combination of settings gives you the grind you like. and making a note of them for next time!
 
I would strongly recommend you get hold of the Tormek manual (page 75 has the following very helpful chart)
Tormek Gouge grind chart.PNG


If you read round page 75 it explains the different jig settings and the effect they have on the bevel. The primary reason for extending the wings ie moving in the direction of an Ellsworth grind is to hog off more stock when roughing out bowls. The primary reason to change the angle of the bevel is to help get round the transition of wall to bottom on the inside of a fairly deep sided bowl. Other reasons include the reverse of the wings for sheer scraping and of course simply grinding off the points of the wings to help avoid catches.

The Tormek chart makes comments about which of the progressively more acute angles might be useful in a given scenario because there is a price to pay for grinding too steep an angle which is that the gouge can becme more difficult to use.

Bottom line, as the chaps say, you need to experiment and I recommend you start with the grinds that the Tormek suggest for beginners because they are easier to use at the start. As you progress, experiment with the more severe angles.
 

Attachments

  • Tormek Gouge grind chart.PNG
    Tormek Gouge grind chart.PNG
    75.4 KB
Paul Hannaby":2yrijklj said:
If you increase the angle, you lengthen the grind and if you decrease the angle, you shorten the grind.
I have heard this quoted before but I have never understood it.

There is a video by Robert Sorby

http://youtu.be/k-nTHpfcwkQ

This shows three grinds at 1:20, 3:00 and 4:40 mins. Each cutting edge is profiled by creating a 'horseshoe' and then using a jig to remove the excess metal. The jig angle looks the same in each case but the grinds are short, regular and long.

I don't see how one correlates jig angle with grind length.

Bill
 
This whole elliptical grind thing is riddled with confusion and proprietary terminology from the manufacturers. Many confuse the angle of the bevel grind with the amount by which the wings are swept back. The Robert Sorby pro-edge video that Bill has posted is helpful because it shows the shoulders being ground off.
Here's a short excerpt from a correspondence I was having with Jeff Farris about the differences between the Pro-edge and the Tormek adjustments. Its useful in as much as it defines the 3 variables which affect the geometry of the grind.

In fact, for pretty much all the elliptical grinding systems (Tormek, Oneway Wolverine or Pro-edge etc) there are 3 overlapping adjustments which govern all the geometries of the grind and they are:

the amount of tool protruding from the front of the jig, the angle between the tool axis and the rotational axis, and the distance between the point of rotation and the abrasive contact point. A change in any one of those settings will affect the length of the wing and the bevel angle of the grind.

Unfortunately, the adjustment of those three things doesn't affect the profile on the ProEdge in exactly the same way it affects the profile on any other system. On all the rest, the adjustments move the contact point along the arc of a curve (the grindstone). On the ProEdge, the contact point moves along a straight line, rather than a curve. Bottom line, you can't look at the settings in Tormek's book and get the same profile with the same settings on the ProEdge.

With all that as a disclaimer, the knuckle adjustment (which controls the angle between the tool and the rotational axis) has the greatest effect on the wing length. The protrusion and the distance from the contact have the greatest effect on the bevel angle, but also affect the wing length.
 
YewTube":1brde71u said:
Paul Hannaby":1brde71u said:
If you increase the angle, you lengthen the grind and if you decrease the angle, you shorten the grind.
I have heard this quoted before but I have never understood it.

Bill

Think of it this way - if all the other variables remain the same and you adjust the jig angle to the minimum (position 0 / 90°) so the tool is almost on the same rotational axis as the jig, you will grind a cone on the end of the tool so it will effectively be a short grind. If you go to the other extreme and have the jig angle to the maximum (position 5 / 180°), the tool is almost at right angles to the rotational axis of the jig so you will grind long wings on the tool.
 
Paul Hannaby":2zwnzsn5 said:
Think of it this way - if all the other variables remain the same and you adjust the jig angle to the minimum (position 0 / 90°) so the tool is almost on the same rotational axis as the jig, you will grind a cone on the end of the tool so it will effectively be a short grind. If you go to the other extreme and have the jig angle to the maximum (position 5 / 180°), the tool is almost at right angles to the rotational axis of the jig so you will grind long wings on the tool.

This is true if the jig is of the same type as the Wolverine where the jig pivots about a single point but is not true for the Tormeck where there is an axis of rotation which slides from left to right.

If you take a pencil with an eraser and set it at an angle to the table (the bevel angle) with the point touching the table. If you keep the angle fixed and the point in the same place on the table and rotate the pencil on it's axis you have your (0/90) position. This will give you the cone grind (pretty well what you would do to sharpen the pencil). The eraser does not move other than to rotate.

If instead of rotating the pencil you keep the point on the table and move the eraser in an arc until it touches the table (describing quarter of a cone with point at the pencil point). You are now in a position to grind the the wings. This Tormeck system of sliding axis.

The Pro edge system is a mini Tormeck.

I have a Tormeck and a home made Wolverine and both jigs are set at 45 degrees and are never changed. I would be interested to hear from anyone who changes the angle on a regular basis for some rational reason.

Bill
 
I have two 'go to' gouge sharpening heads, one a Tormek, the other a home made look-alike made before I was given the Tormek.

They are both set at different angles, the Tormek is at No 3 notch and suits my 'bottom of a bowl' gouge which has a nose angle about 50 deg.
The other is set to give me a nose angle more like 35 deg. and is my major work horse.

I rarely change the angles so that I only have to check the tool protrusion setting for minimum metal removal when used.
Likewise the Jig Base remains locked at one position 90% of the time only gets it's spacing from the wheel changed for 'special grinds' on other lesser used tools, this again is set with spacer blocks so that the positions are readily returned to.

As is pointed out in the excellent Tormek video, resetting the angle precisely to get their 'Touch and Turn' matching profile is not easy and the demonstrator actually has several Jig heads permanently PK screwed to a setting rather than moving the jigs.
Fortunately this Tormek level of setting accuracy is largely irrelevant with a normal grinder because metal is removed more rapidly and absorbs slight mis-matches.
 
Bill,
I do exactly what I described with the Tormek jig and yes, it does work. The same would apply to any other jig that has an adjustable angle. The sliding mount makes no significant difference.

I can't say I've tried sharpening a pencil this way though! ;-)
 
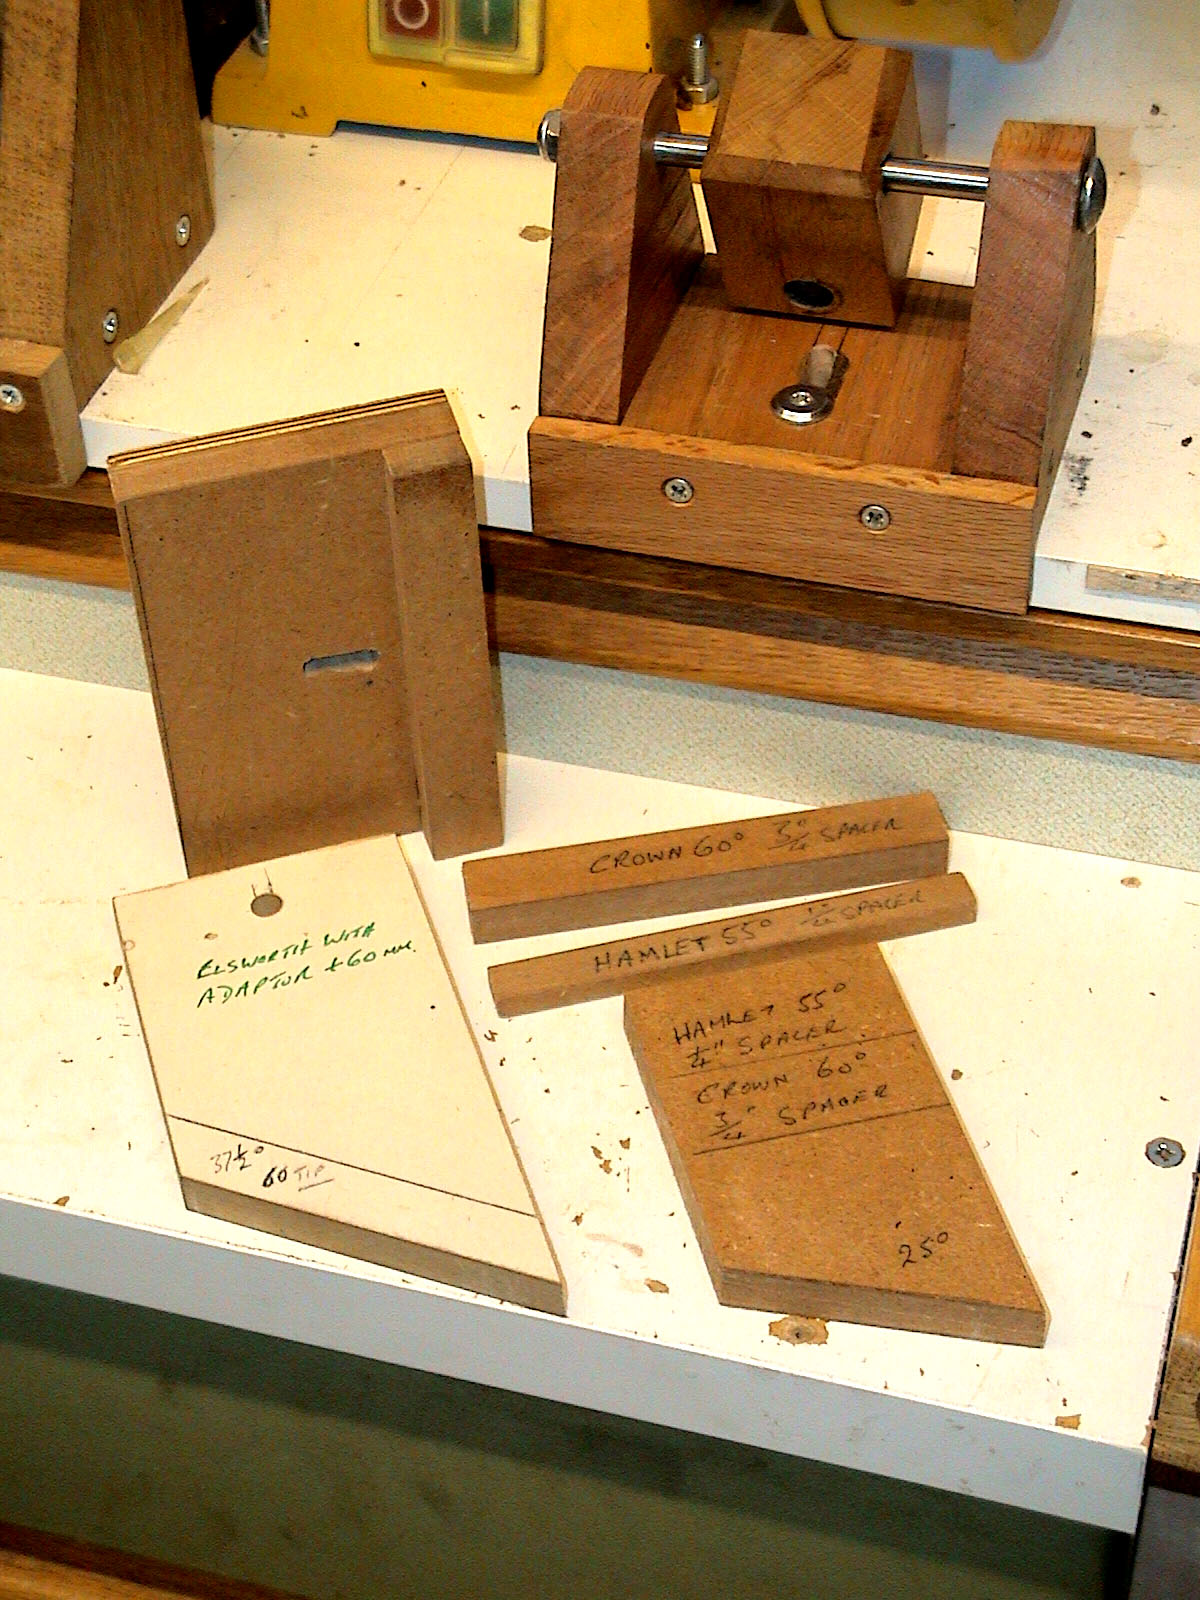
One of the main things to do whatever form of jig you use, once you have a setting you are happy with is to make up some simple setting gauges for angles and distances out from wheel with a bit of scrap MDF or similar, mark gouge name and setting details on them.

Then resetting jig each time you move it is easy and repeatable without worrying about angles etc.

DSC02899.JPG


The angle templates are used to set the Tormek jig to the 'notch settings' the other bits are spacers I use to set the Pivot base to Height and distance from the wheel for oddball tool grinds..
 
Sorby also changed the single hole "arm" to a three hole version. I've been given the newer one but not tried it yet.

pelgj.jpg
 
I think that was to help get over some of the profile limitations when using a flat belt as opposed to a curved wheel as per the original Tormek use, I've been meaning to explore the concept rather than moving my base fixings as I do at the moment but laziness says keep going with what I've got and spend the time spinning rather than playing. But logic does tell me that anything that results in leaving any jigs fixed and undisturbed can only be a good thing.

Although I have invested a few hours recently making a few tools of the Cindy Drozda ilk having read Kims mention of their use getting into fine coves etc. perhaps a couple of hours playing with a change of pivot block could be productive.
 
YewTube":21uitp1t said:
Paul Hannaby":21uitp1t said:
Think of it this way - if all the other variables remain the same and you adjust the jig angle to the minimum (position 0 / 90°) so the tool is almost on the same rotational axis as the jig, you will grind a cone on the end of the tool so it will effectively be a short grind. If you go to the other extreme and have the jig angle to the maximum (position 5 / 180°), the tool is almost at right angles to the rotational axis of the jig so you will grind long wings on the tool.

This is true if the jig is of the same type as the Wolverine where the jig pivots about a single point but is not true for the Tormeck where there is an axis of rotation which slides from left to right.

If you take a pencil with an eraser and set it at an angle to the table (the bevel angle) with the point touching the table. If you keep the angle fixed and the point in the same place on the table and rotate the pencil on it's axis you have your (0/90) position. This will give you the cone grind (pretty well what you would do to sharpen the pencil). The eraser does not move other than to rotate.

If instead of rotating the pencil you keep the point on the table and move the eraser in an arc until it touches the table (describing quarter of a cone with point at the pencil point). You are now in a position to grind the the wings. This Tormeck system of sliding axis.

The Pro edge system is a mini Tormeck.

I have a Tormeck and a home made Wolverine and both jigs are set at 45 degrees and are never changed. I would be interested to hear from anyone who changes the angle on a regular basis for some rational reason.

Bill

It might be that what's confusing this issue is the part that human intervention plays in the role of controlling wing grind length.

The length of the wings can be BOTH short and longer on identical gouges with absolutely no jig adjustments at all, neither knuckle setting, protrusion or jig distance from abrasive (the 3 adjustable variables on elliptical grinding systems). Simply spending more or less time grinding at the sides of the gouge ie the wings will be a factor in how long they're ground. If this isn't clear then have another look the Tormek official chart below and note that the first 2 entries for bowl gouges show two possible grinds: short and long. Each of those grinds have no settings changed. Both have a bevel angle of 45 degrees. It's operator decision that determines how much time is spent grinding the wings that determines which profile results.

Tormek Gouge grind chart.PNG


Chas.....the longer boss for the pro-edge is effectively giving the user a similar adjustability as the USB on the Tormek. (Because it controls distance of jig from point of abrasive contact.) The 3 hole positions are akin to Tormek's holes A & B on their turning tool setter and the 3rd hole on Sorby's boss is for an Ellsworth profile which they call an extra long grind. But Bill is right to point out that in each case for the 3 different wing length grinds on their video the bevel angle is 45 degrees.

I confess to still being slightly confused by all this as its difficult to wrap brains around multiple overlapping dimensions in 3D. But it seems to me one factor is the human one mentioned above. The Sorby longer boss also clearly demonstrates the role that distance of jig from abrasive point has.

What I still don't get is why with the Sorby system you need to do the old gouge upside down routine to grind the horseshoe before you perform the elliptical grind. Specifically, why don't you need to do the same with the Tormek
 

Attachments

  • Tormek Gouge grind chart.PNG
    Tormek Gouge grind chart.PNG
    75.4 KB
Random Orbital Bob":kgj6arw9 said:
Chas.....the longer boss for the pro-edge is effectively giving the user a similar adjustability as the USB on the Tormek. (Because it controls distance of jig from point of abrasive contact.) The 3 hole positions are akin to Tormek's holes A & B on their turning tool setter and the 3rd hole on Sorby's boss is for an Ellsworth profile which they call an extra long grind. But Bill is right to point out that in each case for the 3 different wing length grinds on their video the bevel angle is 45 degrees.

I confess to still being slightly confused by all this as its difficult to wrap brains around multiple overlapping dimensions in 3D. But it seems to me one factor is the human one mentioned above. The Sorby longer boss also clearly demonstrates the role that distance of jig from abrasive point has.

What I still don't get is why with the Sorby system you need to do the old gouge upside down routine to grind the horseshoe before you perform the elliptical grind. Specifically, why don't you need to do the same with the Tormek

Yes on my setup I have to move the base away and upwards to achieve the Ellsworth grind, I'll investigate if a simple multi hole pivot block will achieve the same, much simpler.

Don't think that the reverse Horseshoe grind is essential in either case, but it does simplify and provide a good aiming point and would be beneficial on a Tormek if done on a belt sander or coarse grinding wheel to reduce prolonged waste metal removal.
Your point about operator input is spot on, the jigs ease manipulation but operator input controls the finished profile, many times we see tools sharpened to points or with breakthrough into the flute wall because the operator has not understood the significance of dwell time on any particular area of the tool.
 
Robert Sorby quoted to me "that they buy the gouge jig from Tormek", it is better to buy something that works rather than investing lots of money in a new jig or infringing on any copyright issues, the same can be said for some other wet grind systems too.
So it would mean that Sorby would have some limitations between the two systems as you cannot move the bar in or out like on the Tormek and others that are the same as the the Tormek apart from the colour and badge.
Most of the others all buy the Tormek system minus the colour and badge of course as it is a great system and it would stop any possibility of copyright infringement if they had to make their own and of course the investment to find out you cannot make a system that is better.
Saying that I have invested in the Sorby system as I like the straight grind that I get from them.

By the way has anyone either used a worn out Sorby pro edge belt or turned the belt inside out to see if you can get a good hone from it instead of buying the honing or polishing wheel.
I have made a honing belt from a worn out belt and disk sander but have not tried the same on the Sorby system.

Thanks

Tim
 
I'm afraid I have absolute luxury in this respect as I have a Tormek and the new sorby linisher so when I've done the shaping and rough sharpening on the Pro-edge I do any necessary polishing on the leather strop of the Tormek. Sorby do buy in the Tormek elliptical grind jig rather than make it but their solution to variability in the universal support bar is the long grind boss ie the one with the three holes.

Sorby take a much more pragmatic view to gouge bevel sharpening and basically pre-bake the settings into the jigs. Its much simpler and it takes all the guess work out of grinding different shapes. I've had a Tormek for 6 years now and the Pro-edge for 6 months. I use the PE 90% of the time now for turning tools because its simpler to setup and faster to operate. I keep the Tormek setup for a particular gouge grind I like and do all the eclectic stuff on the Tormek like knives, secateurs blades etc but the PE has taken over as my go to system for turning tools.
 

Latest posts

Back
Top