Under Development - Garnham style dropout boxes

UKworkshop.co.uk

Help Support UKworkshop.co.uk:

This site may earn a commission from merchant affiliate links, including eBay, Amazon, and others.

DavidE

Established Member
Joined
23 Jan 2007
Messages
251
Reaction score
0
Location
Lancashire
Hi all,

I'm sure many will be familiar with the "cyclone substitute" shown by Mike G. recently. I thought it was a rather good idea and started setting about making one on Sunday afternoon from various scraps lying around.

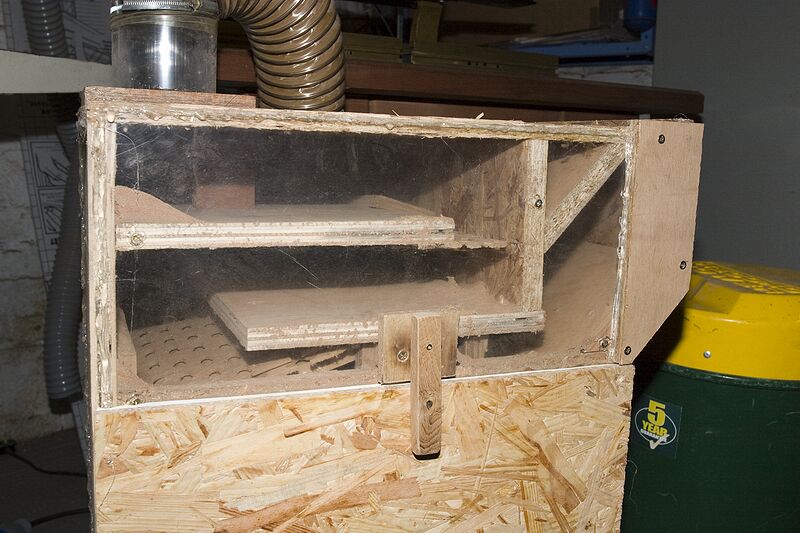
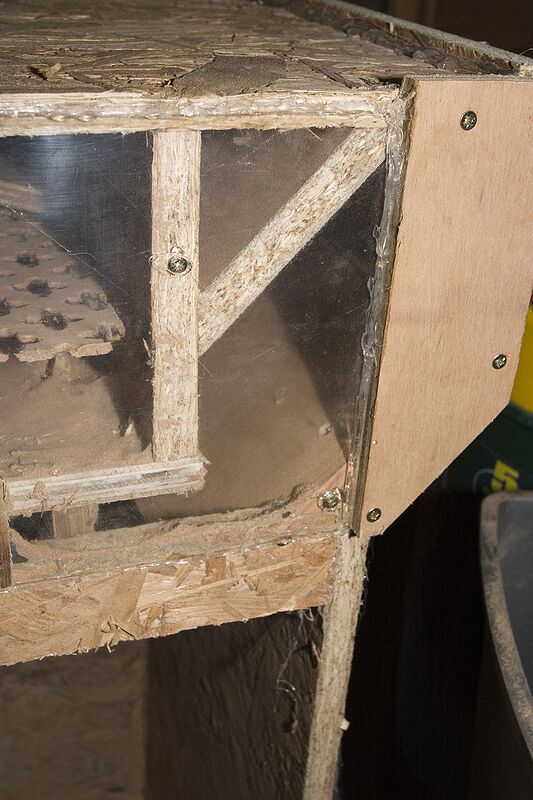
I decided to put a clear front on the top part of the "works" so I could gauge how effective it was and try to optimise it - in particular the baffle plates. I'm still working on this and will be attempting a few calcs this evening to try to review the design further. When I get the internals sorted I'll post a drawing with dimensions.

Anyway at the first pass I reckon it is about 98% efficient and is only letting the very fine dust pass. Hence the challenge to try to improve it further. The inlet gets a good swirling vortex going and with the increase in flow area this is where most of the dust drops out down the slide into the bin area.

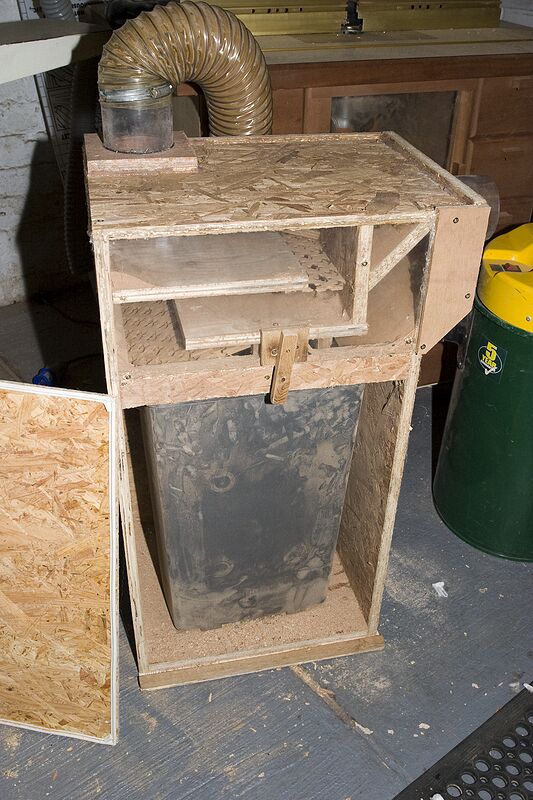
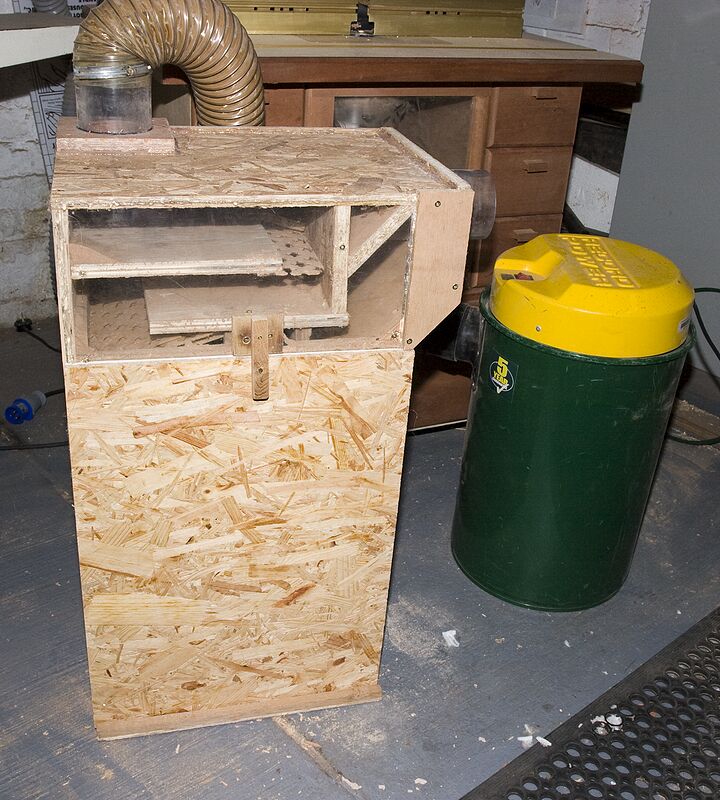
These photos attempt to show the story so far. You'll notice some of the bits of wood round the baffles really are scrap bits and are not finalised yet!
crw_25965_std.jpg


Overall view

crw_25966_std.jpg

The gubbins

crw_25975_std.jpg

With the door off showing the bin - note the draught sealing strip and the slot at the bottom which the door sits in. The latch holds it quite tight and the extractor does the rest. When the baffles are sorted I will add some roofing underlay fabric or similar to guide the dust into the bin more.
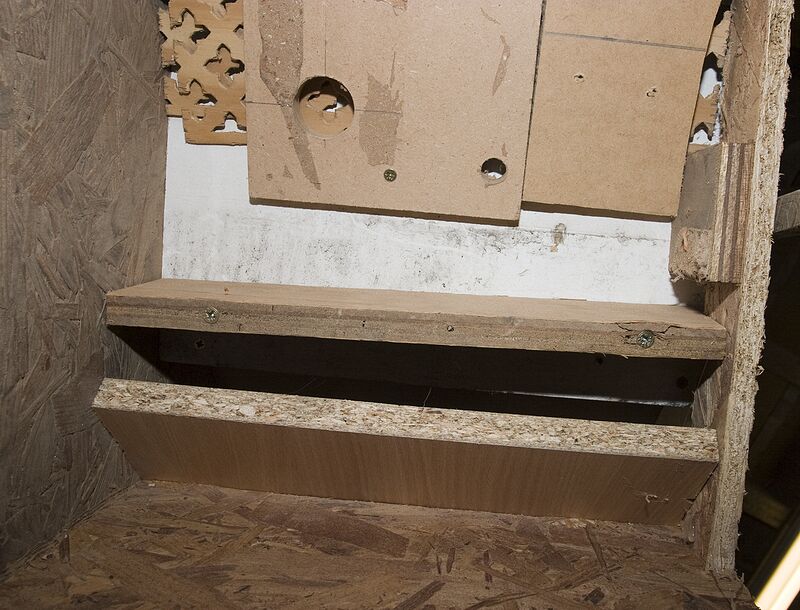
crw_25980_std.jpg

Looking up from the base.

crw_25983_std.jpg

Inlet area.

If you do make one make sure you anticipate sealing all the joins. I got through a few hot glue sticks to get it air tight. I'm going to paint it too as I think one of the OSB boards is slightly porus (it spent some time as a temporary floor and got a bit damp)

Please let me know if you have any suggestions for improvements.

I wouldn't hesistate to recommend making one - this was virtually zero cost and took a few hours to make - then I have been tweaking around trying to get that extra few percent. I've got quite a few ideas some I've tried and others are yet to be tried or are not needed. I did have an offcut of 4" soil pipe in the middle at one stage which was doing some interesting things and may be worthwhile pursuing further.

Cheers
David

PS thanks Mike!
 
Excellent stuff David! Well done. It shows what can be done with some scrap and a couple of hours of work.......and a bit of playing about. Your clear panel is a great design idea, enabling you to see how any tweaks work-out in practice.

The key thing, folks, is that these don't have to follow a set pattern. Make them whatever size and shape you want. That looks a really serious vacuum, which I guess might mean that a little more dust gets through the system into the vacuum than is the case with mine.

I happen to know that there are one or two others under construction around this little forum.........so come on guys............show us the photos!!!

Mike
 
I built a small one as an experiment. I did get a noticeable loss of suction but that was with a 4 meter hose so I might try a shorter one.
Have to say though that very little sawdust got as far as the vacuum so, quite impressed and will keep on with a MK2 version (when it warms up a tad).
 
Would it be possible to add some sort of fine filter at the end? Catch the last fine bits before they go off to the Hoover?

Something standard like a dyson hepa filter?


Or would this reduce flow too much?
 
Mike Garnham":3iqnsa6d said:
. That looks a really serious vacuum, which I guess might mean that a little more dust gets through the system into the vacuum than is the case with mine.

Mike

Mike

Does that mean we need to make the box significantly bigger in section if the suction device is much stronger (say 3hp)?

Miles
 
Thanks for the comments so far.

Regarding filters - the trick is to try avoiding them as there is already one on the extractor. Making this will cause some loss of "woof", however, if it keeps the filters clearer longer the average "woof" will be much higher generally.

Mike

Does that mean we need to make the box significantly bigger in section if the suction device is much stronger (say 3hp)?

Miles

Miles - the trick is to drop velocity down - > Which means increasing the flow area. So for my extractor the spec is a flow of 53 litres/second (it probably won't achieve this in reality). In the 4" pipe the flow speed is 6.7m/s. Then when it lands in the wide expanse of this box it reduces to 0.28m/s (approx figures with some assumptions in).

The baffles and stuff are a bit of a black art to try to get some throttling/turbulence/flow stagnation to get the stuff to drop out of the flow.

Cheers
David
 
miles_hot":2pjf3cbw said:
Mike Garnham":2pjf3cbw said:
. That looks a really serious vacuum, which I guess might mean that a little more dust gets through the system into the vacuum than is the case with mine.

Mike

Mike

Does that mean we need to make the box significantly bigger in section if the suction device is much stronger (say 3hp)?

Miles

I do this all by intuition, Miles, so I don't know, really..........but I reckon that a big suction would require a bigger box, and/ or more baffles. If I move shortly, as planned, I'll be building a new workshop and will have an external "drop-box" with a serious suction device.........so we'll find out then!

Mike
 
DavidE":1joxwbij said:
Thanks for the comments so far.

Regarding filters - the trick is to try avoiding them as there is already one on the extractor. Making this will cause some loss of "woof", however, if it keeps the filters clearer longer the average "woof" will be much higher generally.

Mike

Does that mean we need to make the box significantly bigger in section if the suction device is much stronger (say 3hp)?

Miles

Miles - the trick is to drop velocity down - > Which means increasing the flow area. So for my extractor the spec is a flow of 53 litres/second (it probably won't achieve this in reality). In the 4" pipe the flow speed is 6.7m/s. Then when it lands in the wide expanse of this box it reduces to 0.28m/s (approx figures with some assumptions in).

The baffles and stuff are a bit of a black art to try to get some throttling/turbulence/flow stagnation to get the stuff to drop out of the flow.

Cheers
David

David

What are the calculations you're using? I ask as the 3-5hp motor that I am planning will hopefully generate around 800-1000 cfm which I think comes to around 470l/s in a 6" pipe (at the entry to the box)...

Miles
 
I'm building a 'Garnham Special' at the moment as well, specifically to extract off the tablesaur. The orientation of mine is vertical as opposed to Mikes original horizontal version (if that makes sense) so I'm inserting an extra baffle to increase the air travel length.
Good tip also about making sure it's well sealed...will have to sort out some silicone for the interior. I've already got some self adhesive strip sealant so my next job is to start the door and catches.

The thing that's holding me up at the moment is that I need an odd length of 63mm tubing...I wonder if anyone's got anything gash lying about unused that they'd care to part with for a coupla beer vouchers? - Rob
 
Mike Garnham":3n1xlx94 said:
Rob,

rainwater downpipes are 63mm dia., if that is of any use to you.

Mike
Mike, I've got a bit of that but it's too big to fit the vac etc. What I need is an oddment of bendy pipe to run from the vac to the box and the saw to the box. The vac I'm using is the Axminster W1000 (no longer made unfortunately) which gives a goodly amount of suck but uses this larger size hose
Edit - thinking about it, the bit of rainwater pipe I've got is bigger than 63mm and I'm fairly sure there's a smaller size available, which would probably do the job..will have to do some investigating - Rob
 
Rob

check out your local vacuum cleaner repair shop - they sometimes have second-hand flexible hoses and/or plastic connectors etc - for a donation to their beer money?

But may not be big enough diameter for your needs.

Dave
 
Rob, could you not try making a saw cut (handsaw!) down the length of your pipe and then fold it in on itself, to reduce the outer diameter?
 
Another method worth a go is heating the pipe up with a hot air gun until it becomes pliable and moulding it to shape. I've had great success reducing the size by starting in the middle of a pipe and heating a reasonably long section - say 6" and then pulling the ends apart. this gives a nice progressive taper.

James
 
Jamesc":y772jehs said:
Another method worth a go is heating the pipe up with a hot air gun until it becomes pliable and moulding it to shape. I've had great success reducing the size by starting in the middle of a pipe and heating a reasonably long section - say 6" and then pulling the ends apart. this gives a nice progressive taper.

James
That sounds an interesting technique which sounds worthy of bit of experimenting :wink: - Rob
 
miles_hot":qfovo4tp said:
David

What are the calculations you're using? I ask as the 3-5hp motor that I am planning will hopefully generate around 800-1000 cfm which I think comes to around 470l/s in a 6" pipe (at the entry to the box)...

Miles

Hi Miles,

The calculations are based on continuity so if you know the flow rate over a given area as stuff can't enter or disappear you can assume that the flow rate remains the same. Now in real life there will be pressure drops and turbulence which means the figures are only a guide... so starting with a bit of dimensional analysis -

We want flow speed in metres/second, we know the area which is m² and we know the flow rate in litres/second which you can convert to m³/s. For your example then...

The flow rate (Q) in m³/s is 0.47 (1000l = 1m³)
The area (A) will be (in m²) Pi x r² = Pi x .075² = 0.01767

We want m/s so if you divide Q/A you get m/s

=> = .47/0.01767 = 26.6m/s (Which is about 60mph!)

One thing to remember is the type of extractor as the performance will drop off with any restrictions etc thus slowing the flow down. All these calculations don't take into account the amount of dust being dragged along either.

I think the key point really is if you calculate comparative areas you'll get an indication of the change in velocity... so if you increase the area by a factor of 10 the flow speed will have to reduce by that value (as the relationship is linear) subject to all the other non ideal bits mentioned.

I hope this helps :?

David
 
woodbloke":23le49yk said:
I'm building a 'Garnham Special' at the moment as well, specifically to extract off the tablesaur. The orientation of mine is vertical as opposed to Mikes original horizontal version (if that makes sense) so I'm inserting an extra baffle to increase the air travel length.
Good tip also about making sure it's well sealed...will have to sort out some silicone for the interior. I've already got some self adhesive strip sealant so my next job is to start the door and catches.

Rob - the whole vertical thing is interesting, and has got me thinking a bit!

I'd have used silicone on mine, however, it's that cold at the moment I was lucky to get the hot glue on before it set :wink:

There will be a MkII as I have tools spread out over two buildings and if it's warmer then I'll probably silicone it. To say the faces were a good fit and cut with the Festool or Table Saw the loss of suction without sealing was very impressive!

I was wondering about all sorts for the catches - in the end the simple tapered strip at the base and the Oak Sneck have worked wonders. As Mike said in his original post the extractor finishes the job off!

David
 
This is my first post in the 'on-topic' section, I've come to woodworking only recently, now having the space, more time and (a little) money. I've been knocking bits of wood together for various sorts of garden use, but not yet really made anything.

I want to make a couple of timber frames for a cutting bench and work bench. There is a fair amount of rough sawn timber around left by the previous owner of the house, so thought I'd use that. Lacking the skill, knowledge and, to be honest, patience, to learn how to use hand planes, I bought a planer and separate thicknesser. Unfortunately my current Bosch Vac doesn't have a wide enough tube to cope with the output of either and fills far too quickly. So seeing Mike's invention I thought I'd have a crack at it.

I don't really have any scrap (yet) so went out and bought some 18mm ply cut, apparently, to size. First mistake, I hadn't realised quite how heavy this would make the box, so was a bit of a struggle putting it together. Secondly the cuts weren't quite to dimension and ended up bodging a lot of the joins. Having recently bought a set of EurekaZone guide rails (yes, I have all the tools and no idead) I took it all apart and resized all the panels to be square.

It's a blatant rip-off of Mike's design and seems to work quite well. There appears to be a slight loss of suction and all I've used it for so far is to vacuum the garage floor :oops: but it does look like the majority of the large debris at least is dropping.

I need to finish off the collection tubing for the CS and the battery of the Dremel is flat so whilst I'm waiting for that to charge I thought I'd post some photos.

2Bv2LyDHLXbaLhjLZcjbEA


I didn't have a drill bit the right size for the dowel so used a hole cutter (not sure of the name) and it's too big, hence the screwdriver as a wedge. I need to get some larger dowel to fit.

d5-tdg8ExUYlGXBPWLOjWQ


And the insides..

mq4JTbiDF8Tq5fsMHITk3g


It needs a small tweak to the bottom ledge as the door is currently too tight. Once I start using some tools in anger I'll get a better idea as to how effective it is. I'd like to put a perspex front on, I think it would be interesting to watch it in action. Also I plan to make a draw/bin to make emptying a little easier.

Thanks for looking, any comments appreciated.
 
Back
Top