trouble with dovetails

UKworkshop.co.uk

Help Support UKworkshop.co.uk:

This site may earn a commission from merchant affiliate links, including eBay, Amazon, and others.

tombo

Established Member
Joined
26 Feb 2005
Messages
381
Reaction score
0
Location
Wirral, UK
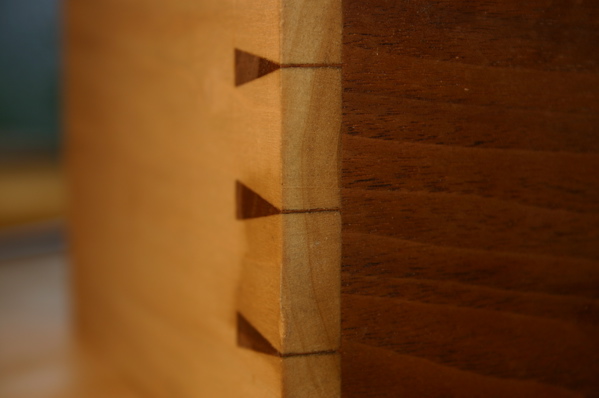
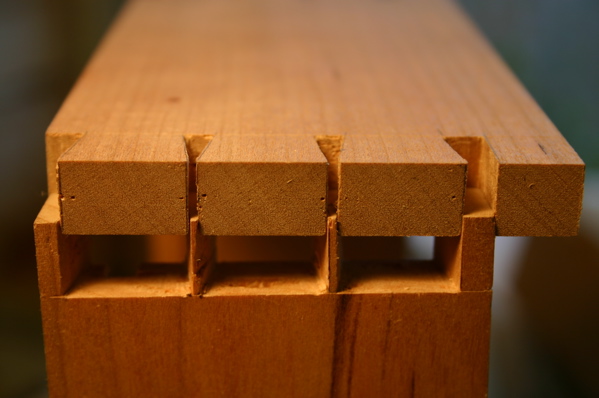
wada ya think about these dovetails, pretty nice aye?
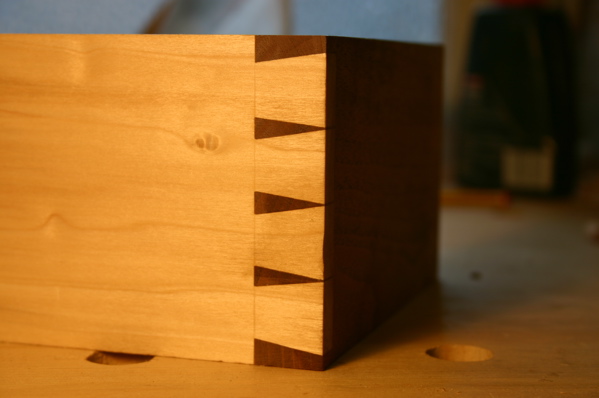
1033614694_b32cd23112_o.jpg

1033614724_58763f43ae_o.jpg


Sadly i did not cut them, they were made by some pushy canadian who forced me into buying some lie neilsen tools :roll: you may have heard of him Rob Cosman :D

I have not had much experience cutting DT's but how hard can it be? RC made it look so easy I can copy his demo piece and I have this DT saw
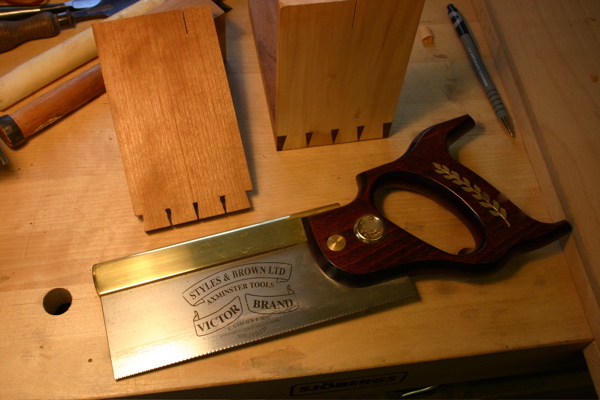
1033614900_ab40105ca0_o.jpg


and this is the result, dont think Rob Cosman has anything to worry about just yet :?
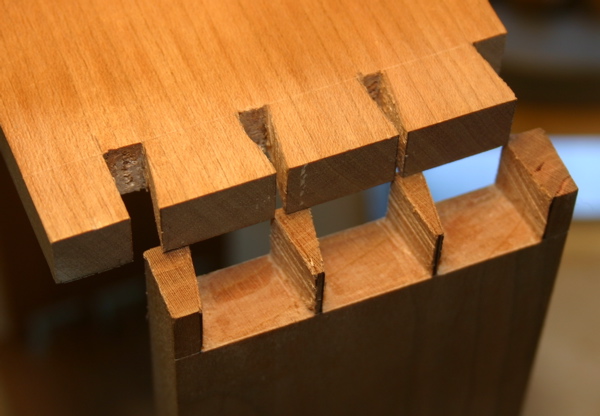
1033614886_a31819400b_o.jpg

1033614744_7c617375bc_o.jpg


As you can be seen the cut left by my saw is ragged, the final photo shows a staight ripcut made by my saw compared to Rob's LN. The difference is pretty clear.
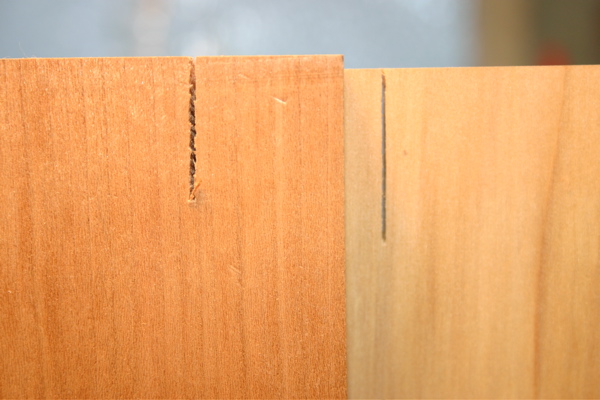
1033614908_bbca592393_o.jpg


so what is the opinion? is it my technique or is it the saw?

Tom
 
Tom
As Javier said, try removing a little set from your DT saw to see if that sweetens things up. Lightly run a diamond stone down each side once and then test. Be careful not to remove ALL the set or you'll have a saw that sticks in the kerf.
Let us know how you get on....
Philly :D
Oh, and just because RC isn't here doesn't mean no-one will mention this! :lol:
 
Tom - inclined to agree, try a finer set with a rip tooth as it does make a big difference, I use the LN d/t saw which is superb - Rob
 
tombo":25i52352 said:
I have not had much experience cutting DT's but how hard can it be? RC made it look so easy I can copy his demo piece and I have this DT saw

Feh. I can make playing the piano look easy.

I know people who make juggling look easy.

Actually, cutting DT's is much easier than playing the piano or juggling (and BTW, I don't like the aesthetics of RC "trick" pins, although I freely admit his skill in making them).

I would recommend reading Ian Kirby's dovetail book. One of the "bleedin' obvious" things he recommends is simply marking a piece of wood with a load of sloping lines (either all left, or all right) 1 every half inch. Then cut them, as well as you can. Then saw the end off the piece of wood and repeat.

Because if you can't cut a straight sloping line, you can't cut a dovetail. So he recommends (at least when learning) practising the separate skills before putting them together to make a joint.

BugBear (waiting for a certain someone to tell me I'm making a simple thing complicated)
 
have to say from a personal point having recently made a dozen or so
dovetails i think it is easier to start with wider pins.

the skill is learning to cut, not in how thin you can make them :?

more importantly, and others may know surely the end with the pin that thin won't be too strong??? also not a lot of glue area :twisted:

it is certainly good to practice cutting the slopes, and also i found the LV guides useful.

good luck

paul :wink:
 
It's actually slightly easier to make thin pins as both cuts are from the same saw kerf, see above.
That's why it's so common in light furniture such as chests of drawers etc.

cheers
Jacob
 
Cosman cuts many hundreds (or thousands ??) of demo joints per year.

He is over 40.

He started serious woodwork before he was 15?

Practice is the main key, and yes I'm afraid your dovetail saw has too much set, but this is easily rectified.

Those shoulder lines look quite good though the 1/4" chisel may have been a bit blunt judging by the end grain separation. Deeper crisply cut shoulder lines are a great help.

I think your results are very creditable, good luck,

David C
 
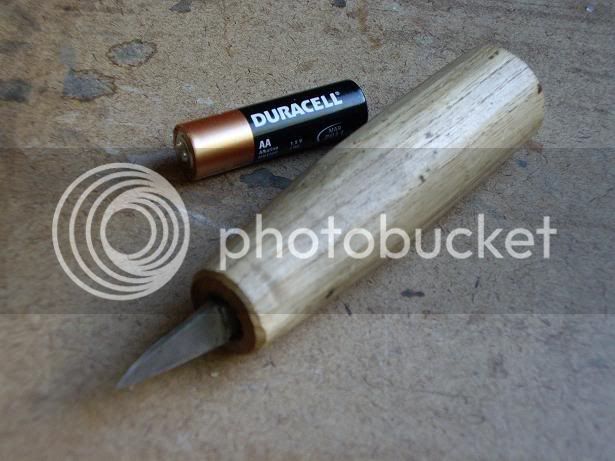
If I could add to Davids suggestion, it's much easier to clean out the bottom of the sockets in the very tight corners with something like this:

2s2d1fgg.jpg


....a homemade knife. Stanley knives in all their various guises aren't a lot of use as often the blades are the wrong shape, they're loose in the handles and the handles are generally too small. This knife blade has been ground down on the Tormek from an old cut-throat razor (top quality steel), left quite broad at the top for strength and tapering to a single bevel with a needle sharp point. The large handle (battery for comparison) means that I can get a really good grip on it and the blade (which is epoxied in) can be honed to an absolutely wicked edge.....just the job :D - Rob
 
woodbloke":nl8w6t4v said:
If I could add to Davids suggestion, it's much easier to clean out the bottom of the sockets in the very tight corners with something like this:

As long as you say all the way down the (knifed) shoulder line, the corners are created directly by sawing, and any waste is at least a kerf width away, assuming we're discussing through dovetails.

Your knife would be useful for freeing shavings pared from the side of the dovetails, if one hadn't sawn accurately.

Of course my sawing is always perfect, so I don't need such a thing. :whistle:

BugBear
 
BB - as you say, the knife is used along the shoulder line to just clean up the last little slitherino and make the corner really sharp...and it works too :lol: I usually tuck the board under me armpit :shock: hold very tightly with the left hand and pare the corners very carefully - Rob
 
BB,

A small theoretical problem for you.

What shape is the bottom of a saw kerf?

Squareish?? If rip filed.

Which edge of the kerf are we supposed to stop exactly on the gauge line of the sloping dovetail cuts? (With pins this seem possible but my sawing is not up to this, hence the release cut).

A problem which has always exercised this anxious pedant.

best wishes,
David
 
as an amatuer david i would suggest that it is the outside of the kerf
depending on which side you are cutting.

in theory surely, if it were the inner one (IE the one nearer the side of the of the dovetail) then the kerf would be lower than the shoulder line :?

paul :wink:
 
David C":1xf14xpe said:
BB,

A small theoretical problem for you.

What shape is the bottom of a saw kerf?

Squareish?? If rip filed.

Which edge of the kerf are we supposed to stop exactly on the gauge line of the sloping dovetail cuts? (With pins this seem possible but my sawing is not up to this, hence the release cut).

A problem which has always exercised this anxious pedant.

Ah hah. A fellow theorist. Practical people should look away now.

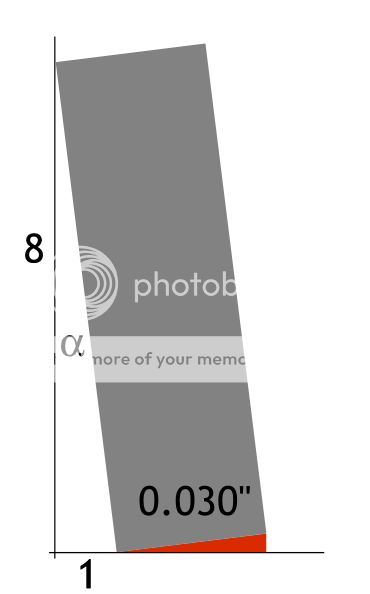
kerf.png


Assuming a saw plate of 20 thou, and 50% set (quite generous) I'll assume a kerf of 30 thou. (0.030 inch).

If we're working in hardwood on traditional 1:8 DT's the tail cuts are at 7.1 degrees (to the vertical), and thus the base of the kerf (assumed to be a straight line on a rip filed saw) is at 7.1 degrees to the horizontal.

Thus we have a right angled triangle (shown red in the diagram, just under a gray saw), who's hypoteneuse is 30 thou, and who's angle is 7.1 degrees.

The opposite, which is the difference in height between the two sides of the kerf is thus 30 * sin(30) = 3.7 thou. In hand work, I can live with this.

I will put up a diagram when photobucket comes back on line. (done)

BugBear
 
David C":rawwqb53 said:
BB,

A small theoretical problem for you.

What shape is the bottom of a saw kerf?

Squareish?? If rip filed.

Which edge of the kerf are we supposed to stop exactly on the gauge line of the sloping dovetail cuts? (With pins this seem possible but my sawing is not up to this, hence the release cut).

A problem which has always exercised this anxious pedant.

best wishes,
David
Whatever the shape, in trad work the cut is always taken just far enough or a bit further. So for the sloping side of a tail the cut must to go beyond the line to be complete, or there would be a little corner bit (BB's red bit, see above) to take out with a scalpel or something (or to ignore). How far you go depends on skill, or speed in cheaper work where the cut will go well past.
You get a similar thing with drawing especially with ink - the lines at a corner look much neater if they are extended just enough beyond the corner itself.

cheers
Jacob
 
bugbear":3fmya3vi said:
Ah hah. A fellow theorist. Practical people should look away now.

Assuming a saw plate of 20 thou, and 50% set (quite generous) I'll assume a kerf of 30 thou. (0.030 inch).

If we're working in hardwood on traditional 1:8 DT's the tail cuts are at 7.1 degrees (to the vertical), and thus the base of the kerf (assumed to be a straight line on a rip filed saw) is at 7.1 degrees to the horizontal.

Thus we have a right angled triangle (shown red in the diagram, just under a gray saw), who's hypoteneuse is 30 thou, and who's angle is 7.1 degrees.

The opposite, which is the difference in height between the two sides of the kerf is thus 30 * sin(30) = 3.7 thou. In hand work, I can live with this.

Well that cleared that up, then :? :? :? :lol:

Good job you weren't asked for something complicated :wink:

Cheers :wink:

Paul
 
David C":1ooqn4vq said:
snip . . What shape is the bottom of a saw kerf? Squareish?? If rip filed. . . . snip

Assuming that anyone can have a bash at answering this and not just BB :lol: I would hazard a guess that yes if the saw is rip filed then the bottom of the cut will be square.

This is my attempt at an illustration.
73455205906155caf878e46c9a2d04786e00dd9677c55f0d3114f720.jpg


As I understand it a rip cut saw has no or little fleam angle and so the bottom of the cut should be more or less flat. I guess it all depends on how well your saw has been sharpened as some other posts here suggest that some saws are not sharpened correctly.

FWIW, I have found Peter Taran's website a mine of information on this subject.

Steve
 

Latest posts

Back
Top