Thin but deep mortise - advise needed

UKworkshop.co.uk

Help Support UKworkshop.co.uk:

This site may earn a commission from merchant affiliate links, including eBay, Amazon, and others.
Helvetica":2eiur0ix said:
I think this is it, I couldn’t get the drill holes close enough to meet, so the ¼” chisel is struggling to remove material going full width. I broke out the side using the 1” chisel, trying to remove the inside long wall of the mortise. They are sharp - 6000 whetstone.

I think if the pillar drill could make joined cuts, that is where the circles overlap, I could just clean the walls. I find the bit is drifting into the next hole. I’m using a hss bit because I find the wood bit finish is too rough. What would a good quality drill bit - or could I use a router bit and would it give a better cut?

I should have said the mortise width is 6.4mm not 7, should have specified. I’m using it to match the groove made with my axcaliber tongue and groove router bit set.

When you say you "blew out the side" of the mortice - I presume you mean you split the piece of wood apart, rather than chiselled in such a squiffy way it came out the side, or that you chiseled all way through and left a messy exit hole ?

You mention matching a groove - if you are making a framed panel, with a groove all round for the panel, and M&T corner joints, cut the mortices first, not the groove. It makes the morticing more work, but if you try to cut a mortice within a groove, if the chisel is slightly too wide you'll split the workpiece apart.

You mention a 1" chisel - this is presumably being used to clean up the sides of the mortice ? Not normally needed, and go steady. Don't try and remove the bits between the drill holes by using a wide chisel with it's edge along the grain - you will split it.

Actually, IMHO it is better to forget the drill, use a proper mortice chisel and a big mallet. Again, chiselling into a drilled hole in the area where the hole is narrower than the chisel is more likely to lead to splitting.
 
I suggest that the reasons for a joint are to locate the mating pieces and provide a large area for glueing.

A lot of cabinet construction folklore goes back to the days of animal glue. Large, deep mortice and tenons were the order of the day because animal glue could dry out and weaken with age. So wedging or cross dowels to add strength were ways to get by. With modern glues may I humbly suggest a stopped tenon at some manageable lesser depth would be perfectly acceptable.
 
ArferMo":xhp8g3nd said:
........ .. cross dowels to add strength......

I'm not sure this is so. In furniture making, dowels (pegs) functioned instead of clamps as the glued dried, and had a decorative aspect. In timber framing they acted to hold the two parts together (ie in place of glue). In each case, although they helped reduce movement they actually functionally weakened the joint. Just an opinion, of course.

I take your basic point, though, that it's an unusual circumstance that needs a deep M&T these days.
 
MikeG.":38ugtr9w said:
I'm not sure this is so. In furniture making, dowels (pegs) functioned instead of clamps as the glued dried, and had a decorative aspect.

Chairs? Very common to add a dowel or two through the tenons behind the seat - the ones every one rocks on.
 
Yep, to pull the joint tight whilst the glue dries. With the angles involved these joints can be hard to clamp. The chair would be stronger without them as they produce a weakness in both the leg and the tenon.
 
MikeG.":1sanlzhl said:
Yep, to pull the joint tight whilst the glue dries. With the angles involved these joints can be hard to clamp. The chair would be stronger without them as they produce a weakness in both the leg and the tenon.
You may use a dowel to pull joints up. You can't generalise to everywhere else. I'm thinking of a production environment where clamping wasn't an issue, (jig frame with air rams), but dowels were still specified. Are you really suggesting a glued dowel adds weakness; think about that for a moment. Remember glue lines are stronger than the wood; if you pull two properly glued surfaces apart they always break somewhere other than the glued surface.

You may be confusing the times you've seen a tenon having the section a dowel shear away. That is simply because the joint was overloaded. I think the plain joint, without a dowel would have failed at a lesser load.
 
ArferMo":bqcpid64 said:
......You may use a dowel to pull joints up. You can't generalise to everywhere else.

I wasn't. I was talking about the historical origins of the draw-bore pegged joint.

I'm thinking of a production environment where clamping wasn't an issue, (jig frame with air rams),

See above. I'm a traditional woodworker, using mainly hand tools, so my interest isn't in modern practise.

Are you really suggesting a glued dowel adds weakness

Yes. They produce a weakened tenon, and weaken the piece with the mortise.......is my working assumption, having not tested both to detruction.

think about that for a moment. Remember glue lines are stronger than the wood

Ah, you jumped centuries. See my first answer, above.

if you pull two properly glued surfaces apart they always break somewhere other than the glued surface.

They will now, but not in the 19th century, and earlier.

You may be confusing the times you've seen a tenon having the section a dowel shear away. That is simply because the joint was overloaded. I think the plain joint, without a dowel would have failed at a lesser load.

I predict that when an independent third party tests this you'll be wrong. I won't be surprised if I'm wrong, but neither will I care very much.
 
@ MikeG
Well, to go back to my initial statement; animal glues when dried out became brittle with age and could lead to premature joint failure. The cross dowel was a way of ensuring a mechanical fixing to the joint. So failure wouldn't be absolute. The dowel may well have helped pull a joint together whilst glueing, but more likely it was inserted to tension the tenon and continue to mechanically hold it tight after material shrinkage. But I don't think the two use-cases are mutually exclusive, both are plus points for using a cross dowel. And I am sure craftsmen of old saw it that way too. PS green oak barns are assembled with mortice and tenons and all joints are pegged and not glued.
@ Phil Pascoe in that situation the joint was over-loaded. You can't believe it wouldn't have failed without a peg? Also if glue has been applied properly to all mating surfaces, the the intersect with the dowel is stronger than the wood (see earlier comment).
 
ArferMo":g5k3t0qs said:
...... PS green oak barns are assembled with mortice and tenons and all joints are pegged and not glued.

I've been building and specifying green oak structures my whole working life. For example.

@ Phil Pascoe in that situation the joint was over-loaded.

How else do you test a joint other than to the point of failure?

You can't believe it wouldn't have failed without a peg?

The claim is that it fails sooner because of the peg, not that it wouldn't have failed.

Also if glue has been applied properly to all mating surfaces, the the intersect with the dowel is stronger than the wood (see earlier comment).

This is only true to an extent. The cross grain/ end grain elements of the join will be nowhere near as strong as the wood. Also, your argument that the glue is stronger than the wood makes your other argument, that you need wood to strengthen the join, moot. You can have one or the other, but not both.

Besides all that, as Phil says, when a glued pegged joint fails you will see a split through and around the hole. In other words, the hole is a weakness. When pegged joints fail (structurally rather than through rot) in oak framing, it is often the tenon which breaks, generally along the grain outside the peg hole.
 
MikeG.":1kgg1qq0 said:
... When pegged joints fail (structurally rather than through rot) in oak framing, it is often the tenon which breaks, generally along the grain outside the peg hole.

Don't you green oak guys use a tapered peg? I suspect that is the cause of your problem; try less taper. Or less welly behind the mallet.
.
 
ArferMo":2pf1jzg1 said:
........Don't you green oak guys use a tapered peg? I suspect that is the cause of your problem; try less taper. Or less welly behind the mallet..

No, they're not tapered. They may be pointed, but that's only to ease the end of the peg through the mis-aligned holes. After that, it doesn't matter how hard you hit them, or how far. Some joints fail at that point (it's generally pegs breaking at that point, rather than the joint) because the holes have been mis-aligned a tad too far. And I wasn't talking just about my joints. I've taken apart 300 year to 800 year old joints, and they often have failed well into their life when the building has moved.
 
Drawbores should be tapered. It was an apprentices job to plane off fingertips. Foreman always said it was the only way to do it(by hand with a blockplane) untill i made a router jig to make the drawbore in a fraction of the time with repeatable consistent accuracy. They should be tapered to pull up and hold the joint firm.

Sent from my SM-G960F using Tapatalk
 
For furniture, yes, but that's not what I was talking about, which was green oak framing. Early pegs were riven then cleaned up with a draw knife and a point put on. They were roughly straight sided. Later ones were belted through a metal tube/ pipe on a shaving horse. I've taken apart dozens of ancient joints and none of the pegs were tapered. Some of the early ones were nearly square in section (square peg in a round hole) though, demonstrating that these were seasoned pegs going into unseasoned timber.

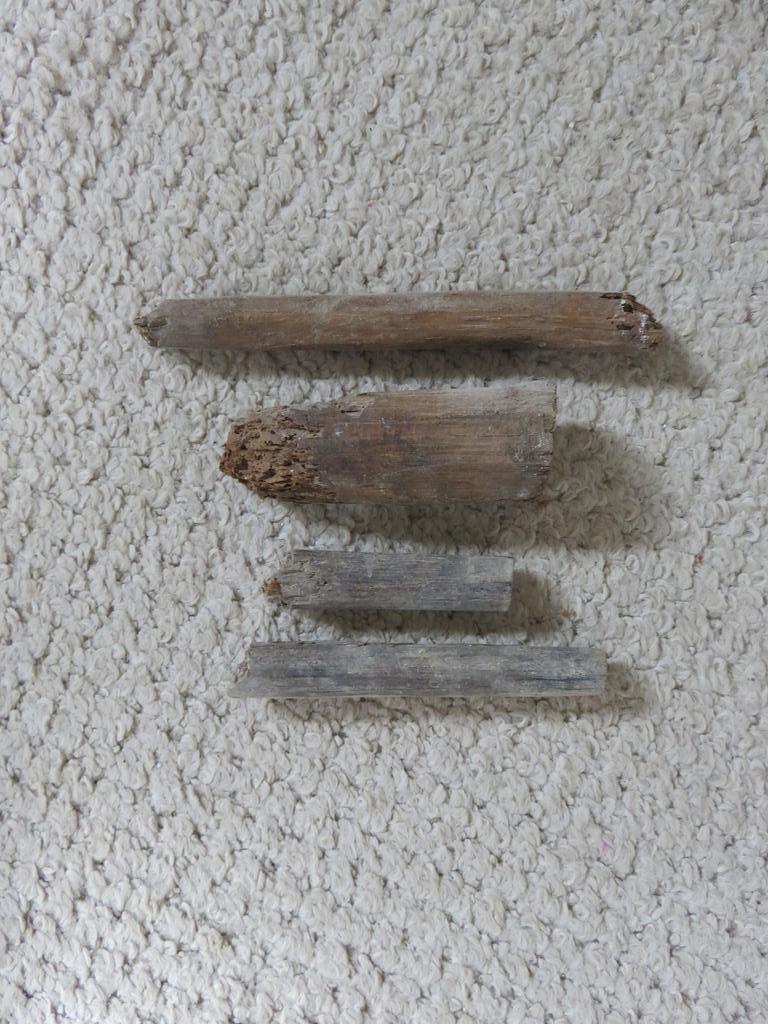
Here are 4 I saved from this house, dating from 1695 to 1705:

DFMmgZE.jpg


The large one was pegging a face halved scarf joint in the sole plate and is about 35mm in diameter. They all have facets showing they were made with a draw knife.
 
MikeG.":33zg9074 said:
. I've taken apart 300 year to 800 year old joints, and they often have failed well into their life when the building has moved.
It's interesting that the wheelwrights and wainwrights of old recognised the inordinate stresses and strains on wheels and wagons and adapted their initial timber only solution to a hybrid one using iron. Iron straps and iron bolts were frequently deployed around a joint or other load bearing surface.

In the timber houses where you've found failure it shows that the craftsmen of old were still learning their craft, but at a slower rate than the wheelwrights. Because houses failed more slowly and the original craftsmen were dead when the fault came to light.

But a point of failure at a peg doesn't mean the peg introduced the weak point. Without a peg the otherwise unsecured tenon would fail anyway. If, as you say, pegs cause failure at insertion, then that's operator error or wrong timber choice. Heart Oak is used for its superior strength across the grain provided by lignin in the medullary vessels that are transverse to the grain direction.

The Ancient Egyptians used pegs on chests to hold timber parts together as did medieval craftsmen before glue technology appeared. Pegs are fine when used appropriately and their use, historically, goes beyond holding mating surfaces together while the glue dries - your original assertion.
 
ArferMo":uaxlkk0j said:
........Pegs are fine when used appropriately and their use, historically, goes beyond holding mating surfaces together while the glue dries - your original assertion.

You've misunderstood my original assertion, entirely. Pegs are not necessary in glued joints, and they may even weaken them. However, in unglued joints, or in glued joints which will become unglued because of the poor quality of the glue, they are obviously critical to the success or otherwise of the joint.

You've also misunderstood joint failure in buildings. For a start, many buildings from the 17th century onward (earlier in some cases) used blacksmith-made brackets and straps to hold vulnerable pieces together, or as repairs for previous failures. Many or most failures were as a result of either lack of adequate maintenance (limewashing lime panels, for example, or replacing broken roof tiles) leading to local rotting, or because of ignorant changes made internally (tie beams sawn in half after hall houses had a first floor added are an absolute classic, but there are many others). Properly maintained buildings in their original unaltered state didn't generally suffer from failure unless they had the sole plate directly on the earth (rather than a plinth), so your claim that housebuilders were "still learning their craft but at a slower rate than wheelwrights" is just flat out wrong. The junction between secondary joists and a bridging joist, for instance, evolved over the centuries into one of the most elegant and sophisticated joints in the western woodworking world, employing principles of structural engineering that wouldn't be codified until centuries afterwards.
 
So far the best solution has been my Ray Iles ¼" / 6.3mm bevel chisel after drilling some barely overlapping holes with a 5mm wood bit (pillar drill doesn't have the accuracy for even a 6mm bit - Lidl pillar drill has it's limitations!).

I'm going to try a straight cutter on my router table for speed, but I can only find a 25mm cutter. The cutter is the same diameter as the shaft so hopefully I can use it at two depths, and from both sides, to get a really nice mortice. If it doesn't work well, or save time, I will buy a narex ¼" mortice chisel and just mallet it out by hand. It is definitely slower by hand, but not by as much as I thought.

I appreciate the discussion about dowels. this is a sideboard door, not a rocking chair, not sure it's going to undergo the same stresses, especially with the fact that I am allowing for movement of the panels in the rails. I still might though. Would you recommend offsetting the dowel hole for a draw bore? by how much, 1mm?

chisel.jpg

chisel2.jpg

pillar-drill.gif
 

Attachments

  • chisel.jpg
    chisel.jpg
    150.4 KB
  • chisel2.jpg
    chisel2.jpg
    135.4 KB
  • pillar-drill.gif
    pillar-drill.gif
    925.2 KB
Helvetica":18d17kxq said:
..... Would you recommend offsetting the dowel hole for a draw bore? by how much, 1mm?......

If you don't offset it it's not a draw-bore, just a bore. :) I don't know what your wood is, but even so I'd be offsetting a little more than that, I reckon.
 
Something I would suggest that is supposed to prevent breaking out the sides is to clamp the workpiece. A good way is to use a handscrew across the work and clamp that to the bench. Or use a block of wood each side, with one g-cramp to hold them together and another to hold down to the bench.
 
Back
Top