Storage chest

UKworkshop.co.uk

Help Support UKworkshop.co.uk:

This site may earn a commission from merchant affiliate links, including eBay, Amazon, and others.

motownmartin

Established Member
Joined
10 May 2007
Messages
2,147
Reaction score
0
Location
Enderby, Leicester
Every year we have the same problem, the cushions for the outdoor furniture end up scattered around the sun lounge when it rains, the thing is that it's nice to sit in the sun lounge when you can't sit outside but there are no seats to be found, as the first pic shows
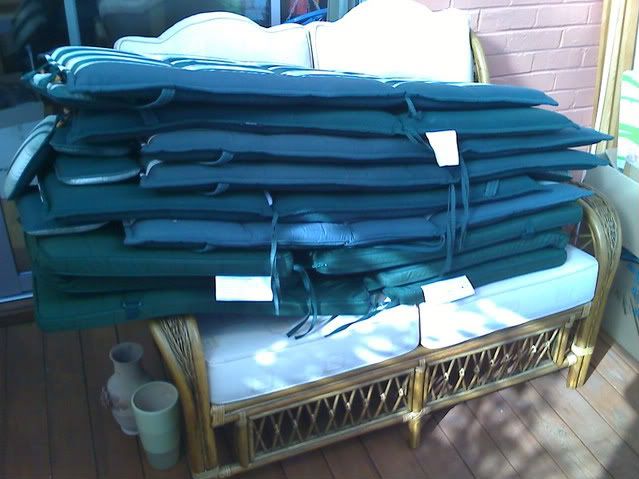
09-10-08_1232.jpg


So I thought about making a storage chest, like this
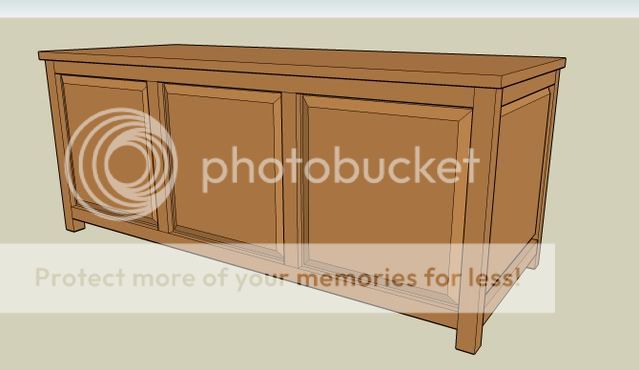
chestbuild.jpg


The dimensions of this are 5 feet by 2 feet by 2 feet, does anyone see any problems making a large chest like this out of Oak (apart from the cost)
 
Nice time to start this project, make sure it has plenty of ventilation, as you do not want any molt or funges, as these seats are always damp
 
Mcluma":tkozchxu said:
Nice time to start this project, make sure it has plenty of ventilation, as you do not want any molt or funges, as these seats are always damp
Good point, I think that i'll put holes in the bottom.
 
An Oak lid may be a bit heavy, you could make a full length drawer which means you wouldn't need to remove what you place on top to get the cushions out. :D
 
No, no problems......you'll be fine with that design. All I would say is the normal.....don't glue your panels in fully........I would glue them about a third of their width in the centre of the end-grain sides (if you follow).

I reckon this design would really benefit from a series of stop-chamfers around all the panels....you maybe had them planned anyway, I don't know.

Take care with the lid design to allow for expansion etc.....any number of ways of achieving this. I would certainly keep it simple and have a lid rather than drawers. Also, assume that people will sit on it......maybe have a hidden middle "leg" to prevent any bending as a result of your 20 stone neighbour perching on it. You could put a skirting around the base between the legs to do the same job, and to prevent dirt and dog hair accumulating underneath.

The only other thought is kids fingers. If there are kids around, maybe you might space the lid off the frame so if it slams down it doesn't chop digits off.....or you could have some sort of stay that requires a second movement before allowing the lid to close.

This should be a very nice project, and I look forward to seeing the photos.

Mike
 
Thanks for your input Shultzy and Mike, I don't think i'll go with the drawer idea, I want to keep it as simple as possible, could possibly put stays on the lid though.
 
Mike Garnham":1dklykob said:
.I reckon this design would really benefit from a series of stop-chamfers around all the panels....you maybe had them planned anyway, I don't know.

Mike
Mike, what are stopped chamfers :?

This is how I designed the panels, I thought this would allow them to move seeing that the grain would be the opposite of the top and bottom rails

panel2.jpg
 
Martin,

stoppped chamfers are chamfers that don't reach the end of a piece of wood. They are a purely decorative feature, but have quite an effect in that they remove viusal "hardness" and break-up lines, creating interest very easily.

I haven't worked out how to put arrows on my photos yet, but if you look closely at the legs and around all the panels on these two oak pieces I made recently, you will see stopped chamfers doing their thing:

2930361673_da4925f905_b.jpg


The other minor change I would suggest to you would be to bring the corners (legs) out, so that the frames around the panels don't sit flush with the face of them. This is another device to create interest. There are design choices to be made at every turn, but if you are going for a classic or even mediaeval look then creating depth in the faces of the work is really important. We are only talking about 4 to 8 mm. Again, you can see that in the photo.

The movement room you have is fine........it is the gluing (or not gluing), which is the most important factor. I always glue my panels in, but only in the middle of the panel end-grain ends (as I said in my first post above).

Mike
 
Hi

If my arithmetic is right your panels are going tobe about 18" wide, I would groove them a bit deeper into the uprights to allow for shrinkage across that width and also finish the panels before gluing up, so that the unfinished area does not show if thy do shrink.

Regarding childrens fingers and the heavy lid. Having the top recessed so that there is a half inch gap between the lid and the box, except for at the corners and mid way would make injury less likely and also provide ventilation.

Chris
 
Mr T":3plm0dez said:
Regarding childrens fingers and the heavy lid. Having the top recessed so that there is a half inch gap between the lid and the box, except for at the corners and mid way would make injury less likely and also provide ventilation.

Chris
Hi Chris, I guess you mean something like this

chestbuild1.jpg


Seems and looks like a decent idea
 
Mailee,

yes, they are mine. I finished the telephone table about 3 or 4 months ago I reckon, before I started posting on here. They were posted on Get Woodworking.......thought you might have spotted them there!!! I didn't bother posting them here because going through my entire "back catalogue" could be a bit tedious!!

Martin,

if you follow my suggestion of making the corner more of a leg by bringing it slightly forward of the horizontal panel members, then a logical extension of that is to simply have it half an inch taller than the panel......creating the gap you are after. I think I mentioned this in my first post. Remember your 20 stone neighbour though, and also put some support in the middle.

As for Chris's point, he is right. I generally cut a 12mm groove and set the panels in 10mm.

Mike
 
Mike Garnham":3pzpeath said:
I think I mentioned this in my first post. Remember your 20 stone neighbour though, and also put some support in the middle.

As for Chris's point, he is right. I generally cut a 12mm groove and set the panels in 10mm.

Mike
Yes you did mention it Mike, I just didn't understand what you meant :oops:
 
Martin,

there is something else you might like to have a think about......

If your chest is going to stand against a wall, as they generally do, you might consider the location of the hinge. If you put the hinge in the normal place, then the lid will not be able to open much past the vertical before it hits the wall, and will probably fall forward. Your only option then will be to pull the chest further from the wall.

An alternative approach you might consider is to fasten one of the boards that might otherwise have been part of the lid to the chest.......overhanging as though it were part of the lid.....then have the lid hinge off this. This could push the hinge point forward by as much as you want, say 4", which would be plenty enough to allow the hinge to stay open whilst you are hauling out your cushions.

Let me explain that again, because I am not sure I would understand that if I hadn't written it myself!......if the lid were to have consisted of 5 boards, say, make it of 4 instead, and fasten the 5th to the top of the chest at the back, as though a continuation of the lid. The lid (now 4 boards wide) would hinge off this fixed piece.

Just a thought!

Mike
 
I understand Mike and you've just set a light bulb off for me. I have a toy chest on the bench (so to speak) ATM.

Thanks
 
Tom,

even more important for yours, as it is likely to be used by apprentice humans unused to the effects of gravity!


Mike


Worst of the lot are coopered lids.
 

Latest posts

Back
Top