Spiral Candlesticks

UKworkshop.co.uk

Help Support UKworkshop.co.uk:

This site may earn a commission from merchant affiliate links, including eBay, Amazon, and others.

Wood spoiler

Established Member
Joined
7 Sep 2010
Messages
724
Reaction score
0
Location
Rural North Hampshire
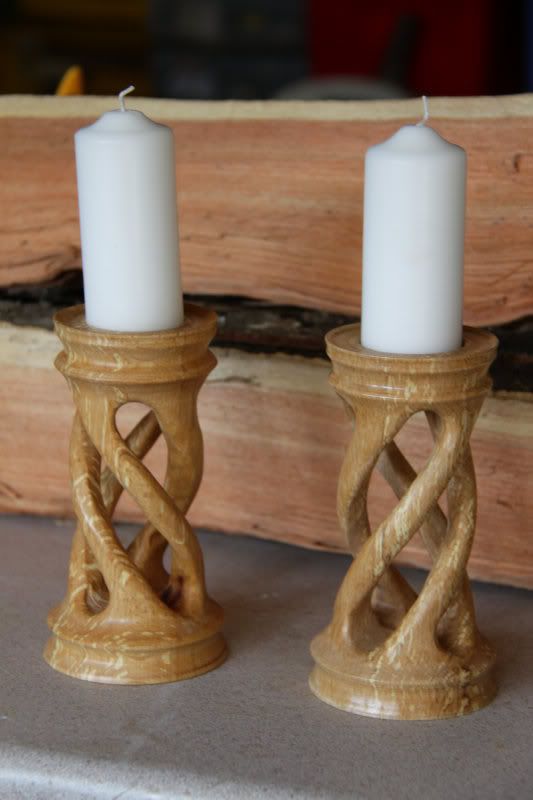
I have been asked for details of how to make the spiral candlestick.

With no claim to originality whatsoever, the design I loosely followed can be seen here.

http://www.waterfront-woods.com/Article ... Candle.pdf

It is fitting that John won with his contribution, as he was the kind gent that first shared the link with forum last year.

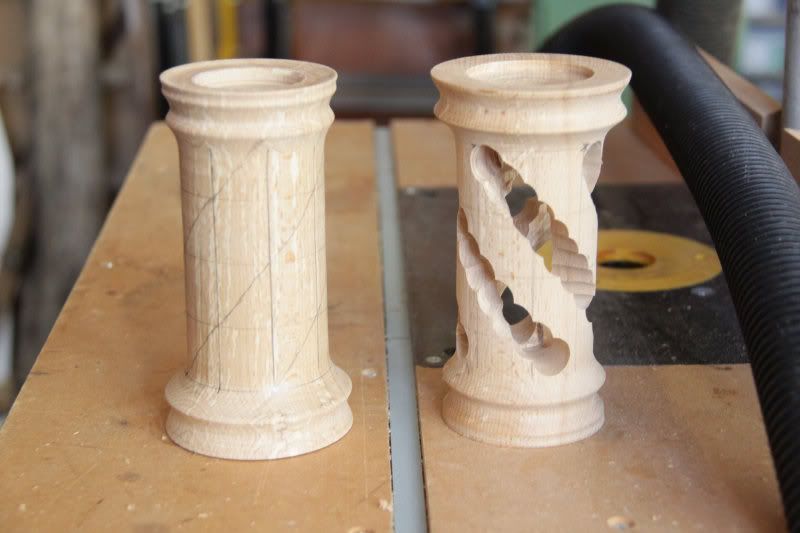
I have done the one piece version but found the three piece version i submitted in the February Challenge, by turning the column with a spigot each end to fit into the socket on the top and bottom, more satisfying, in the absence of stunning wood to do it in.

If you fancy having a go please be aware that it does involve substantial sanding (that does include understating the case!) my tip is to buy some grippy gloves to save the hands.
 
Hi Woodspoiler, I also did a barley twist from a pdf file I found on the net. I also agree with wearing heavy gloves, as I still have the scar from using a wood rasp to make my candlestick. Loved the clean lines of yours.

Doug
 
I used a long strip of abrasive held at each end with artery forceps. It does 2 things 1. gives you something to hang onto and 2. something to hold any gashes together and stem the gush of blood :oops:

I have to agree with Colin that there is a hell of a load of sanding needed to get it from this

Spiralcandle1.jpg


to this

Spiralpair.jpg


But well worth the effort and I have sold a pair of the above ones too. The new owner bought them after seeing them on a forum and was well pleased..

Nearly forgot! I don't use a rasp for the outer bits. A 1/4" drum in my dremel and flex drive really takes the back out of a lot of it
 
Hi John, did you drill the spirals out to start with, by hand or on a pillar drill? Thats the bit I rasped. Fully agreed with George about your entry.

Doug
 
Pillar drill Doug with a 1/4" forstner if I remember correctly.

I marked it up on the lathe because I have an indexing ring on my Axminster ???80 chuck and that's the bit that needs to be accurate (sorry I can never remember the names of the bits I get for very long, unless they don't work).

I made a little vee block, held in the drill vise to hold it steady and hey-ho away we go! Just set the drill press to go just past the center. As I said, the left hand thread is easier and cleaner than the right hand jobbie, because of the grain tearout due to the direction of cut.
 
As I have said on another thread. Most of the sanding is done with the piece held in the chuck on my lathe and my Dremel suspended on my home made support with a flex drive and a 10mm sanding drum in the hand piece. With the vac hose fixed under it to collect the dust. It takes a hell of a load off of the sanding. But you still have to get in there with a strip of abrasive through the spirals to round off the inner faces. That's what takes the time and effort, but it really is worth it.

If/when I do another I will see if I can remember to do a work in progress. Promiss, 'onest! :)
 
I have one of those 'capstans' in my chuck draw and that is where it will stay :shock: . I got part way through doing a twist that way and it was HARD work even on some pine! I kept the part finished bit to remind me not to go that way again. If you did yours that way then I'm even more impressed!!

It was not helped by the arthritis in my hands. That stops me putting very much push pressure on any tools, including hand saws, planes, etc. I'll stick to my Forstner bits :mrgreen: :mrgreen:
 
Hi John, yes it was hard work, but my hand has almost healed completely now, from using the rasp (will be drilling out the next one). Now on to platter number 2.

Doug
 

Latest posts

Back
Top