Sorby Pro-edge belts

UKworkshop.co.uk

Help Support UKworkshop.co.uk:

This site may earn a commission from merchant affiliate links, including eBay, Amazon, and others.
Update:- You convinced me and I put my money where my mouth was, so to speak, and got the RS PE a couple of weeks ago. Thanks for the advice.

If you're still looking to sell on a couple of those trizact belts to get back some of your initial outlay, I'd be very interested. I'm also considering ordering an MX60 micromesh belt (equivalent of P240 grit European standard) and maybe a 150MX too (P360 Equivalent). The MX range is the ones that they do specifically for steel finishing, and I thought they might make good intermediate touch up belts, given that micromesh seems such high quality and to last well. The grits go down to 3 micron, but I think that may be getting a little excessive!

If anyone is interested, I could see about making a larger order and combining postage, as the only supplier I can find of the 50mm x 760mm belts is the manufacturer themselves in the USA.

If I'd be wasting my time with the idea, feel free to let me know :)

Nic.
 
i have some trizact belts left if you want some- drop me a PM. I have the A6, A16 and A30, which are the grits supplied by Sorby.
 
Random Orbital Bob":3e38u2bi said:
The PE really solves that problem and yet seems to be better at keeping the edge cooler than a regular dry grinder. It does heat up but my experience is it heats up a lot less than dry grinders.

+1

In hundreds, maybe thousands of grindings I've never blued a tool with a Pro Edge. The only criticism I'd have is that you can sometimes end up with a big gap between the tool rest and the belt, which can make life tricky with short tools.
 
I use a Pro-edge for grinding and shaping a bevel with a coarse grit, but do the rest by hand on oil stones
 
I've been working away in my spare minutes, sorting my turning tools on the Pro Edge and setting them up to the very slightly different grinding angles that are standard with the Sorby guides, rather than fettling away trying to keep the exact grinds I'm used to and I'm REALLY impressed. The huge job of reshaping my big bowl gouge was done in about 45 minutes, after spending an age roughly working out the bevel settings that I wanted.

It occurs to me, that RS sells the PROSET tool for setting what Tormek calls the TSO or Tool Stick Out - the amount of the bowl gouge protruding from the jig, to produce a particular grind angle. Tormek has their own tool that does the same, but wouldn't give the right readings for a flat belt. Could anyone take pity on me and list the stick-outs for the Pro Edge in MM scale, so that I can knock up a bench-edge scrap guide tomorrow, instead of spending another £20+ (inc VAT and Postage to the "Highlands") to get the original guide in a week or so, to then copy and consign to a drawer?

It may be a cheeky thing to ask, but I think it's more than a little cheeky to not include that setting tool in the £330 deluxe version of the kit. The guide's measurements are listed by the angle they achieve, rather than the stick-out, so I can't simply use a photo to guide me.

Much appreciated if you can help.

Nic.
 
nicguthrie":1460cwyc said:
I've been working away in my spare minutes, sorting my turning tools on the Pro Edge and setting them up to the very slightly different grinding angles that are standard with the Sorby guides, rather than fettling away trying to keep the exact grinds I'm used to and I'm REALLY impressed. The huge job of reshaping my big bowl gouge was done in about 45 minutes, after spending an age roughly working out the bevel settings that I wanted.

It occurs to me, that RS sells the PROSET tool for setting what Tormek calls the TSO or Tool Stick Out - the amount of the bowl gouge protruding from the jig, to produce a particular grind angle. Tormek has their own tool that does the same, but wouldn't give the right readings for a flat belt. Could anyone take pity on me and list the stick-outs for the Pro Edge in MM scale, so that I can knock up a bench-edge scrap guide tomorrow, instead of spending another £20+ (inc VAT and Postage to the "Highlands") to get the original guide in a week or so, to then copy and consign to a drawer?

It may be a cheeky thing to ask, but I think it's more than a little cheeky to not include that setting tool in the £330 deluxe version of the kit. The guide's measurements are listed by the angle they achieve, rather than the stick-out, so I can't simply use a photo to guide me.

Much appreciated if you can help.

Nic.
45 minutes!!! Why so long? 5 minutes max IMHO.
Things are a lot cheaper, quicker and easier freehand - particularly on the Pro edge which has a tool rest with a range of set angles - but the angles aren't critical as long as the thing is sharp. First few goes may be a bit untidy but after a bit the results are just as good as anything you do with a jig.

The Pro edge is a handy bit of kit but any belt sander or linisher will work as well but slightly less conveniently. The Bosch GBS75 is good because you can just sit it on the bench upside down - no further fiddling required.
 
Sorry nic, I don't have that part. Haven't done the bowl and spindle gouges yet.
 
I don't have the pro-set either Nic but I'll give you one recipe which is what I use for a detail spindle gouge leaving a 35 degree bevel and a classic fingernail grind and its:

P = 75mm (that's protrusion or stick out as you call it)
knuckle setting #3
distance from back of collar to back of elliptical grinding jig = 34mm
hole one in the elliptical grinding boss

That produces a perfect detail gouge every time. If your tools are well out you should do the horse shoe technique first to grind off the tops of the wings and true up the edge.....do that with the platen set at 45 degrees or a bit less and then do the bevel grind back to that line evenly all round.

On the wider issue of Sorby publishing "recipes" for different grinds. I've been after them for that for some months now and they have promised to publish something a la the Tormek guide but nothing just yet. I'm pretty hopeful they will do this because about a year ago a chap called Jeff Farris defected from Tormek USA to Sorby and he will bring a lot of the marketing expertise to Sorby. Underneath it Sorby are a somewhat fuddy duddy old Yorkshire firm that don't really understand all this modern stuff like t'interweb and I believe Jeff will bring a breath of fresh customer facing air to them in the coming years. He and I are friends and I'm in dialogue with him about this.
 
Jacob"} said:
45 minutes!!! Why so long? 5 minutes max IMHO.
[/quote]

OK Jacob, you asked for this... :) As it was my first time using the thing, I was taking it very carefully, the tool I was working on was a cheap end-of-stock old Sheffield HSS steel narrow flute bowl gouge with an outside diameter of about 3/4 inch and a U shaped factory bevel of something like 70 degrees - it was a huge amount of steel to remove, which is why I gave up on my beloved Worksharp for the turning tools. Also, just for added challenge, my genetic thing is flaring up at the moment and my grip is awful, I need two hands to pick up a 2 litre bottle or a full kettle, or the tendons etc in the palm area of my hand protest to the point you'd think they were snapping. That made a chunk of steel like that gouge pretty tough to manipulate finely at those angles and hold in place - You asked! :)

That all said, is why I was utterly chuffed at the pro-edge. I'm pretty unflappable in general, and it's rare to be this impressed at such a fairly simple tool, so thanks for the recommendations folks.

R.O.B. Thanks v much for the dimensions. Protrusion is a far better word for it - the silly TSO thing is how it's referred to in the Worksharp guide to all the Tormek jigs, so I assumed it was a Tormek thing, but must just be an Oregon, USA phrase thing from the guys at Darex. How would you suggest changing those settings to produce a gouge that was more "slightly swept back traditional bowl gouge" than detail gouge? I'm guessing shorten the protrusion to increase the grind angle, leave the rest pretty much alone? Just for clarity "distance from back of collar to back of elliptical grinding jig" is that inside to inside? I'm also a little confused by the last bit, my boss for the jig only has one hole for the jig and one for the rest arm...

I'd noticed the lack of help from RS online, all you ever seem to find is tutorial videos. It made me assume that they were just a bit mercenary, happy to sell you more stuff and recommend a tool for a problem, but not very hands on for support or advice once they have your money. Passing on that this is the impression they give some by their current strategy may help your buddy to push through some of his changes.

I didn't know about the horseshoe thing when I went ahead and did the first try, might have made the job shorter! :)

Thanks again folks.

Nic.
 
nicguthrie":19m2wv6u said:
Jacob":19m2wv6u said:
45 minutes!!! Why so long? 5 minutes max IMHO.

OK Jacob, you asked for this... :) As it was my first time using the thing, I was taking it very carefully, the tool I was working on was a cheap end-of-stock old Sheffield HSS steel narrow flute bowl gouge with an outside diameter of about 3/4 inch and a U shaped factory bevel of something like 70 degrees - it was a huge amount of steel to remove, which is why I gave up on my beloved Worksharp for the turning tools. Also, just for added challenge, my genetic thing is flaring up at the moment and my grip is awful, I need two hands to pick up a 2 litre bottle or a full kettle, or the tendons etc in the palm area of my hand protest to the point you'd think they were snapping. That made a chunk of steel like that gouge pretty tough to manipulate finely at those angles and hold in place - You asked! :)...
OK sorry I didn't know! Best of luck with it.
 
It's cool Jacob, I didn't mean to come over as going off on one! :shock:

Sometimes tone is easily lost in text, without a skilled author - which I certainly am not! :roll:

Nic.
 
nicguthrie":nd0uar1h said:
Jacob"} said:
45 minutes!!! Why so long? 5 minutes max IMHO.

R.O.B. Thanks v much for the dimensions. Protrusion is a far better word for it - the silly TSO thing is how it's referred to in the Worksharp guide to all the Tormek jigs, so I assumed it was a Tormek thing, but must just be an Oregon, USA phrase thing from the guys at Darex. How would you suggest changing those settings to produce a gouge that was more "slightly swept back traditional bowl gouge" than detail gouge? I'm guessing shorten the protrusion to increase the grind angle, leave the rest pretty much alone? Just for clarity "distance from back of collar to back of elliptical grinding jig" is that inside to inside? I'm also a little confused by the last bit, my boss for the jig only has one hole for the jig and one for the rest arm...

I'd noticed the lack of help from RS online, all you ever seem to find is tutorial videos. It made me assume that they were just a bit mercenary, happy to sell you more stuff and recommend a tool for a problem, but not very hands on for support or advice once they have your money. Passing on that this is the impression they give some by their current strategy may help your buddy to push through some of his changes.

I didn't know about the horseshoe thing when I went ahead and did the first try, might have made the job shorter! :)

Thanks again folks.

Nic.[/quote][/quote][/quote][/quote]

PE Gouge jig setting1.jpg
PE Gouge jig setting2.jpg


Rather than regurgitate I'll simply paste in the response Jeff gave me when I was setting up my PE and started asking the same questions with respect to "how can I match a favourite grind ie what settings should I dial in to the PE jig variables. As Jeff points out there are three variables and changing each one has an impact on the grind.

So I'll paste that very comprehensive response here in a moment. The confusion about which hole on the boss is that there is an alternate boss you can buy which has 3 holes in it. (Its much longer than the one we're discussing ie the regular one which has just the one hole for the jig and one hole for the attachment bar). You (like me) obviously don't have that boss so don't worry about it. Its job is to try and get close to reproducing an Ellsworth grind which can be done but which requires the axis of tool rotation to be quite far from the grinding medium. What that long boss does is achieve those conditions.

Anyway here's Jeff's advice.


The original design of the ProEdge aimed at reproducing the factory grinds precisely. If you leave the jig as it is delivered and follow the instructions in the book, you'll produce exactly the profiles found on Robert Sorby Fingernail Gouges when they come out of the package.

The adjustments are present because Robert Sorby, Ltd. buys the fingernail jig from Tormek. We felt they had the most effective design and rather than try to work around their patents, we chose to buy the jig from them. If we produced the jig ourselves, the collar and the knuckle might not be adjustable at all.

That said, like Tormek or Oneway Wolverine or pretty much any elliptical grinding system, three things affect the gouge profile. the amount of tool protruding from the front of the jig, the angle between the tool axis and the rotational axis, and the distance between the point of rotation and the abrasive contact point. A change in any one of those settings will affect the length of the wing and the bevel angle of the grind.

Unfortunately, the adjustment of those three things doesn't affect the profile on the ProEdge in exactly the same way it affects the profile on any other system. On all the rest, the adjustments move the contact point along the arc of a curve (the grindstone). On the ProEdge, the contact point moves along a straight line, rather than a curve. Bottom line, you can't look at the settings in Tormek's book and get the same profile with the same settings on the ProEdge.

With all that as a disclaimer, the knuckle adjustment (which controls the angle between the tool and the rotational axis) has the greatest effect on the wing length. The protrusion and the distance from the contact have the greatest effect on the bevel angle, but also affect the wing length.

If you decide to alter the settings of the fingernail jig from the way it is delivered, make sure you can get it back to the factory settings before you do! Before you move the collar, use a scribe to scratch a line on each side of the collar so you can put it back right where it was. The knuckle adjustment should be somewhere around setting number 3 or 4, depending on where the index is scribed on your unit. We use a fixture at the factory that sets the angle at 120 degrees. Since the scale is a bit crude and the pointer seems to move from one batch to the next, I scribe a tiny line across the parts so I can bring it back accurately and quickly if I make an adjustment.

I have a spindle gouge ground to a rather long bevel with a fingernail profile. It's what most people would call a detail gouge. It's not exactly the same as the factory standard fingernail grind, so I had to experiment to find the right settings for it. I use a 75mm (3 inch) protrusion, the knuckle is at setting #3, and the back collar is 1-5/16" (34mm) from the end of the shaft.

If you have a favorite profile that you're trying to reproduce on the ProEdge, here's the process I used to arrive at those settings.

1) Take the belt off the ProEdge.
2) In general, if you want a long bevel, work with a long protrusion, short bevel, short protrusion. Use standards you can repeat easily.
3) In general, if you want a short wing, use a lower number on the knuckle scale. If you want a longer wing, use a bigger number.
4) Put the jig in the boss and adjust the back collar until the bevel lays flat on the platen when the tool is at dead center.
5) Roll it from side to side, observing the contact between the bevel and the platen.
6) Adjust as necessary to have contact all the way around the bevel, keeping in mind that an adjustment in one setting will most likely require a slight tweak to at least one other.
 

Attachments

  • PE Gouge jig setting1.jpg
    PE Gouge jig setting1.jpg
    127 KB
  • PE Gouge jig setting2.jpg
    PE Gouge jig setting2.jpg
    107.1 KB
With a bit of practice it becomes easy to copy turned items well enough so you can get a set of drawer knobs, or shaker pegs etc. all near enough matching - by eye alone without any sort of jig. Except I do mark the salient features with a pencil (takes 2 or 3 seconds).
If you can do these quite subtle shapes by eye then you are definitely capable of forming a bevel on a gouge freehand. It's that simple (and fast, cheap etc).
 
I couldn't ask for more.

Thanks bob, that's a total gem. I'll print it out and hide it beside the sharpener for when I inevitably forget :)

Going to tackle the remaining few tools over the weekend now that my hands have backed off from their protest for a bit! Once again, thanks for all the advice everyone, it's a far more appropriate tool for the wood turning tools than my original. Wish I'd grabbed the Sorby in the first place, but then originally I didn't even have a lathe - was using only bench tools, and the WorkSharp 3000 is still quite a bit better for those... C'est Lavvie as they say :)

Nic.
 
nicguthrie":3ejvmfsb said:
I've been working away in my spare minutes, sorting my turning tools on the Pro Edge and setting them up to the very slightly different grinding angles that are standard with the Sorby guides, rather than fettling away trying to keep the exact grinds I'm used to and I'm REALLY impressed. The huge job of reshaping my big bowl gouge was done in about 45 minutes, after spending an age roughly working out the bevel settings that I wanted.

It occurs to me, that RS sells the PROSET tool for setting what Tormek calls the TSO or Tool Stick Out - the amount of the bowl gouge protruding from the jig, to produce a particular grind angle. Tormek has their own tool that does the same, but wouldn't give the right readings for a flat belt. Could anyone take pity on me and list the stick-outs for the Pro Edge in MM scale, so that I can knock up a bench-edge scrap guide tomorrow, instead of spending another £20+ (inc VAT and Postage to the "Highlands") to get the original guide in a week or so, to then copy and consign to a drawer?

It may be a cheeky thing to ask, but I think it's more than a little cheeky to not include that setting tool in the £330 deluxe version of the kit. The guide's measurements are listed by the angle they achieve, rather than the stick-out, so I can't simply use a photo to guide me.

Much appreciated if you can help.

Nic.

For the benefit of the forum, I invested the £11.75 to purchase the part from sorby at the Newark show. I will measure the angle settings tomorrow. In fairness, like the proedge it is nicely made. I would expect it to come with the machine, even if it was a paper version in the manual that told you the settings. Having invested over £300 in the machine, it is not unreasonable to ask to do all that the duluxe kit should be capable of- sharpening chisels and gouges commonly used for turning.
 
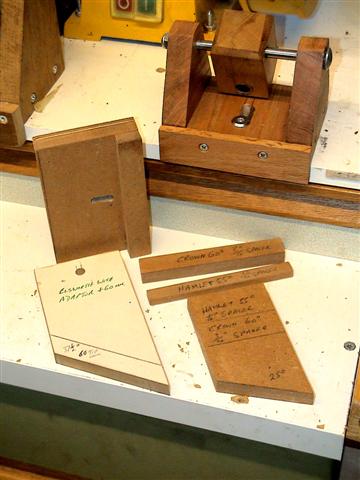
Might I suggest that whatever settings you end up with/prefer for your various gauges you make yourself some simple angle guides/templates to match the pivoting jig, trying to mark and return to the tormek number dial with any accuracy is not easy..

I have a tormek head and a homemade version and they are set to my most used angles/shaft projections so don't get altered that often but if I do I can reset without having to worry about angles etc.
The sort of thing I'm on about can be seen here, and just sit in the crook of the jig whilst resetting.

DSC02899%20(Small).JPG


If you write the name of the tool/s and the tool projection (and the actual jig angle if you like) on them then you have a handy reference to re-set should you ever need it.

The ones in the above link are old from 2008 but are still in the draw albeit with some up to date scribbles on them to suit a slightly altered grinding setup.

Something like:-

  • Hamlet Bowl Gouge
    Tool Projection 50mm
    Bevel angle 55 deg.

    Head Angle 25 deg.
 
Marcos, that would be really great, I've been wondering whether to buy the proset but have felt a bit miffed that the information re protrusions is not in the manual.
Paddy
 
Back
Top