Ripple maple Finish Osmo or Morrells shellac

UKworkshop.co.uk

Help Support UKworkshop.co.uk:

This site may earn a commission from merchant affiliate links, including eBay, Amazon, and others.

mbartlett99

Established Member
Joined
10 Aug 2010
Messages
893
Reaction score
3
Location
Hitchin, Hertfordshire
I've just veneered some very well figured ripple maple (from Mundys who were super helpful) and of course need to finish them. FWIW they
re for kitchen doors and will have a cherry frame. I'm trying to keep them pale while bringing out the figure - in a way opposing needs. After bit of advice here and some test panels decided that a pale shellac would do the trick but did a test piece with Osmo Polyx (which will be on the cherry). Result was a bit of a surprise ....
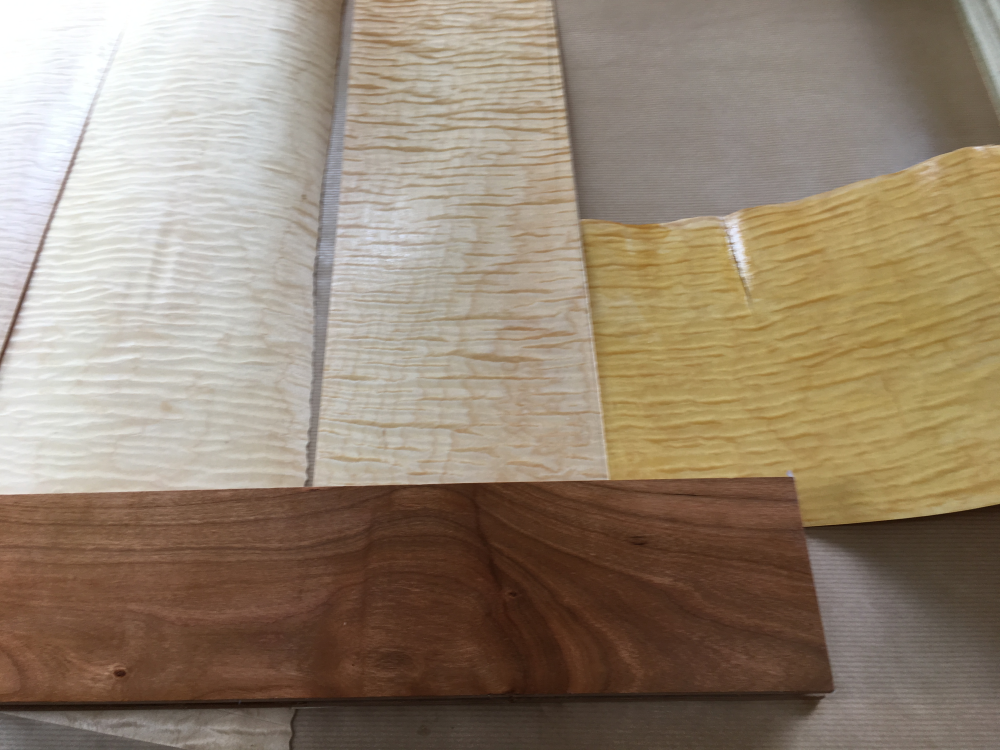
IMG_0719.png


From left to right matt nitro cellulose, osmo polyx and then Morrells Special Pale Polish.

Had two surprises; firstly how yellow the shellac was (thats pale?) and then how little the osmo had altered the colour. Totally unexpected. I haven't used either finish before so pointers welcome.

I've also done some test panels with waterborne pu, acrylic etc but they did nothing for the figure.
 

Attachments

  • IMG_0719.png
    IMG_0719.png
    961.9 KB
I've got a piece of mdf with offcuts of various timber species stuck to it, two of which are maple and sycamore. I gave it a coat of polyx satin clear a couple of months ago, and theres very little to no yellowing.
I'll try to post a photo when I get home.
 
I'm no expert on finishing, but on the shellac scale that is pale. Orange shellac, Button polish, Garnet, they are all different.
You could try a Super-Blonde dewaxed shellac.
 
I wrestle with this all the time as I use a lot of figured Maple and figured Sycamore.

I've been trying to find the time to post a WIP on how to jazz up simple pieces of furniture with little tricks like splayed legs, **** beads, and the decorative "socks" on these pieces.
Side-Table-Pair-01.jpg


By co-incidence these are made from fiddleback Maple that is very similar to your timber (these are in the solid where as yours are veneers but that doesn't make much of a difference) so I happen to have some photos to hand,
Side-Table-Pair-02.jpg


Side-Table-Pair-10.jpg


My personal view is that trying to preserve the "whiteness" of the timber in this particular case is a waste of time, as both Maple and Sycamore will discolour very quickly. A month in a sunny room is all it takes before they start showing an amber tinge. Furthermore, if you use an oil based finish then you immediately get the benefit of "popping" the grain. Given that the spectacular grain is why you chose this particular timber in the first place it seems to me that accepting a small amount of yellowing in order to get a great deal of grain enhancement is a worthwhile trade off.

The question is what finish gives the most grain enhancement for the least amount of yellowing?

In my experience Osmo will take some beating. You could use blonde shellac but you'll get very little grain enhancement. Another surprise is how much yellowing you can get from many brands of water based pu varnish although again, you'll get very little grain enhancement. Try an oil or an oil based varnish and you'll plenty of grain enhancement but then you'll also get serious yellowing. Osmo seems to offer a sweet spot in the middle.

Incidentally, to get the maximum possible grain enhancement you have to first apply several dilute coats of a stain. In Victorian times this was the method used to create a faux tortoiseshell finish from fiddleback Maple or rippled Sycamore, and today is used by luthiers to create those signature spectacular finishes. I wouldn't recommend it for your application as it's just too gaudy, but if you have some scrap veneer it's worth playing around with staining as the results are jaw dropping!
 

Attachments

  • Side-Table-Pair-01.jpg
    Side-Table-Pair-01.jpg
    100.2 KB
  • Side-Table-Pair-02.jpg
    Side-Table-Pair-02.jpg
    88 KB
  • Side-Table-Pair-10.jpg
    Side-Table-Pair-10.jpg
    59.8 KB
The way luthiers do it is to apply the stain and then sand or scrape. Long grain in the figure absorbs little stain so this goes back to nearly bare wood. End grain pulls the stain deep, so this remains stained. The result is high contrast. But it's easy to overdo it, so practice on scrap to discover how many coats of stain give the best look.
 
I did this a year or so ago on the fit out for a motor yacht which was panelled in fiddleback Maple. Because these were large expanses I used a water soluble, light brown, aniline dye (spirit based would have dried too quickly unless sprayed on, and left drying marks). It was super bling-ey but that's what the client wanted. I've also done it on small pieces of delicate furniture or jewellery boxes where it somehow feels more appropriate. Using "wood"based shades likes browns or pale orange gives a more organic and naturalistic effect, using blues or greens gives a very dramatic but clearly artificial look. Whatever you do don't use a pigment based stain, it will look terrible.
 
Thanks so much Custard; needed the confirmation to push me off the fence - which is where I seem to spend a lot of time. Ragged on a thin coat of Polyx satin this morning and it has come up nicely - will stick another on tomorrow and see what sort of gloss its giving. At a guess I'm going to need 3 to 4 but its quick and easy so not too stressed about that - will get on with the frames while I'm waiting.

Will definitely give the staining a miss this time - I get enough motoryacht bling at work - but might play with some when I use the offcuts of veneer later.

BTW ditched the mitre door idea; like you said accident waiting to happen. So they'll be a morso coming up for sale shortly!
 
Sorry for not managing to post a photo. I'm still away from home.

Do you need 3-4 coats? I'm no expert on finishing, so its a genuine question I'd like to know. When I've used hard wax oils I've just followed the method Peter Parfitt used. First coat (either brushed or ragged), very light denibbing and a thin second coat. I've had no issues using this method.
I've only used Fiddes and Osmo (both Satin). In my opinion, the Fiddes has more of a noticeable sheen for the same number of coats.

Those tables are stunning. =D>
 
Are there any particular analine dye brands that are recommended?
I'd like to have a small pop at this.
Thanks all. What a cracking thread.
Cheers
Chris.
 
scooby":2iy8c8r6 said:
Sorry for not managing to post a photo. I'm still away from home.

Do you need 3-4 coats? I'm no expert on finishing, so its a genuine question I'd like to know. When I've used hard wax oils I've just followed the method Peter Parfitt used. First coat (either brushed or ragged), very light denibbing and a thin second coat. I've had no issues using this method.
I've only used Fiddes and Osmo (both Satin). In my opinion, the Fiddes has more of a noticeable sheen for the same number of coats.

Those tables are stunning. =D>

Dunno - we'll see.
 
mbartlett99":1luhfz93 said:
scooby":1luhfz93 said:
Sorry for not managing to post a photo. I'm still away from home.

Do you need 3-4 coats? I'm no expert on finishing, so its a genuine question I'd like to know. When I've used hard wax oils I've just followed the method Peter Parfitt used. First coat (either brushed or ragged), very light denibbing and a thin second coat. I've had no issues using this method.
I've only used Fiddes and Osmo (both Satin). In my opinion, the Fiddes has more of a noticeable sheen for the same number of coats.

Those tables are stunning. =D>

Dunno - we'll see.

Looking forward to seeing/hearing how it turns out.
 
profchris":3eewa9s7 said:
The way luthiers do it is to apply the stain and then sand or scrape. Long grain in the figure absorbs little stain so this goes back to nearly bare wood. End grain pulls the stain deep, so this remains stained. The result is high contrast. But it's easy to overdo it, so practice on scrap to discover how many coats of stain give the best look.

Violin makers generally avid using stain (on bare wood) as stain can kill the 3D effect and "burn" in the figuring. Exactly by the end grain absorbing the stain and then you lose the rippling effect when you change the angle of view.

It might be different for guitar makers though.
 
FWIW, on my wardrobe that I am building. I started using some Osmo that I've had for a few years. It's kept well, mind and I didn't have any problems with it.

I went to my local merchant for some more, and he told me he didn't sell Osmo, but had Treatex, and his customers were happy with it. So I bought some.

It's really good stuff, goes on easily, gives me just the right degree of shine (satin - I always thought that the Osmo was a bit too matt), and I don't need a spray booth. Two coats does the job properly.

It's supposed to dry in 3 hours. Well, maybe, but it's been very humid whilst I've been doing this and it's taken longer, especially to go hard. Overnight is good, though.

I shall use it regularly, I think.

About £50 for 2.5L.

Here you are

I didn't pay that much, though.
 
JohnPW":310pupwu said:
profchris":310pupwu said:
The way luthiers do it is to apply the stain and then sand or scrape. Long grain in the figure absorbs little stain so this goes back to nearly bare wood. End grain pulls the stain deep, so this remains stained. The result is high contrast. But it's easy to overdo it, so practice on scrap to discover how many coats of stain give the best look.

Violin makers generally avid using stain (on bare wood) as stain can kill the 3D effect and "burn" in the figuring. Exactly by the end grain absorbing the stain and then you lose the rippling effect when you change the angle of view.

It might be different for guitar makers though.

I oversimplified! Some guitar makers do this to emphasise the figure, or so I've read many times. But I think they do it quite subtly (except on a few solid body electrics I've seen).

Others like the natural figure. If I'm lucky enough to have highly figured wood, it's shellac and nothing else for me because I think I get the best 3D effect that way. But I'm moderate at finishing at best - I'm sure an experienced builder can highlight the figure without losing much 3D.
 
On such timbers do you ever oil the stock before applying the shellac? Linseed will yellow the wood of course but enhance the figure as well.
 
Hey Guys

Could do wit a bit of help on this as I' m a first time user and its not going as I expected.

After watching a few youtubes I tried putting this on with a white scotchbrite a la Peter Parfitt/Matt Estlea. Turned out quite patchy and it wasn't until coat 4 that it evened out with a bit of gloss - nearly no grain fill.

Needing to hurry up I did some more research and on the other side used a microfibre roller and put on a thin coat just with the roller. It was very even but decidedly matt and the surface is scratchable with my fingernail - put it on as thin as I could.

Any pointers?
 
No. Rubbed it on as thin as I could with the scotchbrite and then wiped gently over following the grain.

The side I rollered just got that, thin as I could, nothing further.
 

Latest posts

Back
Top