Repairing broken guitar headstock?

UKworkshop.co.uk

Help Support UKworkshop.co.uk:

This site may earn a commission from merchant affiliate links, including eBay, Amazon, and others.
MickCheese":74ugw01u said:
Benchwayze":74ugw01u said:
Not exactly a Gibson is it!

Just whack in a few pocket-hole screws.
A spot of 'elmers' glue; plus a biscuit maybe to be posh and job done.


(homer)

:wink: John

best of luck

John

I think you have cracked it, I don't think those other two have a clue! :roll: What do you think? :)

Mick

Well Mick,
Having repaired a Hofner Prfesident for a friend, I must confess the job was a little more sophisticated than that..
I think I will give up the comedy and stick with the day job; i.e., Retirement! :mrgreen: :eek:ccasion5:

Roll on demob, Christmas is too far away and I am dying for some nuts!

regards,
John :ho2
 
John

Good luck with the retirement. Some of me wanting to repair this guitar is just to practice and see what I am capable of. Each time I do something that stretches my ability I get better.

I thought your joke was quite funny and I am sure Jim and Setch thought so too.

I have now glued the neck back together and it looks fairly neat and tidy. Just waiting for some time to cut a couple of splines into the back and then it will be staining the patch and finishing.

Good luck

Mick
 
You will not believe this.

I took a coule of pictures of the glued joint then as I was picking the guitar off the floor it slipped, landed square onto the nut and split the neck again. :oops:

The original joint held it has now split with the grain.

Will now be trying a scarf joint like in Setch's link. :roll:

You just have to laugh!

Mick
 
MickCheese":fscqd9nu said:
You will not believe this.

I took a coule of pictures of the glued joint then as I was picking the guitar off the floor it slipped, landed square onto the nut and split the neck again. :oops:

The original joint held it has now split with the grain.

Will now be trying a scarf joint like in Setch's link. :roll:

You just have to laugh!

Mick

I would believe it...DAMHIK but it involved the aforementioned Takamine! :oops:

Never fear! All this means that you learn more and more...and hey...I did warn you about mahogany grain splits! :wink: You are better off putting a scarf on the back as Setch says.

Cheers

Jim
 
Thanks Mick, although I have been retired for 20 years now!
I practice the guitar every day too, but I still go on YouTube and hear children who leave me in the shade!

All the best and keep 'fretting'...

John (hammer)
 
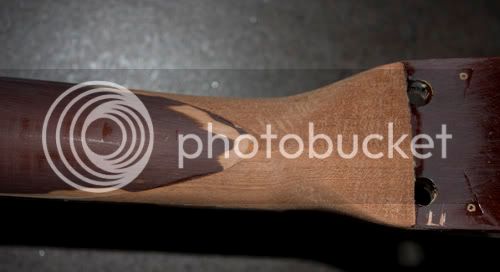
I have today began to try to repair my broken headstock on the Yamaha I got free from FreeCycle.

Just to recap I did glue it but dropped it again cracking the neck in a different place to the original break.
Second Neck Break Pair.jpg


So today I prepared a mahogany blank. It was actually an old desk leg that I salvaged when they were being chucked out at work.
Mahogany Blank.jpg


I was trying to do this without removing the fingerboard but the close proximity of the truss rod made it impossible so the finger board had to come off and the truss rod removed.
Planned Neck.jpg


I then Planned the neck to accept the blank that was to be scarf jointed.
Planned Neck Closeup.jpg


I also planned the headstock and glued it to the blank. It is at present drying.

I am pleased with my progress, all done with hand tools and all seems to be going together very accurately.

A few things went wrong but nothing major. My first attempt at planning the blank for the neck and headstock was not perfect and that was due to me not fully understanding the angles involved. I was left with a fillet that fitted but was not deep enough to flow between the neck and headstock, I just made another.

This all took a lot longer than I had anticipated, that was due to the amount of time I just stood looking at the pieces trying to work out the necessary angles or offering one piece to the next trying to work out the angles. On my first attempt all the pieces fitted together snugly but the neck was not flat and so would not have accepted the finger board.

I will post a picture of the headstock fitted to the blank if it is dry enough to remove from the clamp.

Will continue tomorrow.

Just one question to those that know, when I reinstall the truss rod am I right in thinking I only fix it at the ends and not in the middle?

Regards

Mick
 

Attachments

  • Second Neck Break Pair.jpg
    Second Neck Break Pair.jpg
    133.1 KB
  • Mahogany Blank.jpg
    Mahogany Blank.jpg
    47.8 KB
  • Planned Neck.jpg
    Planned Neck.jpg
    76.3 KB
  • Planned Neck Closeup.jpg
    Planned Neck Closeup.jpg
    58.5 KB
A few more boring pictures and another question.

Here is the scarf joint head to fillet.
Scarf Joint Front.jpg

Scarf Joint Side.jpg


Do you think the angle of the join is a bit steep?

And

Here is the headstock and fillet temporally clamped to the neck.
Temp Scarf Joint3.jpg


Most of the planning was done with my block plane, I was able to get a very flat surface with this muck easier then my No4 or No5.

Now I need to do some shaping before I glue the headstock / fillet to the neck.

It's not until you do something like this that you realise it is more complicated than it first seems. Getting the scale length right, keeping everything in exact alignment in three dimensions and ensuring the joins are very flat for the best glue surface.

Please feel free to comment, this was a free guitar that I hope will live to play again but most of all is being done for the woodworking experience, I have thoroughly enjoyed playing in my workshop today.

Regards

Mick
 

Attachments

  • Scarf Joint Side.jpg
    Scarf Joint Side.jpg
    59.6 KB
  • Scarf Joint Front.jpg
    Scarf Joint Front.jpg
    82.8 KB
  • Temp Scarf Joint3.jpg
    Temp Scarf Joint3.jpg
    63.5 KB
I'd have made the angle less steep, but you should still be OK. Once you've got the major structural stuff done you'll have the joys of finish repair next - it makes the woodworking look like a piece of piss!
 
Hi Mick

Great progress mate! Often it is the long winded method that works the best...you did well to remove the fingerboard so cleanly!

In answer to your questions....yes...the truss rod is anchored at the body end and the adjustable end at the neck is anchored against a washer that fits in a recess against which pressure is exerted when the nut is tightened.

When you put the fingerboard back on for gluing...use very fine brads to test align it...making sure the frets are perpendicular to the axis of the neck and the fret positions are correct relative to the bridge.

I put them under the fingerboard and then squeeze this into the neck wood once aligned. Then remove, glue and replace in the brad holes. Another way of doing it is to brad through the fret slots but this entails not having frets in yet...which you have so you can't do that.

Look forward to seeing the results! Bravo!

Jim
 
Thanks Setch / Jim

The original neck / headstock may look like mahogany but under the finish it is more like balsa wood. My infill piece seems to weigh about twice as much and is very dense in comparison. No wonder it broke!

Will keep you up dated.

Happy New Year

Mick
 
Given the size of the channel in the neck, I'd expect that to be a u-channel trussrod. These are best installed glued into the channel, which lends a lot of stiffness to the neck. The rod moves freely in the channel, but the channel is glued solidly to the neck.
 
Setch":31kevkfy said:
I glue them in with epoxy, after wiping the u-channel with a little thinners or ,meths to degrease, and roughing slightly with coarse-ish sandpaper to give a little 'tooth' for adhesion.

http://home.asparagine.net/ant/blog/?page_id=7

Very interesting blog there Setch....

So glad I have today off to read it....

Cheers for posting your link

Jim
 
OK

I have done more work on the guitar but got a bit carried away and didn't take any photo's.

I did make a small error when gluing the filleted headstock to the neck, It slipped a fraction in the clamps and I didn't notice until it had dried so is a very small amount out. I did think of starting again but just couldn't face it. I was out by a very small amount but by the time you get to the top of the headstock it is probably about 1 - 2 mm. :oops:

The joins are very tight, what looks like gaps in the photo's are just shadows

Here is the state of play at present. Just roughly shaped, still more work to do with the scraper and sandpaper. To date I have used some rasps, card scraper and sand paper to shape it to this state.

Nearlythere2.jpg


Nearlythere1.jpg


I have learnt quite a bit.

1. Guitars are really difficult to hold on a bench, they are both fragile and a very awkward shape.
2. Keep checking as the glue cures as the awkward shape makes the parts very difficult to clamp.
3. I can actually saw and plane two very flat and accurate surfaces, yippee. (Even though I cannot glue them together straight! :) )
4. I must not rush things.

I was tempted to allow this thread to die as I was so annoyed that I had let the clamps slip but I thought I would just own up and confess all. As I said before the guitar was free and this was a bit of an experiment so great for learning some new things.

So I am now thinking of the finish.

Would the original have been cellulose?

Mick
 
The finish is probably polyester, very few factory guitars use nitro these days.

You'll find matching the finish very hard - I'd probably opt for a black or very dark brown opaque colour on the area of new timber, feathered out in either direction, along the neck and the headstock. Do you have any spray equipment?

Clamping scarf joints is very tricky, especially if the neck is shaped, not square. Here's how I do it, I stumbled on it after experimenting with pins, brads, and all manner of tricks to stop it slipping. It works like a dream and is so easy.

http://home.asparagine.net/ant/blog/?p=121

Also on topic, here's the last break I did, a much easier break than yours! I've since re-done it, after the guitar was dropped again. It broke along fresh timber, no separation of the repaired break at all.

http://home.asparagine.net/ant/blog/?p=208
 
Setch

You make it look so easy. The tape to hold the bits would certainly have helped me. I am only off a little so the strings on one side of the head will be a little wonky compared to the other but I am confident all is flat and and once the nut is re-installed to hold the strings in line I think I may get away with it.

It has been really good fun and I have enjoyed it.

I know that if I need to do a similar thing again I would make a better job.

I do have a small nail gun compressor and a cheap spray gun that was included with the kit but I fear that will not be good enough.

Mick
 

Latest posts

Back
Top