SketchUp Guru
Established Member
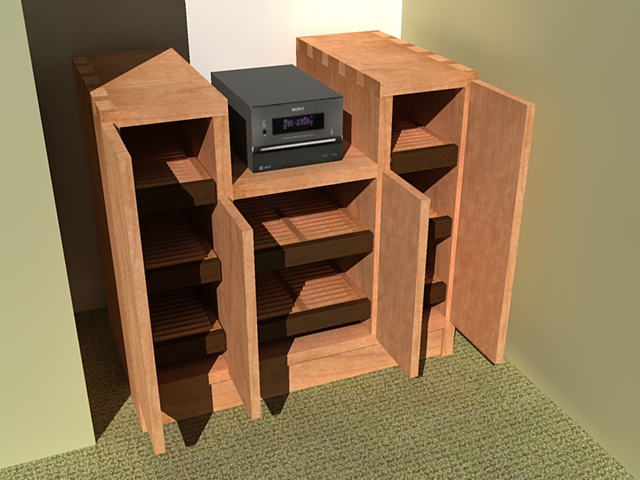
Right, here's the quick tutorial on how I arrived at the rendered image of the cabinets I posted previously. It's really a stretch to call this a tutorial. I am nowhere close to being in a position to teach others how to use the rendering software so I hope you'll bear with me. You know, I never know for sure which spelling of that word I should use in this context. When I think about using the other spelling I get strange images in my head that make shivers run up my spine. Besides, I like all varieties; polar, brown, grizzly. Well, Kodiaks also give me a shiver but I digress. :lol:
Uh, where were we? Oh, yeah. Rendering. That's what they do to fat to make lard. Well, maybe that's what this will turn out to be.
So, here's the rendered image for reference.

And this a similar view from SketchUp.

The last image for now is of the entire "stage"

I drew the floor for the models to sit on and then placed the models. I also drew a large "wall" that would end up behind the camera. You can see it as a dark rectangle off to the left in the third image here. For this drawing I left the front face of that "wall" the front face color I was using. (The rectangle laying down is there simply to show you the color of that wall. It isn't really part of the image or anything.
One important thing to do to the glass in the model is make sure it is only a single face. I originally drew the glass as 1/8" thick so I deleted the rear face of the box.
Then, using the Insert Spotlight tool in SU2KT3.0, I added three spotlights. The lights are drawn by clicking on the desired location of the spotlight and then on the center of the area you want to cover. After the second click you can give the light a name and make some adjustments if you wish. For this model I didn't.
To set the location of the lights I drew a few intersecting guides. In the third image here I have drawn some vertical lines to give you and idea of where these lights are relative to the rest of the model.
That's the extent of the setup in SketchUp.
At this point we're ready to export and start with Kerkythea. I clicked on the button labelled Export model to Kerkythea. The exporter does some hocus pocus and then a box pops up giving some information about the export and asking if I want to open KT. I hoose the affirmative.
Once KT opens I click on Settings>Materials. Right click in the left hand pane of the dialog box and choose Select all. Then right click and choose Rebuild selected. After KT is done rebuilding, the textures are shown applied to spheres in the left side of the box. Click on one to select it, right click and choose Edit.
For the glass, I right clicked on Matte/Phong at the bottom of the Edit box and chose Set Thin Glass. Then I changed Reflectance color to 0.95 at the upper left of the Edit box.
For each of the wood materials I added a little bit of Reflectance and Specular. I also changed the Shininess to around 70 which reduces the smoothness of the surfaces.
The next thing I did was click on Setting>Scene>Lights and changed the Radiance of the spotlight shining on the wall to 2.5.
The final step at this point is to do the render. I click on the Render button and set the resolution (lower results in faster renders) and the Settings that I want to use. Finally I click start and go off and raid refrigerator. In the case of the rendered image above, I chose #19. MLT.
I'm sure this might seem like I wrote this in the Aztec language. It'll make more sense once you've downloaded the exporter and Kerkythea and looked at them it should be a little more clear.
Go here for more info and and to download the program and SU2KT3.0
http://www.kerkythea.net/joomla/index.php
Go ahead and ask me questions. I'd be happy to answer them if I can.
Now, what do you suppose is in the icebox? :lol:
Uh, where were we? Oh, yeah. Rendering. That's what they do to fat to make lard. Well, maybe that's what this will turn out to be.
So, here's the rendered image for reference.

And this a similar view from SketchUp.

The last image for now is of the entire "stage"

I drew the floor for the models to sit on and then placed the models. I also drew a large "wall" that would end up behind the camera. You can see it as a dark rectangle off to the left in the third image here. For this drawing I left the front face of that "wall" the front face color I was using. (The rectangle laying down is there simply to show you the color of that wall. It isn't really part of the image or anything.
One important thing to do to the glass in the model is make sure it is only a single face. I originally drew the glass as 1/8" thick so I deleted the rear face of the box.
Then, using the Insert Spotlight tool in SU2KT3.0, I added three spotlights. The lights are drawn by clicking on the desired location of the spotlight and then on the center of the area you want to cover. After the second click you can give the light a name and make some adjustments if you wish. For this model I didn't.
To set the location of the lights I drew a few intersecting guides. In the third image here I have drawn some vertical lines to give you and idea of where these lights are relative to the rest of the model.
That's the extent of the setup in SketchUp.
At this point we're ready to export and start with Kerkythea. I clicked on the button labelled Export model to Kerkythea. The exporter does some hocus pocus and then a box pops up giving some information about the export and asking if I want to open KT. I hoose the affirmative.
Once KT opens I click on Settings>Materials. Right click in the left hand pane of the dialog box and choose Select all. Then right click and choose Rebuild selected. After KT is done rebuilding, the textures are shown applied to spheres in the left side of the box. Click on one to select it, right click and choose Edit.
For the glass, I right clicked on Matte/Phong at the bottom of the Edit box and chose Set Thin Glass. Then I changed Reflectance color to 0.95 at the upper left of the Edit box.
For each of the wood materials I added a little bit of Reflectance and Specular. I also changed the Shininess to around 70 which reduces the smoothness of the surfaces.
The next thing I did was click on Setting>Scene>Lights and changed the Radiance of the spotlight shining on the wall to 2.5.
The final step at this point is to do the render. I click on the Render button and set the resolution (lower results in faster renders) and the Settings that I want to use. Finally I click start and go off and raid refrigerator. In the case of the rendered image above, I chose #19. MLT.
I'm sure this might seem like I wrote this in the Aztec language. It'll make more sense once you've downloaded the exporter and Kerkythea and looked at them it should be a little more clear.
Go here for more info and and to download the program and SU2KT3.0
http://www.kerkythea.net/joomla/index.php
Go ahead and ask me questions. I'd be happy to answer them if I can.
Now, what do you suppose is in the icebox? :lol:


