question for kitchen fitters

UKworkshop.co.uk

Help Support UKworkshop.co.uk:

This site may earn a commission from merchant affiliate links, including eBay, Amazon, and others.

sunnybob

wysiwyg
Joined
11 Oct 2014
Messages
8,399
Reaction score
169
Location
cyprus
My next necessary "home improvement" is to replace the tiles all around the kitchen work surfaces.
I would really like to do something about all the electrical sockets and switches that litter the space.
Bear in mind this is NOT a complete kitchen rebuild, all the cabinets are staying. The most that might happen is the work surfaces MIGHT be changed (I hope not).
But there are as many as 5 sockets in a row, in a couple of different places and all different uses, and they are a real eyesore.
So does anyone have a favourite way of cleaning all these up while the tiles are off?
 
Bob, you know you don't need to remove the existing tiles to re-tile? If you are coming up to the undersides of wall units and can hide the edges, then tiling straight over the existing can save a heap of work. You just need some longer screws on the socket faceplates.
 
Mike, sadly, these tiles need to come off. They are 4" square with extremely rough imitation stone surfaces. Some are now loose.
Its not a big job, unlike the en suite bathroom I have just finished. Theres only just over 3 square metres total here. If I use 30 cm or even 40 cm tiles theres not many at all.

But the electrical sockets are an eyesore, when put into the wall during the house build they were not aligned, so each has a different width gap between, some are level and some arent.
I will take a picture and show you the problem. They need to go.
 
Why would anyone tile over existing wall tiles. Shocking reply for a trade forum.Only time i would ever tile over existing is on a floor area as the damage ripping up can be harsh but not on a wall.
 
Heres what I'm up against

sockets 1.jpg


sockets 2.jpg


You can see the gaps and angles that have to be changed
 

Attachments

  • sockets 1.jpg
    sockets 1.jpg
    271.1 KB
  • sockets 2.jpg
    sockets 2.jpg
    214 KB
You get all the fuse spurs moved into the backs of cupboards? Then space the rest of the sockets and light switch evenly, leaving about the width of a single socket inbetween each one looks best.
 
Now THAT is a lot of work. :shock:
The walls are solid terracotta air bricks with very thick cement rendering over.
All the conduits come up from the ground to the switches, then down again to appliances, all completely buried and tiled over.
I would have to knock down 3/4 of the kitchen wall and completely rewire. :roll:
I'm hoping for a solid run of neat backing plate like used in office situations to make my life easier.
 
That's UK sockets installed by Greeks! Magnificent blend of cultures. At a guess, someone ordered lots of sockets for the counter, which the local electrician thought was insane (why do you need more than one?), so he put in his usual single sockets, but all in a row. It could be my kitchen - exactly the same dog's breakfast - three sets of sockets, so three different heights, and three different, non-horizontal angles.

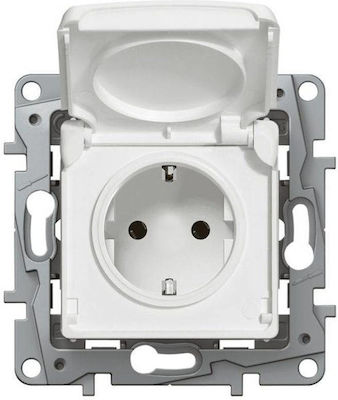
Does each socket have its own separate wiring direct from the consumer unit, and its own separate backing plate (actually a plastic cup, set into the render)? That's what I have to contend with. I did mine in pairs, and luckily found sockets that join together like Lego - both the faceplates and their backing plate (not sure what the official name for the bit rendered into the wall is). You may have to replace both parts of the sockets, and recement them all back in place, only this time together. The faceplates come in multiples, and tie it all together visually.

xlarge_20200127105250_legrand_niloe_764532_asfaleias_me_kapaki.jpeg


Hopefully you can see how they are designed to clip together, but the backplate is much more important to get aligned, and it is a thin, flexible plastic cup set in cement, so not easy. I'm guessing that you have something like this - you may have fully UK spec sockets and wiring, in which case, you need a UK electrician...

What I am trying to say, possibly badly, is that I think you may need to dig out and replace all of your sockets, so get down to the socket shop and see what they have to offer.
 
In not certain I've understood the question - are you wanting to remove them, tidy them up, or rationalize them somehow?
 
I'm not a kitchen fitter but have fitted my kitchen. I think any wiring work in a kitchen needs a certificate from a qualified person, but a re-fit - just replacing fittings in the same place - doesn't. Check though.

It looks like you have a mix of manufacturers and profiles there, some screw heads concealed, some not. One double socket has its switches top right of each plug hole, one has them grouped in centre. Standardising might be an inexpensive way to make it all look 'one of a piece'.

Helpfully most UK back boxes have 'fiddle room' - normally the threaded lug on one or both sides can go up or down a few mm if you slacken off the screws. In most block walls UK style back boxes are fairly crudely screwed in to place with a screw into a wall plug of some sort with wires entering through knockouts top back or bottom. Knockouts usually give you plenty of space around the wires.

My approach to improve cosmetic matters without the expense of getting an electrician and actually moving wiring would be to buy a whole new 'matching set' set of switches and sockets from the same range, spend plenty of time looking at online catalogues. Remove them all. Slacken off the screws in the back boxes and fiddle and force them into better alignment. Get them as good as you can. Then refit the switches, don't fully tighten until they are all in place, when you do make sure all have or have not the white screw covers according to taste, ideally 'have' because the contrast spots of exposed screws really show up any misalignment. It should get it much better than it is. Thinking again, there's no reason why you can't take one or two off and see if you could realign the back boxes before you buy anything new.

A proper job will require an electrician though, and will inevitably end up a bigger job than you thought it would. Modern regulation are very detailed and the electrician can only sign off if all the regulations are met. On an older property that can mean changing quite a lot. It's the right thing to do, but a simple socket move or addition might not be simple.

(or stand a big vase or plant pot in front :))
 
Mmmm, If it were me I would pull it all off and start again. Thats more work I know but from experience with work like this it is often the better route. As has been said, yes existing tiles do provide a good foundation to tile over BUT if they are either unevenly applied or have a textured surface (which is what yours appear to be) then the job of obtaining a perfect tiled finish becomes harder.... it is quite doable but not as good as starting from a flat surface.
So I wold pull them off, re work the backbox holes by slackening them and then use filler/no nails/squirtystuff to stabilize in place before screwing them back in the correctly aligned position. Then you need to use hardibacker board or similar for you to give you a perfect surface to tile on. A perfectly flat surface makes tiling easy. Its more work for sure but you will only do it once and it will be right.
 
Cyprus, as I have mentioned before, is completely anglicised. many years of english rule means everything is the same spec as the UK (just like thailand).
The back boxes are cut into the wall blocks before the walls are skimmed, Adjusting a box is impossible. They are completely immobile.
Electrics here are extremely good in all other respects.

I do not want to knock down walls. I am trying to find a plastic "fingerplate" so when the new tiles are on I can fix the plates neatly and in a line.

Its looking like (as always) I can never find exactly what I want, I shall have to consider my options.
 
Probably more work than you want to go through and may not be legal but you could get a piece of white phenolic or similar electrical/fire rated product and cut and shape one out to cover all the plugs and switches in a single cover? (hammer)

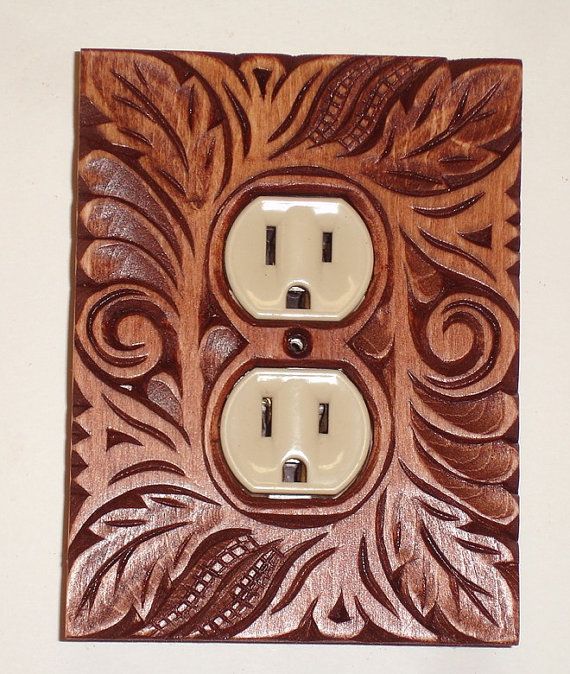
We can buy wooden switch plate and plug covers locally so there could be that option for you if allowed. Think how nice an olive one would look. :wink: Just looked and there are some for sale on British sites.

Just a few more options for you to mull over. :)

Pete
 
Andy, this is a kitchen splash back, with all sorts of hot and cold liquids being, well, splashed about.

If I'm going to achieve any visual improvements (and thats all it is, Its installed and working and completely safe, it just looks bluddy awful), I need a cover plate. Or... several days with a hammer and bolster and 6 tubes of no more nails. :roll:
I'm fed up with this "home improvement" nonsense, havent had a decent week in my workshop this year.
 
If you want them neat, straight and level, you only have one option, and you know what it is.

To make life slightly easier, when you get to put the new backboxes in (cut them out with a multi-tool plus carbide-chip coated blades, and only cut round the sides that have no cable access, obviously), you could use a piece of thin ply or metal strip to hold them aligned, along top or bottom, and bolted or pop-riveted in place. It will be completely hidden behind the tiling anyway. The only issue is dissimilar metals corroding, but if the wall itself stays dry that won't be a problem. You don't really even need to fill around the replacement boxes, as you're tiling.

There are also "dual" backboxes available (as opposed to double ones), which are jolly helpful when you want a pair of single sockets doing different tasks. I have used them a lot. They have the additional advantage that they don't have one of those adjustable threaded lugs (intended to help you get the plate squiffy), and that you can remove the centre divider (but still keep the pair of threaded holes. You are not supposed to do this for certain uses, but it can be most helpful).

Triples and bigger are available, but they are intended for commercial/light industrial use and eye-stretchingly expensive. They also look industrial, similar to the one Andy suggested - nice in an office, but IMHO out of place in a kitchen.

I have done a home made version of the spacer that was linked-to above, and that also works well in a similar way. I used it to make a triple socket (dual box + single). Again, get your alignment done before fixing the backboxes into the wall as a set.

The suggestion of moving the spur boxes (the isolators with fuses) down into cupboards is a good one too - the fewer socket plates you have, even if perfectly aligned, the neater it will look.

I've also fitted surface-mount electrical double-sockets on the underside of a cupboard - I had the ring going to the top of the units already (for a cooker hood). This is almost invisible, but really convenient for things like occasionally plugging-in a food mixer.

Sorry, but you aren't going to neaten that lot up without quite a bit of work, and it's down to fixing the backboxes neatly, then re-tiling neatly too.

E.

PS: I usually cut a spacer, to the above-worktop distance (height) I'm after, for the backboxes. Similarly for above-skirting spacing. Obviously this depends on everything being level to start with (and that's rarely true with skirtings in our house!). If fundamental stuff is out of line you have to compromise somewhere - I usually go for keeping the boxes dead level, and the centre of the set of boxes at a similar distance up from the "horizontal" that dominates (skirting, worktop, whatever). Sometimes it comes down to cutting out paper rectangles and taping them to the wall to see what looks least worst...

And personally I wouldn't be tempted by the idea that you can take L-shapes out of tiles or split them so you don't need to make holes in them for boxes. This was in the tiling chapter of every DIY manual from the 1960s to the 1990s, but to me it always looks amateurish and rarely very neat. So I try to get the boxes in the middle of rows of tiles if I can. There's a bit of drilling and cutting but the result is worth it.
 

Latest posts

Back
Top