Post a photo of the last thing you made

UKworkshop.co.uk

Help Support UKworkshop.co.uk:

This site may earn a commission from merchant affiliate links, including eBay, Amazon, and others.
Thanks all. I'm very pleased with the result. This week I'll write myself up a little report on what I learned throughout the design, build and install, what I'd do differently etc. I have already ordered myself a second 12v driver as constantly changing between bits was a pain and the 18v I have was just a bit too big at times, I have the impact for screw but for drilling pilots/relief holes and then countersinking it was getting daft. Treated (trut, surely?) myself to the brushless bosch as I found it cheaper than normal and only £30 more than the brushed one and I already have the others on the same batteries.

You look to have made a really good job of that, especially considering it’s your first built-in, they can go wrong very quickly if you don’t think ahead when designing and planning. Ian
Thank you. There was much gnashing of teeth and pondering and checking and thinking it through. It's been a work in progress for some months now. I event took the time to sapce the shelf pin holes so that they can have 3 shelves perfectly spaced or 5 shelves perfectly spaced rather than just banging in a load of holes 32mm apart. If I recall the ply delivery sheet said it all came in at 400ish kg and I had to shift it all 30m from the drive to the workshop too!

They wanted the square cubbys at a set size so that determined everything else since I didn't want different width segments. The tablesaw was declared unsuitable early on when a test cut showed blade marks all along the edge and since its a visible edge I wasn't going to faff around removing it on every edge. Instead it was all done with the tracksaw. Naturally the curvy worktop was the biggest worry but it came out nicely in the end.

I made myself a pathfinder drawer to work out the blum tipon drawer runners, realised I had to remake the front and back, then had to remake the sides, then realised that 420mm slides in a 450mm cabinet with 18mm inset drawer faces fitted to 15mm boxes wasn't going to fit so I sorted a solution for that. That's why you to a test I suppose! It all came out well in the end.

From the install I only made 2 cockups, both on infills. The bottom one I measured to the inside right face of the drawer unit rather than the outside. I cheated a small block to fill that hole near the skirting. The other was the right most lower infil under the desk. I tried something daft and the festool planer was quite content to eat a cove into the end of the fillet and naturally on the side that was visible. Another little filler bit put in to fix that one.

Also have to thank Hart Wholesale who helped me out. I had ordered the incorrect bits for the drawers (easy to do on your first try) and they sorted it and included the extra bits at no charge in part becase I'd been incorectly told it would be in stock on x date and it wasn't.
 
Finally finished a plywood and some kind of dark brown wood desktop for the wife. The black bits are epoxy. I was pretty pleased with this considering ive never attempted anything like it. Had a few little tears out when using a routing sled. Have to build one for myself now so I don't feel left out 😁View attachment 119751
Regarding Geebee's desktop, Really nice work, it is pleasing design as it does not repeat and keeps you looking for more.
 
@Geebee just saw your desk top, stunning! Love the seemingly random design.
I came across this cabinet whilst I was in America recently which is sort of similar – ish. The doors are tambor doors that slide open, even second hand it was $17,000.
65CFD0FF-5415-4CDF-AEB6-9BCD344941C6.jpeg
2D72C3D1-4641-4DFF-9043-F52705DBC638.jpeg
 
Finally finished a plywood and some kind of dark brown wood desktop for the wife. The black bits are epoxy. I was pretty pleased with this considering ive never attempted anything like it. Had a few little tears out when using a routing sled. Have to build one for myself now so I don't feel left out 😁View attachment 119751
This is excellent. Love the layout.
 
Thanks all. I'm very pleased with the result. This week I'll write myself up a little report on what I learned throughout the design, build and install, what I'd do differently etc. I have already ordered myself a second 12v driver as constantly changing between bits was a pain and the 18v I have was just a bit too big at times, I have the impact for screw but for drilling pilots/relief holes and then countersinking it was getting daft. Treated (trut, surely?) myself to the brushless bosch as I found it cheaper than normal and only £30 more than the brushed one and I already have the others on the same batteries.


Thank you. There was much gnashing of teeth and pondering and checking and thinking it through. It's been a work in progress for some months now. I event took the time to sapce the shelf pin holes so that they can have 3 shelves perfectly spaced or 5 shelves perfectly spaced rather than just banging in a load of holes 32mm apart. If I recall the ply delivery sheet said it all came in at 400ish kg and I had to shift it all 30m from the drive to the workshop too!

They wanted the square cubbys at a set size so that determined everything else since I didn't want different width segments. The tablesaw was declared unsuitable early on when a test cut showed blade marks all along the edge and since its a visible edge I wasn't going to faff around removing it on every edge. Instead it was all done with the tracksaw. Naturally the curvy worktop was the biggest worry but it came out nicely in the end.

I made myself a pathfinder drawer to work out the blum tipon drawer runners, realised I had to remake the front and back, then had to remake the sides, then realised that 420mm slides in a 450mm cabinet with 18mm inset drawer faces fitted to 15mm boxes wasn't going to fit so I sorted a solution for that. That's why you to a test I suppose! It all came out well in the end.

From the install I only made 2 cockups, both on infills. The bottom one I measured to the inside right face of the drawer unit rather than the outside. I cheated a small block to fill that hole near the skirting. The other was the right most lower infil under the desk. I tried something daft and the festool planer was quite content to eat a cove into the end of the fillet and naturally on the side that was visible. Another little filler bit put in to fix that one.

Also have to thank Hart Wholesale who helped me out. I had ordered the incorrect bits for the drawers (easy to do on your first try) and they sorted it and included the extra bits at no charge in part becase I'd been incorectly told it would be in stock on x date and it wasn't.

Is the top in one piece or is the curved section connected and if so what method did you use? Is it sturdy enough without a leg under it?
Really nice and it's given me a new idea for my study which was just going to get a worktop with cabinet underneath and shelves above but that curved return extension to the top looks great.
 
Finally finished a plywood and some kind of dark brown wood desktop for the wife. The black bits are epoxy. I was pretty pleased with this considering ive never attempted anything like it. Had a few little tears out when using a routing sled. Have to build one for myself now so I don't feel left out 😁View attachment 119751
Absolutely beautiful. Are they strips of plywood making most of the desktop?
 
Is the top in one piece or is the curved section connected and if so what method did you use? Is it sturdy enough without a leg under it?
Really nice and it's given me a new idea for my study which was just going to get a worktop with cabinet underneath and shelves above but that curved return extension to the top looks great.
While I would have preferred a single piece top, the cost and logistics of buying, moving, machining, transporting, scribing and then fitting a 3m top with a 1.2m deep section on one end on my own left me cold so I resisted that urge!

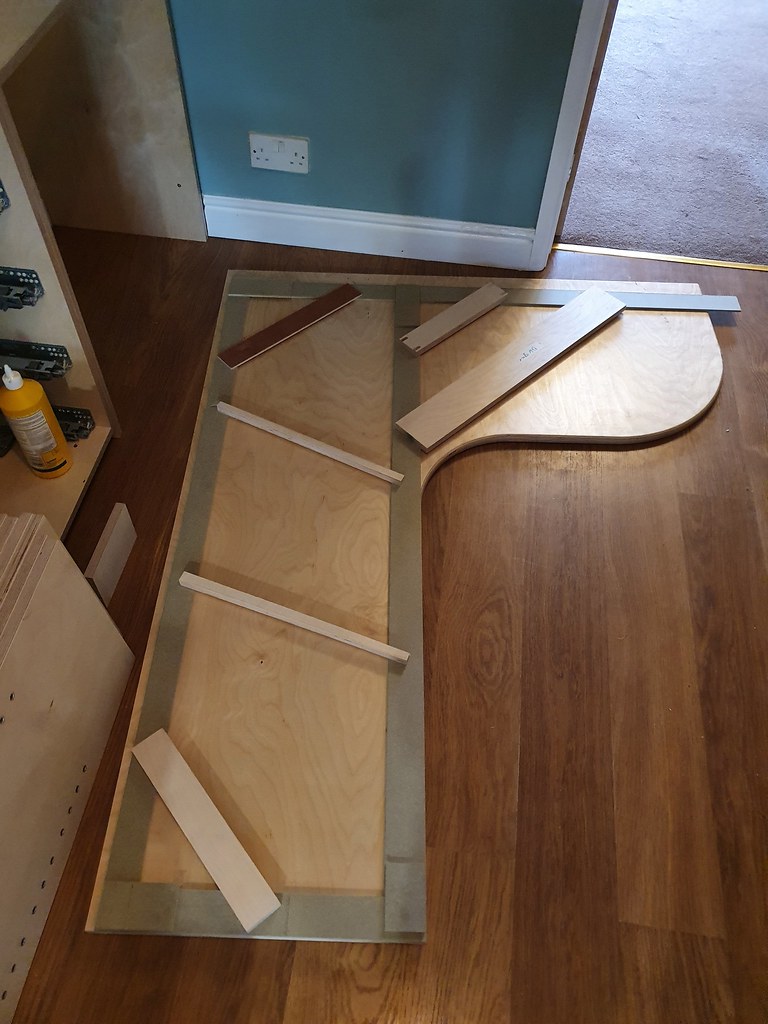
It's done in 2 equal length halves that join under the middle of the unit beneath the 2 18mm bookcase sides that land there. The curved end is just part of that right hand half of the desk. I made myself a 6mm mdf template after making a quick circle jig for my palm router and then used a bearing guided bit to get the shape onto the ply. The part that sticks out is supported by a brace on the wall but they didn't want a leg to start with. It's 24mm birch so while there is a little flex there I could probably sit on it and it won't break. The "unit" below that end is just 2 side panels and 100mm wide brace peices to support the desk. They are each secured to the adjacent cupboard and the wall and then to the desktop itself.

They asked me to do it this way and if they want it changed I'll change it.

Below you can see that section on it's own, with the scribing template laid on top as, naturally, the walls were all over the place. Not going to lie and say there were not some heebie jeebies about making the first scribe cuts on that piece.

51599810923_528a81c968_b.jpg


You may find this useful for setting out, Cabinet Configurator I haven't used this version as I have the old Dynaplan software that lets me load carcase drawings into sketchup, certainly saves a lot of extra work, nice work by the way.
Yes I did use it but only after I'd already got my hardware order slightly off. considering everything else it does you;d think it would also give you the cut list for the parts for the boxes but hey ho.
 
Last edited:
Finally finished this one on Friday. My first built in unit. Why start small :LOL:

The same friends that asked me to make the loft bed wanted this to finish their "phase 1" of moving into the new house. Birch ply, 3m wide, 2.5m tall, Blum push to open panel matched doors and drawers, Hafele shelf pins and inserts, 18mm sides and 24mm shelves. All assembled on site after unloading from the back of my Skoda Superb 😂 My first real attempt at scribing now that I know how to do it. They are very happy, as am I to have it done and out of my workshop!

Oh, and that one overhead bulb was all the light there was. I'll get a nicer pic once it's "dressed".

I already tagged @petermillard on twitter. His youtube channel has been a great source of knowledge and ideas and has helped give me the confidence to try this.


Thats amazing! I'm hoping mine looks even half as good as that but I'm doubting myself quite a bit!
 
OK so full disclosure, most of what i do is done on a CNC machine, I know some will say it's not woodworking but I don't class myself as a woodworker, more of a maker with an interest in wood. after being medically discharged from the Royal Navy (following a RTA) I worked for about 15 years as a signmaker doing cad cut vinyl & large format print, had to stop doing that for health reasons but some of the equipment I had could be used for other things such as the CNC which is how I got back into working with wood.
Was going to post a video of something done on the CNC however it seems the file is to big so this is something done without the CNC, made far a childminder who sent me a picture she found on the internet & asked if I could make something the same.

garden thing.jpeg
 
OK so full disclosure, most of what i do is done on a CNC machine, I know some will say it's not woodworking but I don't class myself as a woodworker, more of a maker with an interest in wood. after being medically discharged from the Royal Navy (following a RTA) I worked for about 15 years as a signmaker doing cad cut vinyl & large format print, had to stop doing that for health reasons but some of the equipment I had could be used for other things such as the CNC which is how I got back into working with wood.
Was going to post a video of something done on the CNC however it seems the file is to big so this is something done without the CNC, made far a childminder who sent me a picture she found on the internet & asked if I could make something the same.

View attachment 119986
Dude that's awesome, I may have to steal the idea, our Reception school year group would love this for their outdoor area.
 
Not my idea so your stealing nothing from me lol, if you do something along the same lines think a bit bigger that I did with this. After I made it I got to thinking that there was a lot of wasted space under the unit. Could have put in some cupboards for outdoor storage items for one. The area at the end where she wanted a little garden for them to look after could be almost anything, mud kitchen, sand box etc anything to do with outdoor play. I went with a clear polycarbonate panel, acrylic can get a bit brittle & could crack or break but polycarbonate is pretty much bullet proof although you do have to be a bit more careful as it will scratch & also if you go the same way make sure the polycarb is UV stable or it will yellow over time.
 
I just finishen this small oak and cotton string bench:

View attachment 119967


View attachment 119968

super fun project - 20% time spent on wood work and 80% on weaving :)
Love it! How hard was the weaving to pickup? Wife wants me to make her something like the ‘hans wegner chair ch25’ for her 40th. Year after next so I’ve a little time to learn new skills.
 
Back
Top