Picture frame, first attempt !

UKworkshop.co.uk

Help Support UKworkshop.co.uk:

This site may earn a commission from merchant affiliate links, including eBay, Amazon, and others.

Graaz0r

Established Member
Joined
20 Jun 2018
Messages
29
Reaction score
0
Location
Cambridgeshire
I thought after much browsing of this site and admiration of all your fine works, I'd post my first picture frame, really my first project that isn't in some way house/DIY related.

Used beech for the frame and black walnut for the splines, not perfect but happy enough for a first attempt, hopefully next ones will be a little crisper. It'll have a canvass installed and the black plywood is just for mounting and a small shadow gap around the canvass.

Biggest learnings were...

1) I clamped it like an ***** when I glued it up (clamp from end to end, will make some corner jigs before I make the next one)
2) I've since cut my riving knife to make non-through cuts to cut the rebate as a router (handheld) was a real pain !
3) Need some more practice on making the splines, didn't come out as crisp as I'd hoped

Not finished it with anything yet, that side is a little alien to me so need to do some reading, any advice/suggestions on what to use / how to use it is most welcome!
 

Attachments

  • IMG_20200814_130642.jpg
    IMG_20200814_130642.jpg
    4.6 MB
  • IMG_20200814_130646.jpg
    IMG_20200814_130646.jpg
    4.4 MB
Nice contrast on the splines. You may find that a donkeys ear shooting board will help crisp and tighten up the mitres.
 
Not heard of that before, will have a google - thanks

I made a couple of jigs, one for the mitres and one for the splines to use on my table saw (pics below), but having just cut a few more mitres for some other frames... I fear it's not quite right - will have a round 2 attempt to make another one

The ones I just cut I cut upright on the jig and it has a slight twist in the cut when I offer the mitres up against each other, I'm not sure which way round at the moment but the top or bottom is slightly longer than the other side, so have to assume the fence on the jig isn't quite 90* to the board. It has some flex as I over-cut the grove when making it, so maybe just reinforcing the back will sort that out.. TBC, will look when I'm next in the garage

Also, should have routed a rebate for dust... got caught out not sweeping the dust out and had one slightly over-length.. live and learn !
 

Attachments

  • IMG_20200814_162945.jpg
    IMG_20200814_162945.jpg
    4.8 MB
  • IMG_20200814_162954.jpg
    IMG_20200814_162954.jpg
    4.8 MB
hang on... youve cut down your riving knife????????
It's still there, don't worry... Just cut it so it's just below the top of the blade, rather than above it.

Let's me cut timber without going all the way through it, for splines, for example.

Does mean the guard can't be fitted on top, which I don't think I've ever used anyway
 
Nice frame and congrats on your first effort. A couple of things to consider:

1) If your handheld router can be mounted in a table, knock up a very simple table and mount it in there, that will make the rebates much easier (easier and safer than a table saw)
2) you can use a biscuit jointer to cut the splines - again, safer than a table saw, no jig required, and you can easily adjust the height of your biscuit jointer fence to create two or even three splines per corner
3) Ratchet band clamps can be quite useful for frames
 
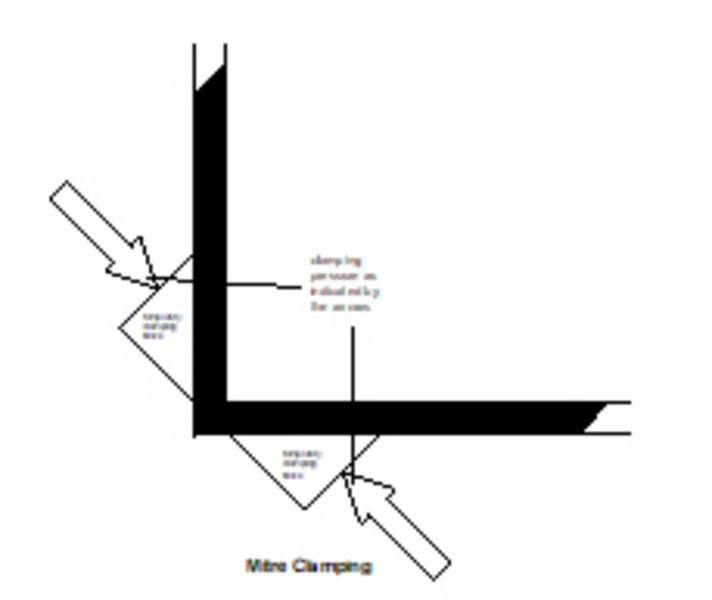
Another clamping tip. Hot glue some 45º corner blocks to the outside of the frame. Then you can use small clamps with a little pressure to close the corners. Don't try to use a lot of clamping force as the blocks will shear off. When you are done carefully pry off the blocks.

The frame looks nice . I would have put 3 splines at each corner for looks.

Pete
 
Another american utube victim :oops: T

be extremely afraid whenever you use that saw.
This is a bit technical, but bear with it, These are actual USA figures
https://www.ncbi.nlm.nih.gov/pmc/ar...y distributed,proportion of amputations (39%).

Appreciate your concern, albeit another subject entirely. Your assumption on being 'another youtube victim' are unfounded, it was this very site that led me to do that, and your concern on those threads was noted at the time.

I'll be purchasing an overarm guard shortly, rather than the flimsy plastic one mounted you can't see through on the riving knife, so no need to worry
 
Nice frame and congrats on your first effort. A couple of things to consider:

1) If your handheld router can be mounted in a table, knock up a very simple table and mount it in there, that will make the rebates much easier (easier and safer than a table saw)
2) you can use a biscuit jointer to cut the splines - again, safer than a table saw, no jig required, and you can easily adjust the height of your biscuit jointer fence to create two or even three splines per corner
3) Ratchet band clamps can be quite useful for frames

I do need to sort out a router table, it's on the list! Though I do like the left over timber you get from using a table saw, sure I can use that for something... serving board perhaps

No biscuit jointer unfortunately, no idea how you'd get splines from them, but it sounds amazing!

Instantly buying those band clamps, they look superb, thanks

Another clamping tip. Hot glue some 45º corner blocks to the outside of the frame. Then you can use small clamps with a little pressure to close the corners. Don't try to use a lot of clamping force as the blocks will shear off. When you are done carefully pry off the blocks.

The frame looks nice . I would have put 3 splines at each corner for looks.

Pete

Can't quite picture the gluing trick, 1x 45* block at the end of each length (on the outside) then clamp between them ?

Yeah, wish I put more splines in too, I was worried they'd come through the thinner material, didn't consider until after I could have just cut that out with a chisel... next ones !
 
Just because this is an english site, members are international and not immune to bad practices :oops: I make no apologies for repeating guard advice, I have known some people who have had to take their shoes and socks off to count to ten.:cry:
:cool:
 
Just because this is an english site, members are international and not immune to bad practices :oops: I make no apologies for repeating guard advice, I have known some people who have had to take their shoes and socks off to count to ten.:cry:
:cool:

I hear you, table saw is terrifying bit of kit and like all other tools, gets the respect it deserves... Bar an angle grinder to it's riving knife 😄
 
I hear you, table saw is terrifying bit of kit and like all other tools, gets the respect it deserves... Bar an angle grinder to it's riving knife 😄
Just a thought - can you buy/make/bodge a second riving knife, but with the guard attachment in place? That way you can keep your fingers in place , and only occasionally risk life and limb when making more frames.

Full disclosure: when I first got my table saw I never even put the blade guard on, and only a year later, when I bought some dust extraction, did I add it back in. Not only am I not covered in dust any more, but also I have got so used to the guard that I feel a bit uncomfortable making a cut with it not in place. I can proudly count up to ten, too.
 
Mike's illustration is what I was getting at.

With the spline jig you built you could make it safer. Have the vertical panel straddle your fence (can't see if it is in the picture) so in cross section it looks like the letter h gives you more control. If you make the 45º sloped bit wider and put a triangle of plywood on each one to cover the blade you keep the blade from ever being exposed outside of the little bit at the bottom of the V. A light clamp or two will hold the frame or small box to the face of the jig so your hands don't have to do anything more than push the jig over the blade. It's what I do even though I now have a SawStop and use it with the guard or riving knife most of the time. With a little thought most any machine tool jig can be made safer without a lot of effort.

Pete
 
my internet is very slow this morning and I cant load pictures, but google 90 degree mitre clamp. They come in all sizes and are very cheap.
 
Back
Top