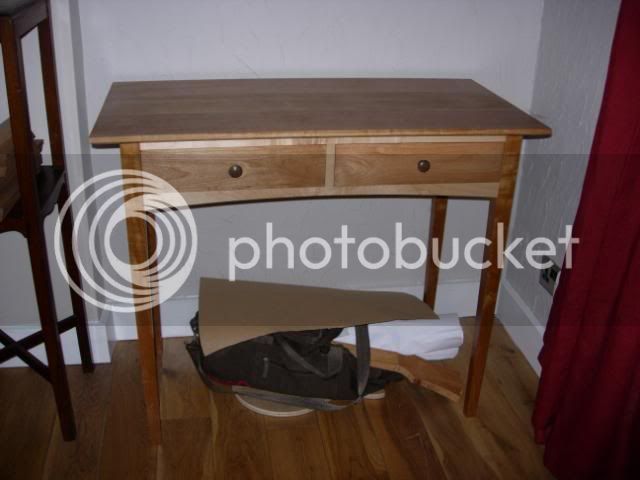
Oak Table/Desk

UKworkshop.co.uk

Help Support UKworkshop.co.uk:

This site may earn a commission from merchant affiliate links, including eBay, Amazon, and others.

Imperial

Established Member
Joined
7 Mar 2007
Messages
584
Reaction score
0
Location
Glasgow
Started making this while waiting for a few quotes to come home to roost.
11rzrzt.jpg

Picked up some Oak today and planned up the material for the top and drawer fronts, they'll be from one plank. The top will have breadboard ends, 1st time doing that and the drawers will be soft closers,no dovetails this time, 1st go at them too.

I had already made the legs from some leftover oak from the Console Table I made. Do you want pics as I progress or when it's finished?

Perhaps you dont want any? :lol:
 
looks like a nice design. Apparantly you get banned if you don't post WIP pics but that may just be a rumour ? :^o :D
 
I do like the look of this. As always, progress photos as-things-happen are preferred! :D :wink:
 
Should look very similar Ironballs, maybe the dimensions will be a little different and I think I may dispense with the upright between the drawers now.
It will perhaps look a little rougher and older by the time I've finished with it :lol:
 
Did lots of ripping, planning sizing components today and glued up the top, the breadboard ends still need sized and fitted. No point in showing you piles of oak...

verp0z.jpg


One of the tops 3 planks was a little different on colour, but I did not want to buy another or have to go back to the Merchant's to get another either, turned out better when sanded and will blend in ok when the finish is applied.

I use the domino to joint the planks as it leaves them virtually flush with only light sanding to flatten, unlike biscuit jointers I've used before(almost all makes). I have not fitted breadboard ends before so I guessing the ideal sizes, tongue 25mm x 16mm thick, the top is 28mm thick, perhaps somebody has a better idea of the correct dim's? I'm also undecided on pegs, hidden underneath or make a feature of them...

isaac Lord seem to be the best price for Blum Blumotion drawer runners, so will take a wee trip there, poss tomorrow or day after and Axminster for some G clamps

Was after some Olive Ash and had been trying to obtain some from Lanarkshire Hardwoods, but they did not have enough left, anyone come across any of late KD'd not Air ?
 
Dry fit of the main body of the Table, curve still to be done to front bottom rail, forgot to do it when I did the sides and back. Waited to measure the middle rail which is used to attach the drawer runners and will attach it with pocket screws in certain places and straight through the top rail. Drawer fronts are ready and next job will be making drawers and fitting runners.
All joints domino'd, for ease and speed of construction
xnbyxe.jpg


fnx0dx.jpg


dxmgxc.jpg
 
really like that bloonose, my girlfriend wants something very similar built and your project looks great, so I may be stealing ideas

have you got any pics of how you did the breadboard ends ?
 
I would have been tempted to dovetail the top rail into the legs to give it some extra strength and rigidity. Looks good though
 
Paul, there are several ways to tackle breadbord ends or 'cleats'... One of which is covered by John Lloyd in the new issue of British Woodworking (I received mine today). :)

I also would've dovetailed that top rail in place; but for time and money, I suppose... :wink:
 
No pic's of the breadboards being done, did not get many comments so thought nobody was interested Paul, sorry....

Ironball's, the center rail is 30mm thick and domino'd to the back rail then pocket screwed to the front rails, trust me its rigid alright. The drawer fronts are applied to the drawer carcasses and will look like one piece

Bought the Blumotion runners to fit this week and I'm going to do something to the drawer fronts which I have not seen anywhere, it'll either look terrible or make the whole thing look quite different,I have enough to make new ones if I don't like them. No decision on handles yet,make my own or buy some arts & crafts types.

Top and carcass have been stained with VDC's and a few coats of Osmo, but the drawers have still to be made. Monday before I start that .
 
More or less finished the Table and it proved very useful in learning how to do Breadboard ends and Blumotion drawer fitting. Wish I was a better photographer :oops: Still need to decide what handles to put on the drawers, may scoop out a circle/oval and inlay a straight piece across or may just buy some arts and crafts types? Also need to veneer up some panels for inside the drawers, just MDF at the moment.

v4m9g5.jpg

2nta2bs.jpg

142gfo4.jpg

15dw7qb.jpg
 
Very nice work. :)

How did you do the two outer corners of the drawer fronts, with the grain running vertically? Is that inlaid?
 
That's a really nice table. I particularly like the breadboard ends on the drawers to make it unique. The drawers look close-fitting too, makes me all teary-eyed to see something come together so nicely.

One thing I'd do differently though - make it a lot slower :roll: You guys need to slow down and turn your days into weeks so that I don't feel as slow as I obviously am!

Cheers,

Lee
 
I cut a couple of veneers to match the Q'sawn leg, removed about 1.5mm from the front of the drawer and glued them on, hand trimming them to drawer edges.
Thought it made the whole thing look a little less bland.
Probably took me 5 days to make but would be much quicker now I know how to make it.
The top may get replaced as it's cupping quite badly, but I'll wait for a wee while to see if it settles down now it attached.

Thanks for the comments, makes it worth while taking/posting pic's :D
 

Latest posts

Back
Top