Newbie seeks worktop router help!

UKworkshop.co.uk

Help Support UKworkshop.co.uk:

This site may earn a commission from merchant affiliate links, including eBay, Amazon, and others.

big

Member
Joined
19 Nov 2007
Messages
13
Reaction score
0
Location
shropshire
Hi there!
I'm a bit new to all this sort of thing, or at least to the wonderful world of power tools and accuracy, but would like some advice on cutting a laminate (sorry!) kitchen worktop...
Firstly, I have a router with straight cut bits and have been attempting to get a lovely smooth cut widthways on the laminate. Using the parallel guide gave me a reasonable finish, but it stops me cutting any further than about 6" from the end (because of the guide), and occasionally the bit seemed to catch which left a small indentation on the inside of the cut (which I didn't really want..).
Then I attempted to cut a longer bit off, so I square-clamped a bit of batten as a stop guide for the router. This caused it to catch and make even deeper indentations..
So, how do I stop it catching?
And would I be better off making some sort of jig with 2 bits of batten, or perhaps skirting, clamped across the worktop?
Any answers and tips greatly appreciated - but I don't really want to buy anything expensive as it's probably the only time I'll do this job (famous last words..)
 
Hi big

Welcome to the forum.

If you look here one of the members has an excellent page describing what needs to be done, but it is using a jig.

Cheers,
Neil
 
Cheers Neil!
That's most helpful..
However, I only need to cut across the worktop with the router - I'm doing the 90degree joints the cheat's way with metal jointing strips - so would prefer not to spend £80 or more on a decent jig (though next time I'm doing this job I'll never do again I'll probably wish I had!)
So would it work by clamping 2 straight edges (like skirting) 30mm apart to fit the guide bush? And how do I stop it catching, is it just me not pushing hard enough?
 
You don't say in your post in which direction you're cutting, or how much of a "bite" you're attempting (i.e., how deep are you trying to go on each pass).

Firstly, you need to cut from the postformed (rolled) edge towards the back, otherwise the rolled edge will blow out if you cut it the other way. If both front and back edges are straight, you still need to start the cut at the front.

Secondly, you need to be running the router with it's right-hand edge against the guide as you pull it towards you. This combination may only be possible by cutting from below.

Depending upon the size of bit and power of your router, don't try to take off too much in one go. A 10mm deep pass is asking a lot, even for a fairly powerful router run against a guide, so lighter cuts will be much easier, even though more will be needed - gently does it! :)

Ray.
 
Big,

Can you not just flip the worktop over and cut it with a circular saw.

I normally only cut open ends with a router, ones that will show and that I am going to edge laminate, so they are smooth.

Now I have a TS55 saw I dont even need to do that anymore because it cuts so square and smooth.

If you need to rout it just make a jig with some offcuts of mdf or something
 
Argee":3hp1k9ds said:
Depending upon the size of bit and power of your router, don't try to take off too much in one go. A 10mm deep pass is asking a lot, even for a fairly powerful router run against a guide, so lighter cuts will be much easier, even though more will be needed - gently does it! :)

Ray.
Ah! Now it makes a bit more sense - I was using it as a saw (homer)
It's a 2kW router, but 40mm was obviously a bit much for it...
So 4 passes at 10mm or so each would do it?
And I was cutting from left to right - with left being the finished edge and decorative side was up..
I do, however, have a circular saw which might do the job with more ease - perhaps I need to practice with the router (any recommendations on good books?) and use the big circular instead..
Now, any tips on how best to cut out a scribed bit with my jigsaw? How do you transfer the scribe-line to the underside to stop the laminate splitting, or do I have to buy different saw blades?
 
big":uoede21r said:
Ah! Now it makes a bit more sense - I was using it as a saw (homer)
It's a 2kW router, but 40mm was obviously a bit much for it...
That's quite an understatement, there! :shock:

Have a look here for some basic routing tips, etc. HTH :)

Ray.
 
Argee":3ux6jf8w said:
That's quite an understatement, there! :shock:

Have a look here for some basic routing tips, etc. HTH :)

Ray.
Doh!!!!
Looks like you've saved my life there - at least I'd already spotted the blades were rather sharp, and that I could easily have routed my own head by mistake!
I shall have another, gentle and very careful go tomorrow after having read the above links..
Thanks very much chaps - any more tips would be most welcome as well!
 
Hi Big,

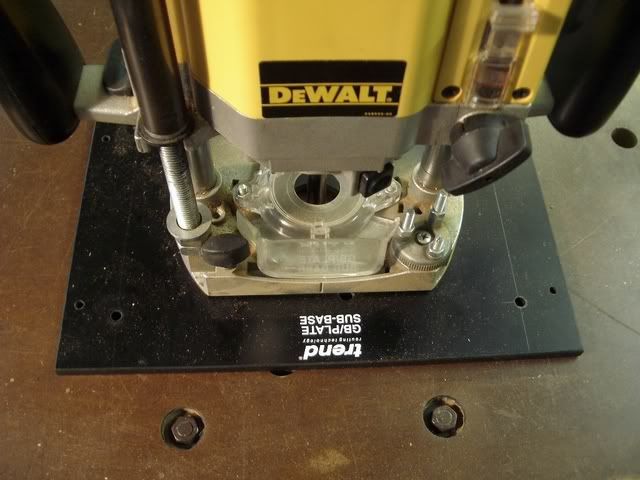
Here's a few more ideas. In order to increase the stability of a router, I find it helpful to use a large square sub-base like this

Router2.jpg


That one is a Trend sub-base but you can easily make one from MDF like this

Router9.jpg


You just need to drill out a central hole for the cutter to go through and then two or three countersunk holes to fit it to the router base (most routers have threaded holes in the base to fit it to).

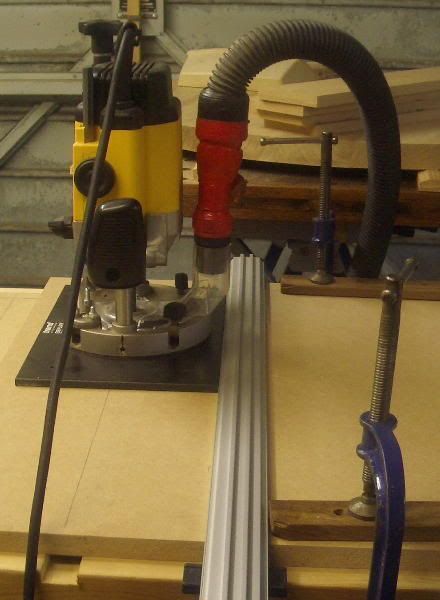
Then when cutting just clamp a straight edge to the workpiece (it doesn't have to be a posh straight edge - a scrap piece of MDF will do as long as it is straight) and run the base against the straight edge like this

Router8.jpg


By having a large sub-base, the base is in good contact with the straight edge well before the cutter starts cutting, so it's easy to make error-free cuts. As others have said, take very light cuts - I would say less than 10mm per cut, more like 3 or 4mm.

One other point - make sure that the piece you are cutting off is supported so that it doesn't drop off, taking a chunk of your finished piece with it :wink:

Hope this helps.

Cheers :wink:

Paul
 
Big - do what Paul C says !

I fit a lot of worktops (kitchen fitter) and it is much easier work if you just take a lot of smaller passes. I have a 2kw router, and you know if you're putting it under too much strain - starts to stall in the cut.

Also - does a nice tidy edge really matter that much if you are using metal jointing strips? The cut needs to be cleaned on the "rolled" edge - cos that is the only part of the cut you will see. The rest can be "rough" - ie doesn't need to be router clean - it will be hidden by the metal strip.

But if you've got a router, why not go the whole hog and do mitred joints. They're not that hard, and if you've already got a router, you can just hire a jig from HSS or similair. Or buy one off e-bay (around £30 IIRC, inc p&p), then sell it once you've used it.

Hope it goes well and the kitchen turns out nice.

Cheers

Karl
 
karlley":1o0sip0x said:
Or buy one off e-bay (around £30 IIRC, inc p&p
I bought a cheap worktop jig and wish I'd spent rather more on a proper jig.
The cheap ones are largely MDF and flex, so your cuts aren't as good asyou think they should me - DAMHIKT :(
The extra cost is trivial compared to the cost of most kitchens anyway.
 
Could I revive and hijack this helpful thread?!

I have a simpler job than the OP, but I have never used a router before.

I have two under 25mm-thick solid beech worktop corners that I want to round off; they are 90° corners and I just want to match the curve to the curved end-panel below.

I think I've understood that I need a piece of mdf with the same curve attached to the worktop to provide a guide for the router, but should this be attached to the top or underside of the worktop? Obviously, it could be screwed to the underside, but would have to be clamped if fitted to the top.

Would a sub-base be useful in this instance?

Any help appreciated for this total newbie!

Would it actually be cheaper and easier to take the worktops to a workshop and pay for it to be done?
 
You need to work from the front edge towards the back to minimise breaking out the visible edge. so depending on which type of bearing guided cutter you have (top bearing or bottom bearing) will dictate which face your pattern is attached.
ensure that the pattern is placed so that you are still just on the curved part when the cutter start to cut otherwise you will have a very visible indentation on the front.

Cut the worst of the waste away with a jig saw or similar only leaving a mm or so to do with the router.

Practice on some scrap timber first.
Make the pattern as smooth as possible, the router will copy any imperfections.
Move the router quickly round the cut, going slowly will tend to cause burns.
This might be counter intuitive and you think you want to go slowly to be careful but this extra time in contact with the wood allows more heat build up and beech is quite susceptible to burns.

Good Luck

Bob
 
Got the kitchen in and it looks grand!
As it turned out I just used jointing strips which meant I could use the circular saw..
However, I did improvise a jig using clamps and bits of wood and routed some end panels to match the doors, all of which I sprayed with Farrow and Ball colours so they look pretty good too.
Next job is to make a slightly downhill running paved area out of very uneven bits of limestone spoil from a local quarry.
 

Latest posts

Back
Top