My learning piece thread

UKworkshop.co.uk

Help Support UKworkshop.co.uk:

This site may earn a commission from merchant affiliate links, including eBay, Amazon, and others.

Stiggy

Established Member
Joined
30 Oct 2015
Messages
257
Reaction score
0
Location
Lewes
I hope you don't mind but I wanted to post pictures of my work to get constructive comments from you guys.

What I have decided to do is keep all my work with imperfections, this way I can remember what I did so I don't make the same mistakes twice(although I will I'm sure!). I could have spent more time correcting the finish, but would I remember the mistakes I made? Probably not.

My very first piece is after about 4 hours of practice with mainly blunt tools - I soon learnt after sharpening a couple what a massive difference it makes, so I did the rest!

So here we go!

oak goblet 1.jpg


oak goblet 2.jpg


This was made from an offcut from a walnut kitchen worktop given to me by a friend.

walnut bowl 1.jpg


walnut bowl 2.jpg


walnut bowl 3.jpg


I'm sure you can all see the mistakes I made as can I every time I look at them, but it just makes me want to do better in the future.

:D
 

Attachments

  • oak goblet 1.jpg
    oak goblet 1.jpg
    195.9 KB
  • oak goblet 2.jpg
    oak goblet 2.jpg
    209 KB
  • walnut bowl 1.jpg
    walnut bowl 1.jpg
    198.6 KB
  • walnut bowl 2.jpg
    walnut bowl 2.jpg
    209.5 KB
  • walnut bowl 3.jpg
    walnut bowl 3.jpg
    192.4 KB
The goblet is quite a nice shape two things jump to mind the first is the bead if it does not turn out then it would have been better to lose it altogether and the second is the bowl thickness it look quite thick.
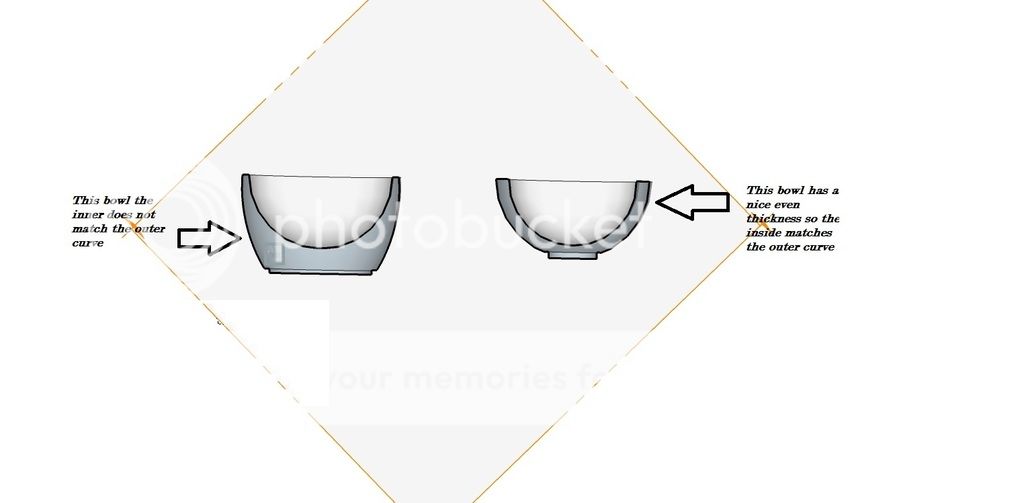
Going onto the bowl the first thing that hit me is that the chucking point, it would have been better again to lose that but that is something you will learn as you go along as it is you can see the jaw marks on it, secondly the inside would have been better if it matched the out side or visa versa. that does not mean you need to do it with every piece but this one it would improve the looks.
Considering that you have only turned for a short time the finish is not bad at all.
Hope you don't mind the comments I have made
 
Thanks Dalboy, I more than welcome your comments!

Everything you said makes sense, I shall practice more and see if I can work on the points you've made.

One question - what do you mean on the bowl by matching the inside with the outside?

Thanks!

:D
 
Stiggy":h56mjj7i said:
Thanks Dalboy, I more than welcome your comments!

Everything you said makes sense, I shall practice more and see if I can work on the points you've made.

One question - what do you mean on the bowl by matching the inside with the outside?

Thanks!

:D

Something like this, It is not a hard and fast as sometimes having them odd can add to the piece but in you case I think it applies. Hope this helps

bowl%20cut%20out_zpsmvmo8poi.jpg
 
if you want to progress your work in the design area, (an excellent goal to have by the way) then you will benefit greatly from Richard Raffan's book, The Art of Turned Bowls, in which he gives key pointers to what makes good form and design. A well formed bowl will look good always, regardless of grain etc.
 
I made an acorn!

I had to do it between centres as my chuck is not working for me as it's a 4 jaw independent.

You will notice the bump on the top which is where i had to cut it off and didn't spend enough time sanding it off (lesson learnt!) before waxing it it. Where the nut meets the shell it needs more work and cleaning, but overall I'm pleased with it.

All my pieces so far have been done by eye - I have some calipers coming soon from Axeminster (along with some other goodies!) so I will be able to produce more uniform work and start using templates for my designs.

:D

acorn1.jpg


acorn2.jpg
 

Attachments

  • acorn1.jpg
    acorn1.jpg
    191.1 KB
  • acorn2.jpg
    acorn2.jpg
    204.8 KB
Stiggy":3fwbmkxz said:
I made an acorn!

I had to do it between centres as my chuck is not working for me as it's a 4 jaw independent.

All my pieces so far have been done by eye - I have some calipers coming soon from Axeminster (along with some other goodies!) so I will be able to produce more uniform work and start using templates for my designs.

Re the chuck, you can still hold a piece like this, just get it good enough centred and whilst the bit of waste in the jaws will be ecentric to the rest of the turned item, when you part it off the finished piece will be fine.

Re the calipers, depending on which ones you've ordered, the first job is to grind / file the tips that touch the wood to a nice and round profile. The typical metal chisel points they are shipped with are fine for static work (although can mark the wood) but if used one rotating wood (I know, caution here but we all do it!) will dig in and bite resulting in them being flung back at you if the tips are not round.

Tip here: if you doing a piece with many different diameters, I have a number of bits of old wire coat hanger bent into elongated D shapes, snipped and the base of the D and rounded over with a file so a rubbing contact is safe. can be set to a gap and provided not forced over too big a spigot / diameter, will hold their setting and work quite nicely. Also regarding the feedback you've been offered above re even bowl wall thickness, make a deeper D and you can run it (with lathe stopped I suggest) up the wall as your hollowing the bowl out and just watching as the air gap changes which will tell you how even or otherwise the side wall thickness is.

Have fun and thanks for sharing!

Simon
 
It's been a while since I last posted but life has been busy!

I bought a new 4 prong drive centre which has made a huge difference to my turning already - can't wait til Chrimbo to get my new chuck!

Ornament 1.jpg


inside out 1.jpg


pot 2.jpg


wand 2.jpg
 

Attachments

  • Ornament 1.jpg
    Ornament 1.jpg
    67.6 KB
  • inside out 1.jpg
    inside out 1.jpg
    38.9 KB
  • pot 2.jpg
    pot 2.jpg
    65.2 KB
  • wand 2.jpg
    wand 2.jpg
    61.3 KB
I have made so many more pieces since my last post.... got lots of photos still on my camera which I need to sort out.

I love trying different things and experimenting - the other day i started a softwood bowl and ended up turning it all to shavings as I was having fun trying different shapes!

Here are some of my experiments - I haven't been tough with myself if I don't get a brilliant finish as I will be concentrating on that more in February.

All c+c welcome as they can only improve my work!

:D

Walnut rings

2016-01-25_1453748428.jpg


Paperclip pot in pine

2016-01-27_1453925283.jpg


Oak tool handle

2016-01-29_1454103332.jpg


Simple oak bowl

10366074_528825530627145_3168247098434617332_n.jpg


Another oak bowl

943900_528825360627162_7834716538805287223_n.jpg


Walnut pot

12628445_10154478584850616_803883832371455038_o.jpg


I will try to upload more soon!

:D

EDIT - Not sure why the bowl pic is appearing below - I can't seem to get rid of it!
 

Attachments

  • 2016-01-25_1453748428.jpg
    2016-01-25_1453748428.jpg
    44.4 KB
  • 2016-01-27_1453925283.jpg
    2016-01-27_1453925283.jpg
    53.3 KB
  • 2016-01-29_1454103332.jpg
    2016-01-29_1454103332.jpg
    66.3 KB
  • 10366074_528825530627145_3168247098434617332_n.jpg
    10366074_528825530627145_3168247098434617332_n.jpg
    35.7 KB
  • 10366074_528825530627145_3168247098434617332_n.jpg
    10366074_528825530627145_3168247098434617332_n.jpg
    35.7 KB
  • 12628445_10154478584850616_803883832371455038_o.jpg
    12628445_10154478584850616_803883832371455038_o.jpg
    132.4 KB
  • 943900_528825360627162_7834716538805287223_n.jpg
    943900_528825360627162_7834716538805287223_n.jpg
    48.9 KB
Well you're improving fast Stiggy. Well done. It's noticeable from your bowls in particular where your wall thickness has really reduced, a sure sign you're controlling the tools better, taking more risk because your confidence is growing. Your finishes look good from the photos. The next step I would (politely) recommend is to read and digest about the idea of the fair curve. The idea is that what pleases the eye is a continuous smooth radius which doesn't alter until a specific transition. Also your skill in bowls has now reached the stage where it's worth trying to bring the curve past the rim. As such you will have a slight undercut when you hollow the inside. Personally I think they have slightly more elegance and they get away from what my turning club masters call the "dog bowl" syndrome

But these are of course all in the eye of the beholder, you're doing really well and just putting the time you're doing is clearly working in spades. I love your rustic wand by the way :)

Also, for spindle work. Do yourself a favour and get a stub centre. You'll never use any other form of drive centre again
 
Random Orbital Bob":2vrpwwbb said:
Also, for spindle work. Do yourself a favour and get a stub centre. You'll never use any other form of drive centre again

Do you mean the drive centres with a spiked ring instead of a 4 prong centre?
 
I have to say your posts have cheered me up no end. Lovely to see enthusiasm of someone who is enjoying their turning. Keep it up.
 
Stiggy":3u6xz8tw said:
Random Orbital Bob":3u6xz8tw said:
Also, for spindle work. Do yourself a favour and get a stub centre. You'll never use any other form of drive centre again

Do you mean the drive centres with a spiked ring instead of a 4 prong centre?

Yes, that exactly. I noticed a typo in my original...its a steb centre and not "stub" :) (But confusingly the type I use is also called a steb drive as it fits into a chuck...see below)

Robert Sorby had the patent on them until very recently I believe so they were quite expensive (I recall paying in the region of £80-£100 for both headstock and tail centre 1" steb centres). But my understanding is that now Sorby have had the patent expire we're expecting a flood of much cheaper clones (Chiwanese presumably) to arrive though I've not personally reviewed any yet.

I use the headstock version that fits into a chuck rather than with a morse taper because that way I almost never have to remove my chuck, even when turning spindles. When you're hollowing that's a Godsend because you turn the spindle blank to a cylinder, stick a tenon on and remove the stubby steb centre (steb drive) and wind it straight into the chuck...its really fast. I'm doing 18 flower pots for a wedding at the moment and that method works really well. Also great for egg cups etc.....anything where you're hollowing end grain and the job is relatively small.


The link below takes you to the page on the Toolposts website where they're explained and priced (no affiliation).

http://www.toolpost.co.uk/pages/Chucks_ ... ntres.html

Cheers
 
Hi

Steb Centre clones available, (when back in stock), from Chronos at a much reduced cost:

http://www.chronos.ltd.uk/acatalog/SCT- ... hucks.html

These centres are very versatile but if you get too adventurous with your tool application they can slip and cut an ring into the stock - too many of these and the centre will no longer grip the stock, (though you can re-claim it by sanding back until the ring groove has gone leaving only the centre mark for re-mounting).

Regards Mick
 
wow...just looks at the Chronos version and they're a quarter the price of the Sorby ones!!! The Sorby version as you'd expect from Sorby are very good quality, robust etc but my goodness me the Chronos ones are better value as I daresay are the Axy ones too.

One amendment I need to make also is my preferred diameter is not 1" as I say above but in fact 7/8" Not that it makes much difference of course...just that if looking at Sorby they don't make a 1" version whereas Chronos do. I found that size (whether 7/8 or 1") seems about right as a compromise for both small and larger pieces. There are sizes available for larger and smaller than that happy medium.
 
Stiggy pm'd me some questions and I thought it worth posting pics of a bowl curve that goes past the rim to create a slight undercut here in this thread. Also note the walls don't dive into the table creating a shadow line round the base. Both design measures to try and lift the elegance of the piece. It's brown oak, just over 12" and as can be seen its use was for more turned items :)

bowl showing curve3.jpg
bowl showing curve2.jpg
bowl showing curve1.jpg
 

Attachments

  • bowl showing curve3.jpg
    bowl showing curve3.jpg
    88.5 KB
  • bowl showing curve2.jpg
    bowl showing curve2.jpg
    117.9 KB
  • bowl showing curve1.jpg
    bowl showing curve1.jpg
    117.1 KB
Brilliant Cheers Bob!

I was given a really nice bit of steamed beech recently which I could get a couple of nice size bowls out of - probably about 9" x 20" x 2.1/2" - I have got to make a spindle gouge jig first though, as the wonderful, beautiful Crown bowl gouge I bought recently is still as I bought it - with the original grind. I need to put a nice swept grind on it before I even THINK of mounting the beech on the lathe!

I hate any time when I'm not making mess, but making jigs has transformed my work and enabled me to quickly sharpen my tools - I'm getting closer to finding my own personal grind, so the time faffing about making jigs is definitely worth it!

:D
 
Dalboy":x9dez7eb said:
Spindle":x9dez7eb said:
Hi

Steb Centre clones available, (when back in stock), from Chronos at a much reduced cost:

http://www.chronos.ltd.uk/acatalog/SCT- ... hucks.html

They should have them in about another 4 weeks as I sent an e mail about 2 weeks ago and the quoted 6 weeks will have to see

Dalboy, do you know what the quality of the Chronos live centres are like? They seem too cheap to be true.
 
Back
Top