My first attempt at wood working - Jewellery Box (WIP)

UKworkshop.co.uk

Help Support UKworkshop.co.uk:

This site may earn a commission from merchant affiliate links, including eBay, Amazon, and others.

cmwatt

Established Member
Joined
8 Sep 2010
Messages
96
Reaction score
0
Location
Inverness, Scotland
Hi folks,

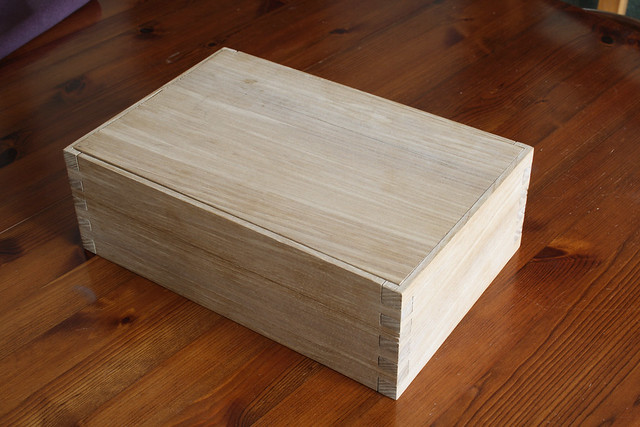
This is my first real attempt at wood working since school days (I'm 25 now), I always enjoyed it at school but never really pursued it as a hobby until now. I thought I'd start off with something small in case I make a mess of it, so it wont be at too much expense! I bought some Elm a couple of months back from a local supplier of hardwood and started working on it a couple of weeks ago now. I've just been doing an hour here and there when I can, with my limited tool selection and have been learning a lot and made a few small mistakes but nothing irrecoverable I think. :D Here's progress so far:


_MG_5412 by Craig Watt, on Flickr

Nothing it glued together yet, so I can replace bits if needs be. You can probably notice the top has slightly warped since cutting it. I took the wood into the house for about a week before working with it, should I have left it longer? Is there any way to sort it now, or will I just need to cut a new top? :-k
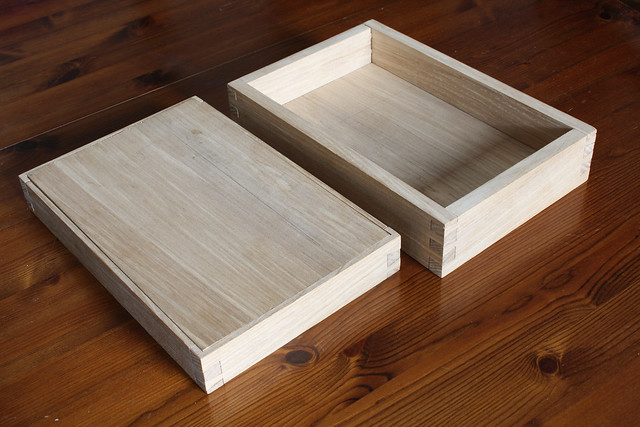

_MG_5419 by Craig Watt, on Flickr

My bandsaw isn't big enought to cut the box after assembly so I had to cut each side individually. That was a nerve racking moment! :shock: Thankfully they all even out pretty level with each other!
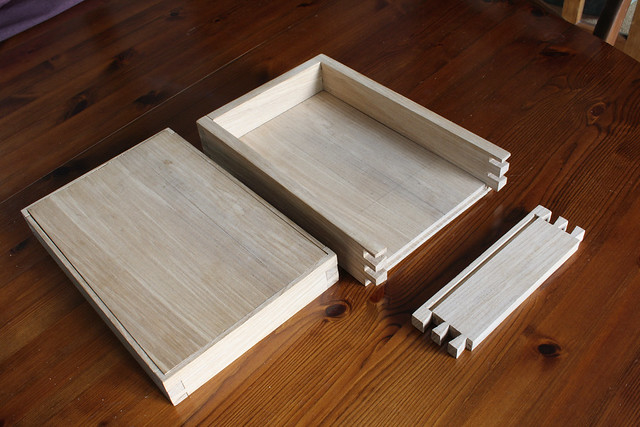

_MG_5420 by Craig Watt, on Flickr

This just shows how the bottom is slotted into the sides. Should I glue this in, or just leave it dry fitted to allow for movement?
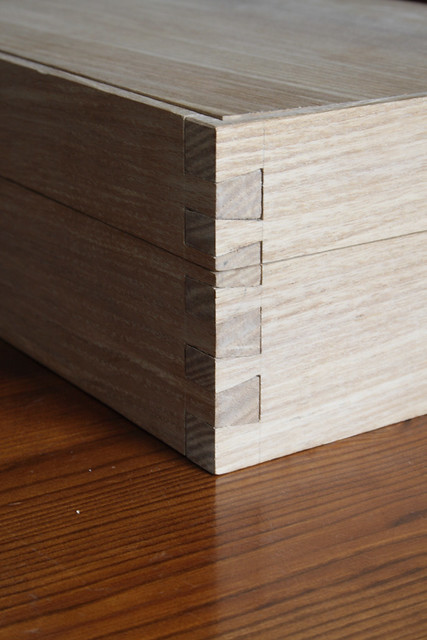

_MG_5418 by Craig Watt, on Flickr

A detail photo of some of my first go's at doing dovetails in hardwood! Some have minor gaps, which I plan to fill with either sawdust or tiny slithers of elm.

_MG_5417 by Craig Watt, on Flickr

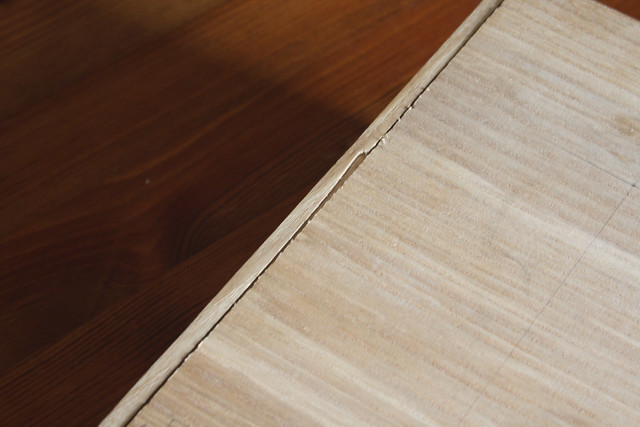
Finally this was a mistake I made when routing the rebate for the top to sit into! Always make sure your work is firmly clamped down! #-o :oops: Think I need to invest in more clamps/different types!

Anyway, still lots to do yet. Need to fit the Neat hinges I got from Ian and a nice wee mortice lock! Might be tricky as I don't have a router table or drill press yet, but I hope to get either/both soon. I also plan to do a small inlay on the top to a daisy design which I am using from a photo. I got some sections of veneer which I intend to use for that. Then I plan to make an internal tray and that sits on ledges all the way around and line it with velvet or something. That's about it for now. If anyone's got suggestions/recommendations, I'd be glad to hear them! :D
 
Thanks Blister, still lots of potential to mess it up yet! hehe It's a big learning curve, doing hand cut dovetails that actually fit, using a router for the first time etc!
 
Craig, It beats my first attempt hands down.

Ref. gluing the base, it seems it is not ply and in that case I would just apply some glue to the central part of each end, this would allow expansion outwards but stop it from moving from side to side.

I would also treat it as a practice piece ( i know elm is expensive) and doubt if the lid is recoverable, carry on with your trays etc, finish it (oil etc) and line it with something cheap, I would save your nice hinges, or even fit them as practice but don't damage them, and do another and keep this one in front of your work for reference and do the next one much slower and check, check, check before you make a cut.

I only started a year or so ago and my mistakes are just starting to slow down, keep going.

This is my latest attempt, just got to fit the hinges and catch on the front
 

Attachments

  • box 2.jpg
    box 2.jpg
    40.4 KB
  • box 1.jpg
    box 1.jpg
    42.9 KB
For a first (or even a second or third) I think that's jolly good! I'd say just carry on to completion and by the time you given it a final plane/sand it'll look a lot better. anyway. You may be able to "lose" that router slip with a bit of crafty inlay all round the edge. Excellent - let's see more WIP pictures. :)
 
Thanks for the kind words guys! :)

That's a good idea RogerP, might do that. We shall see. :)

Thanks for the suggestions andersonec. I intentionally bought enough elm to do two boxes (cost me £28 I think plus £12 for the seller to thickness it for me - now I have my own P/T though). So I might have a go and start making a second and if that turns out better, I could use the better hinges etc on that. Either that or finish this one using the better hinges, then take them off and use them on a 2nd version later on and put cheaper ones on the first. Still to decide. :-k The jewellery box is for my fiancée, who currently is in South Africa but is coming over in December, so that is the deadline! As RogerP says, maybe it'll look better after a good sanding and the gaps are filled in.
 
Wow Craig your pulling my leg first box - if this is your first box you and Andy (seeing his latest box) are set to be masters in no time.

Well done, and remember mistakes will always be made - its how we learn and the next box gets closer to perfection.

Cheers

Ian
 
Coming along Craig. You say that it's elm. Not to put a damper on the box but elm is kind of renowned for moving long after it's been cut / made. Keep going. You can see a box I made at my website.

All the best
 
Thanks guys and thanks Ian again for the hinges etc. I think your (and Malcolm's) boxes look great! Hope to be able to make them as good one day.

Thanks for the info Malcolm, things like that are really helpful to know. Perhaps I should get some books to learn of the more elementary things like that! Any book suggestions for complete beginners welcomed. :)
 
Craig, there is only so much that you can learn from books. You learn a lot more by making furniture (hands on). I am only an e-mail away and will always take time to help. Thank you for taking the time to look.
Just remember it;s very easy to make a mistake, getting out of it requires a little more skill.

All the best and keep well


Malcolm
 
I would comment the same as other posters here, a very good start and you have started a learning process that never stops.

My solution to timber moving and warping on work like this is to work a lot with strip pieces and I like contrast patterns anyway.

If your lid top is unglued, perhaps you could remove, cut to strips and make up for loss of timber with a contrast edging piece.
 
Hey Craig, that's pretty darn good buddy, I too am embarking on this kind of joinery as a novice, the last 6 months and am currently making my first dovetailed box. I spent all afternoon and the box is one set of dovetails smaller than when it started as I had to cut them off and start again, they were so bad the first time!! They are not brilliant now, but yours are much better. I did learn however that its better to make a very accurate saw cut and leave the shaping with chisels to an absolute minimum. I kept getting problems where the chisel cut would pull wood away with the grain, rather than follow the line. Once that happens, it's too late!! ( I was using cherry)

would you agree? I have Rob Cosman's video and watched few people on you tube doing it, but its so easy to go wrong. Still, each set I did was better than the last, as I went round the box. I am trying to decide now whether to do them again, or just carry on, after all, I cant expect it to be perfect first time.. Trouble is the box keeps getting smaller!!

But it is good fun, if a little frustrating ! Well done again!

Cheers, Mark
 
We had a member here some years ago that recommended a mirror is placed behind you dovetail saw cuts so you can observe your rear cutting line, hope that helps. Also another member did one dovetail test piece everyday before he started any stock work to gain the skill which he says now comes automatically.
 
cmwatt":3fhx8zz7 said:
How are you finishing the box? :D

Craig, Sorry for the delay in replying, I finish them with three or four coats of Danish oil then a coat of wax, make sure you give it a buff with some very fine grit paper or 0000 wire wool before applying the wax, makes it feel like velvet.

I still have to have a go at some dovetails but I think I will have to practice on some scrap first, not as brave as you.

Ref. Rob Cosman, I think that is a good exercise in salesmanship for his tools, people have been making superb dovetails long before he came along with his super expensive tools.

One more thing, I have been getting advice from Ian sometimes, just send him a picture, he is more than helpful and who better to get advice from.

Andy
 
Thanks for the idea devonwoody, not sure if strips would fit in the the style or design I had in mind, but will think about it. :)

Hi Mark, I guess you mean me (Craig), not Ian. :D I had the same problem as you, using the chisels to try and get it closer to the line, when in fact it's so much easier as you say to get a good accurate saw cut and use the chisel as little as possible. In fact I recently bought a piercing saw (from workshop heaven) for future use for removing the waste, so there is less fiddling with chisels and should make things quicker. Like you say, practice makes a lot of difference. I practised on some soft wood before (maybe 3 or 4 times, and made a mess of the first 2 or so (getting chip out etc), but was happy enough to give it a go on the harder wood. I must say I found it so much easier using hardwood for dovetails. I have seen Rob Cosman's videos which were helpful, but his tools are ridiculously pricey! :shock:

The good thing with my Pax dovetail saw is it is reflective, so is easier to keep it aligned. A wee tip I found somewhere on the net, was cutting wee notches with a chisel on the waste side of the line to help get a good start.

Thanks for the info andersonec, was thinking about using a similar finish on mine. Currently thinking about getting a router table which would make life a lot easier fitting the hinges and lock, rather than trying to balance the router on a 15mm thick piece of elm. :)
 
Back
Top