Maple Dish

UKworkshop.co.uk

Help Support UKworkshop.co.uk:

This site may earn a commission from merchant affiliate links, including eBay, Amazon, and others.

Gill

Established Member
Joined
3 Sep 2003
Messages
3,537
Reaction score
1
Location
Lincs
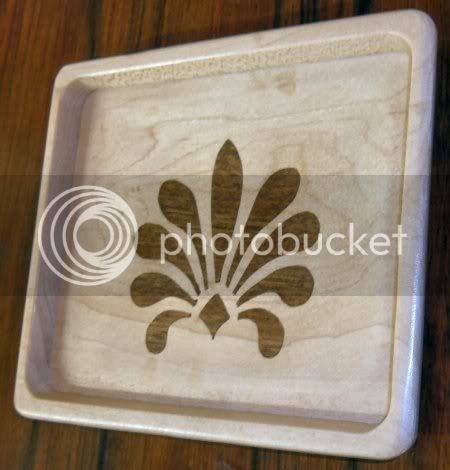
I'm a bit hesitant to post this maple dish because I'm very much aware of the flaws in it. However, I've been told off before for being too self-critical, so here goes:
Dish3b.jpg


Dish2b.jpg


It was cut from a single piece of 6mm maple and inlaid with iroko. The centre of the dish has been gently scalloped out, initially by hand carving and finished with abrasive paper. Finally, a neutral wax was applied and buffed before His Lordship accidentally knocked it onto the floor this morning, shattering it.

Gill
 
Thats great Gill, the hand carved bit leaves me even more in awe, thought it was routed, Di is building a payback list for you at the moment having seen the PM, but I don't think it's suitable for public consumption, (the list that is) glad my names no Maurice.
 
A router went nowhere near this :lol: !

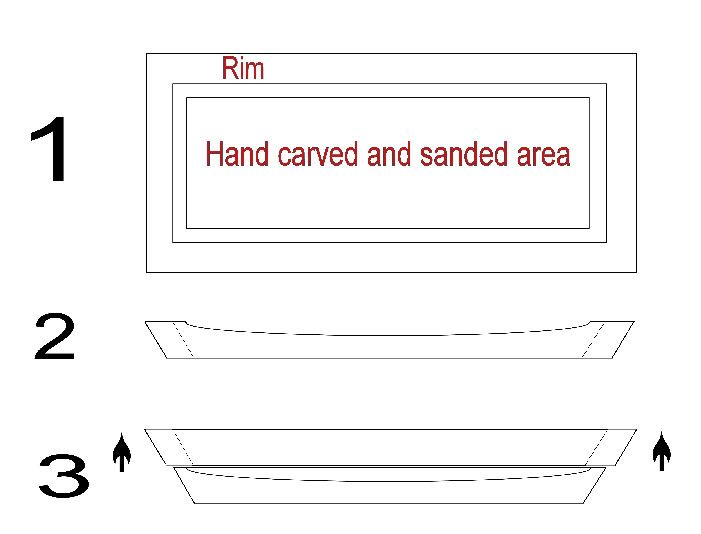
It was made from a single piece of maple by laminating it. The outer edge of the board was cut at an angle and a parallel cut was made inside that at a similar angle so that the bottom of the outer piece would overhang the the top of the inner piece. Then the centre of the inner piece was recessed by hand and the outer piece was laminated on top of the inner piece.

If the top laminate had overhung the recessed area, it could have been sanded back using a drum sander. Fortunately, on my dish project this problem didn't arise.

I've produced a diagram which I hope explains the production techniques better than my words:

Dishstructure2.jpg


This was one of the techniques that I can imagine being very useful to turners and which I'd hoped to discuss on Saturday.

Gill
 
Gill, funny you should post the details at this time, I was given a copy of "Making Wood Bowls, with router & scroll saw" By patrick Spielman & Carl Roehl last week.
We were passing comment at the gathering about recognizing the skill and work input to such pieces but all agreed that doing similar with the lathe doing all the finite finishing was more suited to our short attention spans.
 
I've got that book too - can't you tell ;) :) ? It's really good but the amount of work that goes into the production of each bowl is, as you say, quite overwhelming. Nevertheless, the basic lamination technique should enable a turner to reduce wastage quite dramatically, assuming the glue is strong enough.

Gill
 
Still looking for the flaws I think you will have to post another image pointing them out to some of us who don't scroll 'cos they aren't very good flaws if you can't see them. :lol:

Pet
 
Gill, 'tis brilliant. I'm in awe - wouldn't know where to start! =D>

Gill":14l9k1g3 said:
...before His Lordship accidentally knocked it onto the floor this morning, shattering it.
Eeek! :shock: Cripes, end of the honeymoon period? 8-[

Cheers, Alf
 
You're too kind, guys - it's nowhere near as difficult as you might think. The big problem with this sort of inlay work is that you need to drill pilot holes for the saw blade to pass through. This means that when the inlay is made, you're left with a very small hole which needs to be filled. I've yet to find a satisfactory way to do this because the filler is always visible. Perhaps I should ask for guidance over on the "Finishing" board.

The visibility of these pilot holes matters a lot to me. I'm used to inlaying wood veneers with a knife so as to achieve a perfect fit and the presence of any blemishes is anathema. With this piece, I drilled the pilot holes so that they would be roughly the diameter of the kerf of the blade I intended to use. I then inserted fine jewelers blades to enlarge the holes so that they would accommodate the blade width. Only after enlarging the pilot holes did I insert the actual blade I wanted to use to cut the inlay, hoping this would minimise the damage. Alas, it doesn't seem to have worked.

I even drilled the pilot holes at the precise angle of the scroll saw table too so that the pilot hole would be as close to 'true' as possible - marvelous little gadgets, these Wixey gauges!

Oh well, perhaps I just need a bit more practice :) .

Gill
 
(I think it's a beautiful piece of work, Gill.

On the pilot holes, I suppose the lateral approach would be to make them part of a decorative feature in some way, and thus highlight them instead of trying to disguise them? I don't know whether that would work in this particular design, but if one started by designing with the holes in mind, it could be a solution.
 
GIll, another way of doing this inlay, and I'm sure you will have thought of it already and dismiss my suggestion with a logical reason, is to use the marquetry 'window' method for the inlay. The problem here is getting a good tight cut on the inlay to avoid to much adjustment with the sandpaper.
Alanjm
 
Hi Alan

I've tried the marquetry window method for inlaying with solid wood and it isn't satisfactory. The thickness of the wood used as a window means it's almost impossible to get a scribe into narrow parts to etch the outline. Then you have to cut the inlay very, very accurately and make multiple attempts to get a clean fit, sanding where appropriate. When I tried this project using the window method and it took several days to cut the inlay so as to get a decent fit. Even then it wasn't particularly good; certainly not as good as when I used the pilot hole method.

The window method might be okay if you're using standard marquetry veneers which are little more than paper thick. Nevertheless, you'll still find a knife is more accurate and much quicker than a scroll saw.

Gill
 

Latest posts

Back
Top