Kell No 3 honing guide - worth it??

UKworkshop.co.uk

Help Support UKworkshop.co.uk:

This site may earn a commission from merchant affiliate links, including eBay, Amazon, and others.

Harlequin

Established Member
Joined
20 Sep 2008
Messages
386
Reaction score
0
Location
Leeds
I know that on here there are many who swear by this and others equally who differ but FWIW here are my views.
I ordered the guide recently which was delivered about 5 days ago - came with a set of "hand written" instructions(photocopy!!)
It looks very well done and exudes precision.
Heres the problem though - I still have not used it.
Normally with most buys I have a go immediately to cure the "itch" and have a fair idea of the validity of the purchase - but not this one.
Made a wedge for it 2 days later - somehow the thrill was off.
Today however I wanted to sharpen my LN 3mm chisel - hang on you got to make another special wedge :evil:
In fact if one wished to maintain the spirit of the invention (precision/horologist level etc) it is desirable to make a special wedge for different sized chisels.
If you wanted to sharpen a skew blade - you got it - another wedge type standoff.
It would also be a good idea to make some "standoffs" from the reference pins for small chisels - what to use here wood ?? acrylic is better ,how thick ? - check he web ,order stuff etc.
Lets have a look at the "hand written instructions" again ???

Let me check how it feels on the diamond stones says I - hang on , Forgot I had to make something to house them in so the guide wheels can run alongside.

How does one achieve the right angle ? you measure the overhang with a ruler or make another jig (for skew blades you will need another ofcourse)

Faff !

I realise now why I haven't sharpened anything so far. :(

I agree the Kell No 3 is an excellent example of precision metal working but the true cost of this guide must include not only the guide but the materials and time (sometimes frustration) required to source and create them to even start using the guide.
I admit it is an opportunity to help the user personalise his guide but to me it looks more like selling only half the kit .
The true cost factoring all of these would exceed £80-100 methinks - this for a subtle increase in accuracy of the edge - not worth it IMO especially when all you wanted to do in the first place was get on with cutting wood which is where the pleasure lies -for me anyway.

Sorry all - had to get that off my chest :)
 
My experience exactly Harlequin. Gave up after a couple of weeks of trying to get to grips with it. If anyone wants to try before they buy I am very willing to lend/sell mine.
Simon
ps after a little instruction by John Lloyd I gained the confidence to do it free-hand and couldn't be happier.
 
Harlequin":35upawf5 said:
I know that on here there are many who swear by this and others equally who differ but FWIW here are my views.
I ordered the guide recently which was delivered about 5 days ago - came with a set of "hand written" instructions(photocopy!!)
It looks very well done and exudes precision.
Heres the problem though - I still have not used it.
Normally with most buys I have a go immediately to cure the "itch" and have a fair idea of the validity of the purchase - but not this one.
Made a wedge for it 2 days later - somehow the thrill was off.
Today however I wanted to sharpen my LN 3mm chisel - hang on you got to make another special wedge :evil:
In fact if one wished to maintain the spirit of the invention (precision/horologist level etc) it is desirable to make a special wedge for different sized chisels.
If you wanted to sharpen a skew blade - you got it - another wedge type standoff.
It would also be a good idea to make some "standoffs" from the reference pins for small chisels - what to use here wood ?? acrylic is better ,how thick ? - check he web ,order stuff etc.
Lets have a look at the "hand written instructions" again ???

Let me check how it feels on the diamond stones says I - hang on , Forgot I had to make something to house them in so the guide wheels can run alongside.

How does one achieve the right angle ? you measure the overhang with a ruler or make another jig (for skew blades you will need another ofcourse)

Faff !

I realise now why I haven't sharpened anything so far. :(

I agree the Kell No 3 is an excellent example of precision metal working but the true cost of this guide must include not only the guide but the materials and time (sometimes frustration) required to source and create them to even start using the guide.
I admit it is an opportunity to help the user personalise his guide but to me it looks more like selling only half the kit .
The true cost factoring all of these would exceed £80-100 methinks - this for a subtle increase in accuracy of the edge - not worth it IMO especially when all you wanted to do in the first place was get on with cutting wood which is where the pleasure lies -for me anyway.

Sorry all - had to get that off my chest :)

Yup, it's a precision piece of kit and you're dead right...you need to make a series of wedges for individual, or groups of sizes of blades. How difficult is it though?..once you know the slope of the wedge (given in the instructions) it's a 10 minute job to make one, so it's not hard.
However, you do need to use it with a series of projection boards:

small8-2.jpg


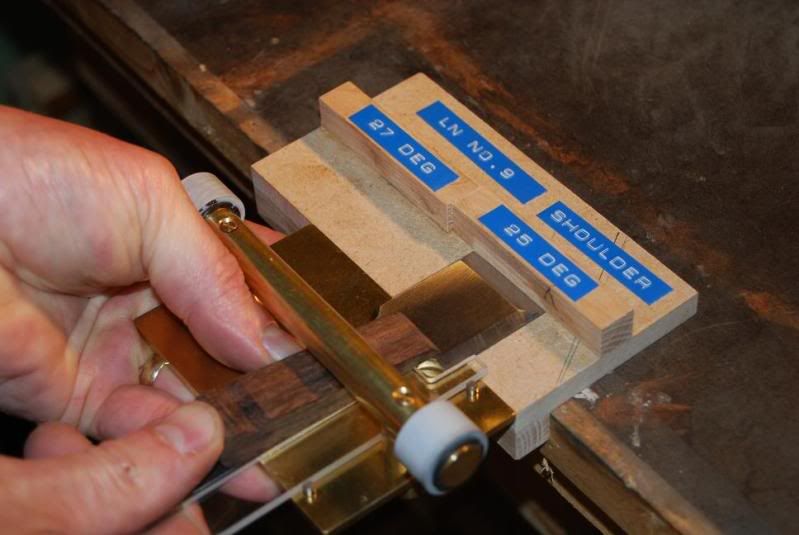
and adaptors for different blades. The pic above shows a shoulder plane blade being set at the correct angle, using the relevant board and an acrylic insert. Moreover, the shoulder plane blade will be honed absolutely dead square, which is difficult to achieve with other guides ('specially ones with a single central roller) The pic below shows a similar application for:

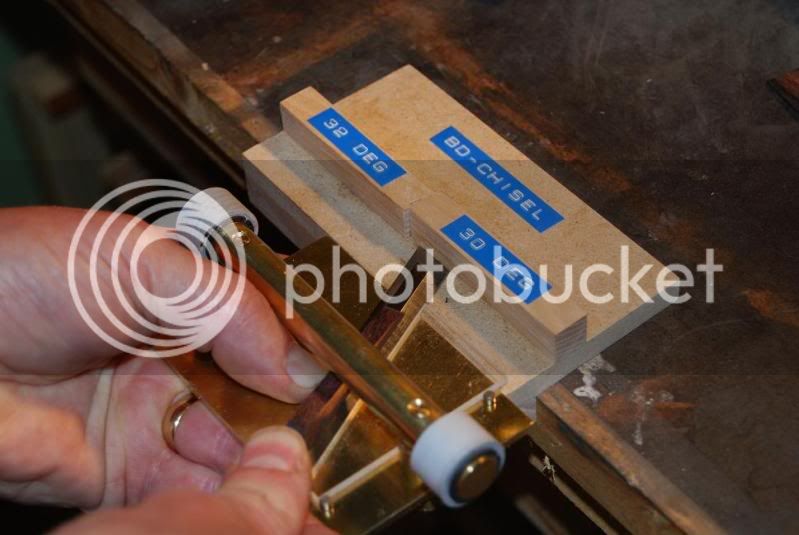
small9-2.jpg


honing a skew chisel...note in each of the pics a different sized wedge.

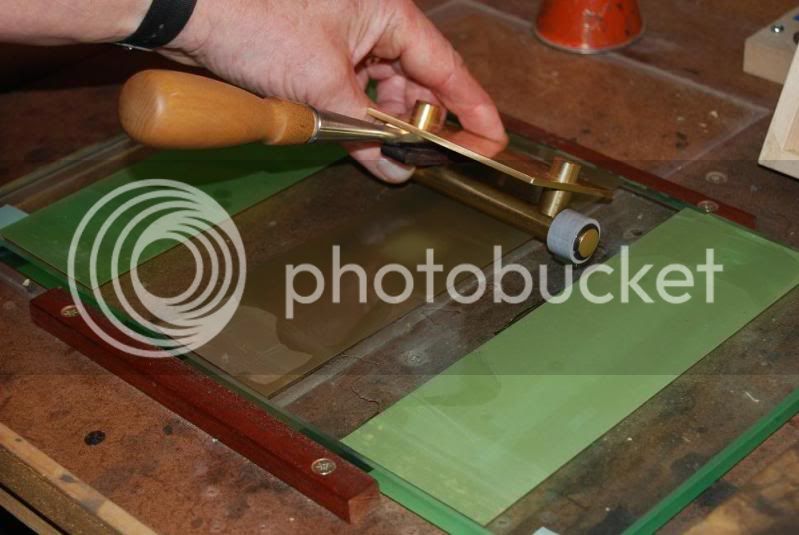
Using the Kell III is a big mistake with diamond or waterstones IMO...you need a surface to hone on where the wheels are level with the honing surface and for this the 3M papers:

small6-3.jpg


from Workshop Heaven are ideal. They last a long time and aren't expensive either.
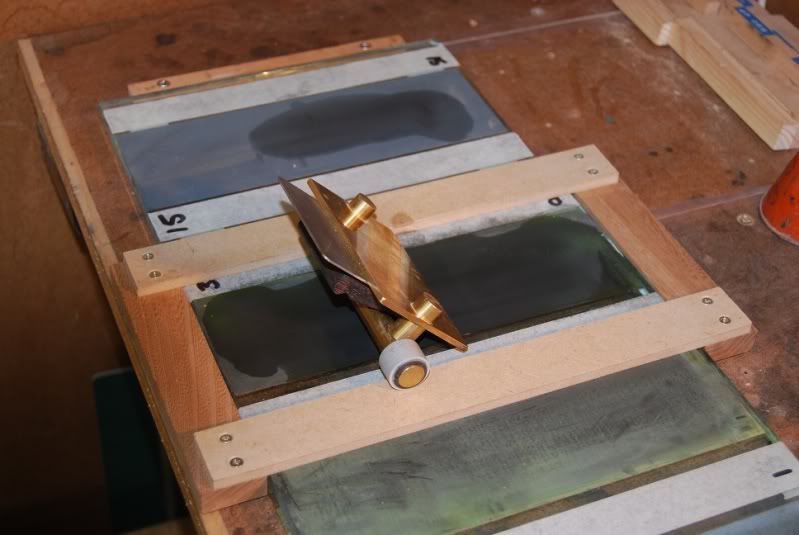
When I first used mine I was a bit stumped at how to hone 45deg as it can't be done normally, but the solution is easy:

006small.jpg


make up a little sled that raises the wheels by 6mm and just slide it across each honing surface in turn.

The 3M papers and the KIII make a fantastic combination if you use all the grits...I can easily hone a dead square single bevel at either 25deg (paring) or 30deg (orie nomi) on my Jap chisels, finishing up on the .3 micron paper, which is around 24,000g. The edge produced has to be felt to be believed :shock:

The Kell III is not, say again NOT a 'straight out the box' type of device. It requires some considered input and thought on the user's behalf to get the very best out of it, but once you have seen the light, it's the simplest and by far the best guide on the market by a very long way, and it will hone 99% of your blades...I can even hone these which you'd be very hard pressed to do in anything else.

Persevere and the penny will drop :wink: - Rob
 
woodbloke":3jyyv361 said:
...I can even hone these which you'd be very hard pressed to do in anything else......
Except freehand of course - absolutely no problem, as any Japanese woodworker would tell you.
Or are there container loads of Kell jigs being exported to Japan, to resolve an ancient Japanese honing enigma?
 
Interesting stuff!

For a long time I've been tinkering with the idea of developing a set of wedges or wedge blanks and maybe even pre-made standoffs or bits of perspex to make them from and selling them alongside this product.

At one end of the spectrum there are going to be a bunch of people who will say - you're having a laugh - I could make that myself in five minutes.

At the extreme opposite end of the spectrum there will be another bunch of people who will try to use the items without even considering the possibility of customising them to purpose and berate the whole lot as $hite if everything doesn't fit their kit perfectly from the get go.

And a thousand shades and flavours of opinion in between.

No personal slights intended here whatsoever, so please don't anyone take offence - I'm merely trying to explain the thought process behind my decision.

The thing that struck me was that the No.3 is a facilitating tool and to people who tend towards the first group it will be the most magical invention they have ever encountered.

For example; there was a thread on here ages ago about them, where the issue of cambering irons was discussed. Problem - the blade registers against pins on one side so if you shim under one wheel and then the other to create a camber it will be uneven. Solution - the whole thing is symmetrical so camber one side, flip the blade around the other way and camber the opposite side identically. Quick, simple, accurate and works perfectly with any width of blade.

So the rationale behind the decision not to supply wedges for it is that the product automatically appeals to customers who are predisposed to get the most out of it. Trying to jam it down the throat of everyone else for personal profit would sully the elegance of what is, to my mind, one of the most beautiful and complete pieces of design ever.
 
Hi Matthew,

Maybe another option would be to make a youtube video demonstrating how you make the wedges and perspex stand-off thingies to fit the various types of blades :-k

Cheers :wink:

Paul
 
matthewwh":3ahgqyoy said:
.... a set of wedges or wedge blanks and maybe even pre-made standoffs or bits of perspex t......
.... a facilitating tool........... the issue of cambering irons ......the blade registers against pins ..... shim under one wheel ..... create a camber ..........one of the most beautiful and complete pieces of design ever.
Or you can avoid all these issues by freehand sharpening.
Cambering is easy - in fact unavoidable if you have a worn out hollow stone like mine! That's another freehand plus - you don't have to flatten stones.
 
woodbloke":3keouccd said:
.... it's a precision piece of kit .......you need to make a series of wedges for individual, or groups of sizes of blades. ......once you know the slope of the wedge (given in the instructions) it's a 10 minute job to make one, ....However, you do need to use it with a series of projection boards:.....and adaptors for different blades. .... the relevant board and an acrylic insert....honing a skew chisel...note in each of the pics a different sized wedge.....you need a surface to hone on where the wheels are level with the honing surface..... how to hone 45deg as it can't be done normally, .....make up a little sled that raises the wheels by 6mm and just slide it across each honing surface in turn....requires some considered input and thought on the user's behalf to get the very best out of it.....it's the simplest and by far the best guide on the market by a very long way, .....
So, if that's the simplest and by far the best guide on the market
the others must be a right pain in the a***e! :lol: :lol:
 
Mr G Rimsdale":lhpjupec said:
woodbloke":lhpjupec said:
...I can even hone these which you'd be very hard pressed to do in anything else......
Except freehand of course - absolutely no problem, as any Japanese woodworker would tell you.

Mmm. Japanese sharpening. Extended sequence of grits, carefully flattened stones, straight bevels.

Sounds quite a good system.

BugBear
 
bugbear":nlpjom07 said:
Mr G Rimsdale":nlpjom07 said:
woodbloke":nlpjom07 said:
...I can even hone these which you'd be very hard pressed to do in anything else......
Except freehand of course - absolutely no problem, as any Japanese woodworker would tell you.

Mmm. Japanese sharpening. Extended sequence of grits, carefully flattened stones, straight bevels.

Sounds quite a good system.

BugBear
You forgot to mention "freehand".
TBH I don't know anything about Jap sharpening except I take it for granted they do it freehand and aren't dependent on the Kell jig. I know they have to put up with soft "water stones" which seem to be problematic compared to the wide variety available here.
 
right - some difficulty

am trying to hone a LN dovetail chisel at 25 degrees
since the blade protrusion is 30mm the side of the chisel can only register against one of the registering pins.
this makes the blade quite unstable and it pivots over the horizontal brass bar with a wedge in use
what is the solution (what am I doing wrong)
how does one maintain the precise angle and orientation?

should I use a standoff - it falls away !!
 
Harlequin":1dxy3v6p said:
right - some difficulty

am trying to hone a LN dovetail chisel at 25 degrees
since the blade protrusion is 30mm the side of the chisel can only register against one of the registering pins.
this makes the blade quite unstable and it pivots over the horizontal brass bar with a wedge in use
what is the solution (what am I doing wrong)
how does one maintain the precise angle and orientation?

should I use a standoff - it falls away !!
You make 25 little wedges and inserts from various woods and bits of perspex and fiddle about for a day or two.
Or you give up and do it freehand in 30 seconds. Or 2 minutes if the bevel is not already close to 25º
 
Harlequin":20hd5z8f said:
right - some difficulty

am trying to hone a LN dovetail chisel at 25 degrees
since the blade protrusion is 30mm the side of the chisel can only register against one of the registering pins.

Hi Harlequin,
I've had a look at the LN's on their site and I'm trying to picture what you are doing, is it the fishtail or a skew?
 
Neither Matthew

it is the basic straight dovetail chisel
the blade from tip to shoulder is about 4 inches or so.
it is just that one of the pins ends up being at about the shoulder of the chisel so the chisel cannot register against both pins for a perfect straight attitude

if you look at woodblokes pics above - the last but one gives an indication of the problem.If that chisel has to protrude out a bit more or say is an inch shorter then what would the upper most registration pin reference (it would be past the shoulder)
 
My first reaction would be that the No1 or No2 guides are designed for doing short bladed chisels and given the option that would be the best choice for the job.

If you wanted to do it with the No 3 it is possible though.

A standoff of thin material that will register against both pins to give square with a shallow parallel shoulder. I have angled the top of the standoff to allow better clearance for the bolster if required.
kell3shortchisel1.jpg


The chisel sits on top of the standoff, reducing the projection required. I just knocked this up out of a bit of MDF to illustrate the principle but it will hold the 2-1/4" bladed chisel shown at 25 degrees.
kell3shortchisel2.jpg
 
In the sailing world they say engines (in sail boats) aren't much use without marinas, and marinas aren't much use without engines.

It's similar with the Kell guide and the scary sharp system!
 
You are quite right that the two work well together but you can use the same guide with stones. Just plane a scrap to the same thickness as your stone and then rip it in half and screw the two pieces to a board as rails running either side of the stone. Wheels running off the stone, so no wear of either where it isn't wanted, and if you use stones that are prone to wear down you can either adjust the blade protrusion or pack under the stone occasionally to bring it back to level.

Just don't tell Jacob about your analogy or he'll be ridiculing new fangled marine diesels and extolling the many virtues of oars before we know what's hit us!
 
matthewwh":3vb6zf5r said:
Just don't tell Jacob about your analogy or he'll be ridiculing new fangled marine diesels and extolling the many virtues of oars before we know what's hit us!

And I bet he has a special way of using the oar that involves dipping

Having said that I'll stick to my 3 quid eclipse honeing guide thanks very much - works fine with Scary
 
Back
Top