Hall Table

UKworkshop.co.uk

Help Support UKworkshop.co.uk:

This site may earn a commission from merchant affiliate links, including eBay, Amazon, and others.

John15

Established Member
Joined
27 Jun 2013
Messages
1,624
Reaction score
39
Location
Near Oxford
leg template 001.JPG

I'm starting a new project, a hall table. It's still in the design stage. I want to try a table with legs other than straight and thought I'd have a go at something with curves.
I've cut a template (see photo) for the type of shape I'm thinking of and would like to ask members for their views, plus and negative, before I proceed with production. The top section will be 38mm square and the bottom 25mm and 700mm high.
Thanks in advance.
John
 

Attachments

  • leg template 001.JPG
    leg template 001.JPG
    300.3 KB
If it looks right to you, use the template to mark and cut out a leg in some construction lumber and step back and see if it still looks right in the round. Make adjustments from there if you think it needs it.

Pete
 
John, - I think that looks pretty good. Is that the ‘front’ view? If so what’s the side profile? Same again or flat?

As has been said knock one up from some cheap timber and see what it looks like.
 
stuartpaul":2reyqmhj said:
John, - I think that looks pretty good. Is that the ‘front’ view? If so what’s the side profile? Same again or flat?

As has been said knock one up from some cheap timber and see what it looks like.

It's the front view. The side view will appear straight apart from the taper. It's a hybrid of several shapes I took off the internet. It's my second attempt, the first turning out much too curvy. I'll make a trial leg out of this new shape to see what it looks like. I'm hopeful it will be OK.

John
 
Looks good.

Remember the old cabinet making adage, "joint first, shape second". Bottom line is you need square and true reference surfaces for morticing.

This can put you slightly at odds with a second tip, minimise grain run out in the thinnest leg sections.

It's resolving these all too often competing priorities that make cabinet making so satisfying.
 
Have you considered rotating the legs by 45°? That way the shape would be visible more. It makes construction a bit more challenging but I think I've seen tables done like that and you seem to be up for a challenge...
 
Clever idea from Andy.

Here's a standard apprentice piece from the Barnsley Workshops with sabre legs angled as per Andy's suggestion.
Barnsley Occasional Table.jpg


Locating a leg like this isn't straightforward (especially when it has a drawer like this design), but neither is it impossibly complex. You may need a bit more meat on the bone at the top of the legs to allow for stronger joinery.
 

Attachments

  • Barnsley Occasional Table.jpg
    Barnsley Occasional Table.jpg
    88.8 KB
Many thanks Custard and Andy for your helpful comments. I was wondering about the sequencing of the mortices - cutting them before shaping will be straightforward for the side ones but for the front ones I will have to cut it deeper to allow for the inward part of the curve.
I have seen photos of legs at 45deg to the top and they look very attractive but the difficulty element is too great for me at the moment, maybe the next time!
 
John15":56uj5d1v said:
I've cut a template (see photo) for the type of shape I'm thinking of and would like to ask members for their views, plus and negative... John
It looks a slightly 'bandy', stiff, and notchy to me. Can you run a pair of parallel straight lines roughly 5 - 7 mm apart (representing a column of wood) vertically all the way down from the top to the foot? I get the visual impression the foot kicks out beyond this small wood column giving a visual impression of slight bandiness and some fragility in the grain, i.e., the outer extremity of the foot could flake off. I think there needs to be a little more work on the inside curves of the template. There seems to be a bit of stiffness in the transition between one curve and the next, the transition about 2/3 of the way up from the foot. The sweeps and transitions on the outer part of the leg seem sweeter, apart from the question I raised above about the projection of the foot's toe. Slainte.
 
Sgian Dubh":3iq8z3oa said:
John15":3iq8z3oa said:
I've cut a template (see photo) for the type of shape I'm thinking of and would like to ask members for their views, plus and negative... John
It looks a slightly 'bandy', stiff, and notchy to me. Can you run a pair of parallel straight lines roughly 5 - 7 mm apart (representing a column of wood) vertically all the way down from the top to the foot? I get the visual impression the foot kicks out beyond this small wood column giving a visual impression of slight bandiness and some fragility in the grain, i.e., the outer extremity of the foot could flake off. I think there needs to be a little more work on the inside curves of the template. There seems to be a bit of stiffness in the transition between one curve and the next, the transition about 2/3 of the way up from the foot. The sweeps and transitions on the outer part of the leg seem sweeter, apart from the question I raised above about the projection of the foot's toe. Slainte.

Many thanks for your observations on the proposed shape of my table legs. Very interesting and helpful indeed. I've just come in from my workshop for the day so will take up your comments tomorrow morning.

John
 
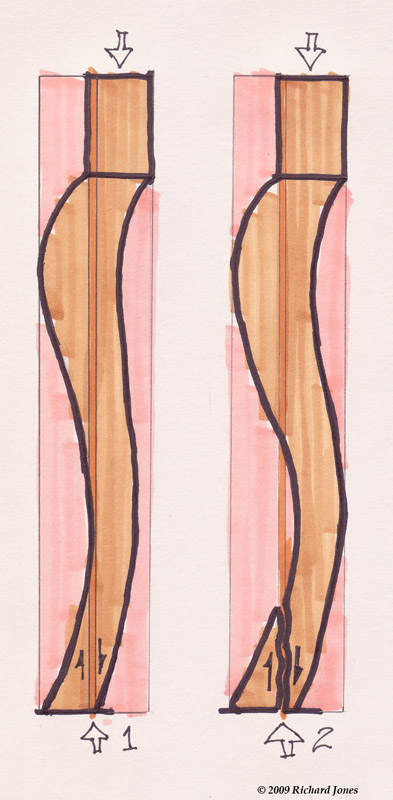
John, here's a graphic illustration of what I mean about a continuous column of wood from top to bottom of the leg. On the left, good; on the right, not so good. The continuous column restrains the limits of the curves, confers strength, and reduces the chance of bandiness. An interrupted column, right, tends to encourage those less-than-ideal characteristics … in my experience and opinion. Others may disagree, but that's what I believe. Slainte.

90-compress-leg-web.jpg
 
Sgian Dubh":3cm9oggx said:
John, here's a graphic illustration of what I mean about a continuous column of wood from top to bottom of the leg. On the left, good; on the right, not so good. The continuous column restrains the limits of the curves, confers strength, and reduces the chance of bandiness. An interrupted column, right, tends to encourage those less-than-ideal characteristics … in my experience and opinion. Others may disagree, but that's what I believe. Slainte.

90-compress-leg.jpg

I was struggling a bit to fully understand your first post but the sketches clarify your points perfectly. Many thanks.

John

John
 
Remember that when you look at a table leg you usually see it from an angle, not straight on.

The longer diagonal measurement is the one you see not the width across the face which means that something which looks right as a template can sometime look to thick in reality. Inspector's suggestion to make a mock up is a really good way around this.

I especially like the 45 degree rotation idea but the joinery will quite a challenge.
 
will1983":1u1ewrxm said:
Remember that when you look at a table leg you usually see it from an angle, not straight on.

The longer diagonal measurement is the one you see not the width across the face which means that something which looks right as a template can sometime look to thick in reality. Inspector's suggestion to make a mock up is a really good way around this.

I especially like the 45 degree rotation idea but the joinery will quite a challenge.

I know what you mean about a curvy leg looking different depending on the aspect and as others have said the 45deg angle looks very attractive but very difficult to accomplish. I've started a second mock-up taking in all the advice given - so watch this space as they say!

John
 
leg4 001.JPG


Nearly there with an acceptable shape. There is a straight about a quarter of the way up the leg which needs sorting out, otherwise OK I think. I'm going to transfer it onto plywood then do the final bit from that.
The top section will be 38mm square so I'll only get a 20mm long tenon. Is there any problem with that? Being a hall table it isn't going to get any rough use.

John
 

Attachments

  • leg4 001.JPG
    leg4 001.JPG
    186.3 KB
When I do a small table like that I use a corner block and a hanger bolt. They are strong and you can take it apart for moving. That leg is 43mm square, made of Alder so not the strongest wood and it is very sturdy. If you are going to use a mortice and tenon then move the joint closer to the outside edge of the leg and mitre cut the corners of the tenon for a longer tenon and more glue surface.
 

Attachments

  • IMG_3743.jpg
    IMG_3743.jpg
    65.3 KB
hall table 001.JPG
hall table 002.JPG


Finally finished my Hall Table which I started in December. Lots of interuptions along the way but the build has been an enjoyable experience and I'm very pleased with the result. Dims, top 900 x 450 and 725 high. Deliberately not the Golden Ratio.
For the top and rails I have used some stock ''Mahogany'' but had nothing for the legs so I bought some Utile from Tyler Hardwoods - it's a shade lighter but looks very nice. All pieces were mostly straight grained and a pleasure to work with. The drawer sides and bottom are beech and I think give a pleasing contrast to the front. The front rail and drawer are cut from the same piece but due to the wood's plainness the continuity of the grain doesn't show.
The most difficult part has been getting the curves right on the legs but with trial and error and advice from members, particularly Richard on 'bandiness' and grain vulnability at the toe, I think I've got them about right although they still look a bit bandy from some aspects particularly from straight-on.
For a finish I used 2 coats of Osmo Clear Gloss. A bit glarey but hopefully OK in the dimmer hallway light. The legs have taken the finish much better than the top and rails which I'm slightly disappointed about.
Many thanks again for member's advice, and for relative beginners like myself don't be frightened to venture into things like curvy legs - taken slowly and one step at a time it is do-able.

John
 

Attachments

  • hall table 002.JPG
    hall table 002.JPG
    126.7 KB
  • hall table 001.JPG
    hall table 001.JPG
    169.9 KB
Congratulations John on your excellent work. And full credit for making initial mock-ups where you weren't sure about things, that's the kind of patient, meticulous approach that identifies proper craftsmen.

=D>
 
custard":13w71lsq said:
Congratulations John on your excellent work. And full credit for making initial mock-ups where you weren't sure about things, that's the kind of patient, meticulous approach that identifies proper craftsmen.

=D>

Many thanks for your comments Custard. Very much appreciated.
I'm currently working on a drawing for a small table with legs at 45deg to the rails as mentioned by yourself and AndyT earlier in this thread. I can't find any details for this joint other than your photo - any suggestions where I might get some help?

John
 
Back
Top