Got a commission!

UKworkshop.co.uk

Help Support UKworkshop.co.uk:

This site may earn a commission from merchant affiliate links, including eBay, Amazon, and others.

StevieB

Established Member
Joined
29 Apr 2003
Messages
1,719
Reaction score
46
Location
Chatteris, Cambridgeshire
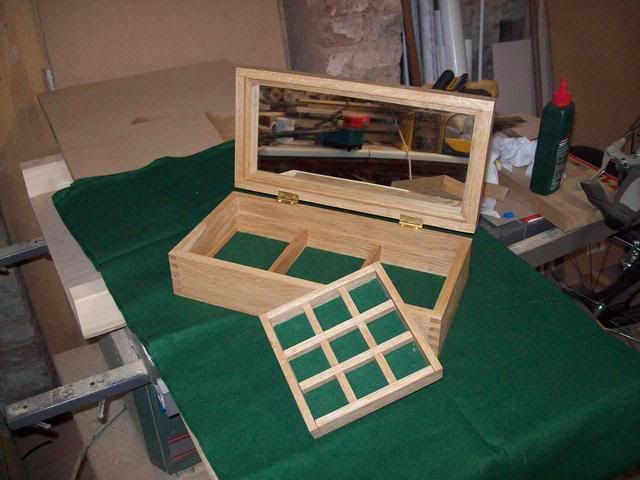
Those of you who were following my now defunct comp entry of a jewellery chest may remember I had to put it to one side rather than bin it after being less than impressed with my ability to hand cut half blind dovetails. So put it to one side I duly did, but that still left the problem that I has promised SWMBO a jewellery box and I needed to do something about it in a hurry. Thus I came up with the following (no WIP, sorry!)
box1.jpg


box2.jpg


box3.jpg


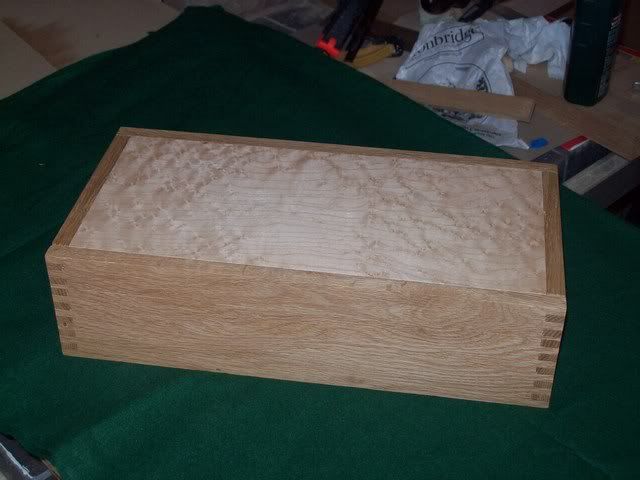
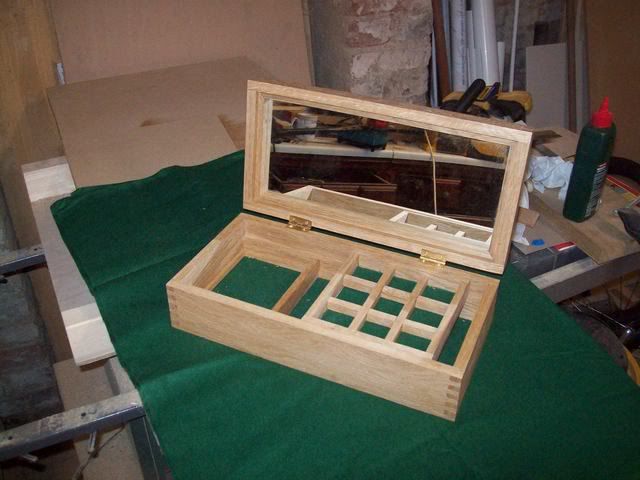
Made from a piece of oak I had left over and a bit of the same birds eye maple veneer, the size is totally determined by the size of the spare oak. Works out as being about 35cm long by 17cm deep. The mirror is cut from a larger mirror that was going to be taken to the tip. Sliding top tray with a fixed three compartment lower section. The only cost has been the Brusso hinges (£20 :shock: ). I am not sure I like the fact they leave a gap between the lid and base when opened, I hadn't twigged this would happen when I cut and fitted them and then it was too late to change. They cannot be set flush to the rear of the hinge as the integral stop needs a space deeper than the hinge to work so I am not sure there is actually any way round this other than cutting a deeper recess for the hinge and it looking odd when the box is closed and viewed from the rear.

Anyway the best bit - someone at work has actually asked whether I will make her one for payment. My first commission! Dead chuffed with that, just a bit concerned the photos, which is all she has seen, mask a few minor imperfections which will be visible in the flesh so to speak. On that basis we have agreed a fee to cover material costs (including Brusso hinges :wink: ) and then we can decide a mutuably agreeable price for workmanship when the finished item has been viewed.

Not sure I want to do this for a living, I am no Andrew Crawford, but I am hopefully going to enjoy the process anyway.

Steve.
 
StevieB":2i48hzgr said:
The only cost has been the Brusso hinges (£20 :shock: ). I am not sure I like the fact they leave a gap between the lid and base when opened, I hadn't twigged this would happen when I cut and fitted them and then it was too late to change.

Nice work, Steve, and congratulations on the commission (particularly when they're also prepared to pay for Brussos!! :shock:). :wink:

It does sound as though you need to chop them in a bit deeper... Look at hinges again carefully - do they taper in thickness? You may even need to 'feather' them in (ie. sloped recesses).
 
Well Done Steve. Looking forward to the WIP!

Interested to know the solution to your Brusso problem, as I have some astronomical hinges for a jewellery box project I'm never going to start.
 
Nice one Steve, don't forget we want to see the other one over the coming months.

Tom - astronomical hinges?
 
Stainless steel brusso. Basically add £20 to the brass price :shock:

Someone has to start making brusso style hinges, cheaper!
 
off to find a book on making maker's marks and brusso style hinges, for dummies (and court jesters).
 
Thanks Guys.

OPJ - not sure the hinges do taper to be honest, but next set I get I will try mounting in some scrap blocks first and see if it is possible to get them flush fitting.

IB - yes... I will get round to it honest! I need to get this new jewellery box out before xmas and then I have a couple of major projects round the house pencilled in for xmas and new year (new front wall, railings and front garden and path - weather permitting) and the ever present but always seeming to slip to the bottom of the list cellar/workshop revamp. I am fed up with working from a single plug socket in a damp cellar but SWMBO feels the front garen is more important. It's taken nearly 4 months to meet all the councils conservation area requirements (still tweaking with them now) so want to start as soon as I have final approval before they change their minds again!

Spec for the new jewellery box is oak and a really nice quilted maple veneer, which I liked so much I bought 4 leaves so I can make a pair of bookmatched doors for another project. Now just need to decide on a project that needs a couple of doors.....

Steve.
 
Nice box Steve. From the pics it looks like you've mounted the hinges directly on top of the timber rather than flush. The surface of the hinge should be level with, or slightly under the wood. The next casket I make (and the design is floating around 'up top') will use Brusso hinges so I'll have to have a little play around with how to fit them - Rob
 
That is just the picture Rob, they are definitely morticed into the carcass. What I suspect I could do is move the 'in' a bit more ie I have too much hinge sticking out of the back of the box. Looking at the dimension of the hinges here:

http://www.classichandtools.com/acatalog/pdf_JB-102.pdf

I have inset them by 0.306 inches (approximately!) since the full 0.485 would have prevented them from opening due to the square hinge rather than the traditional round hinge. What I will try next is going as deep as I can until the hinge will not open and this should reduce the gap between the carcass and the lid.

Steve.
 
StevieB":1on8a0nc said:
That is just the picture Rob, they are definitely morticed into the carcass. What I suspect I could do is move the 'in' a bit more ie I have too much hinge sticking out of the back of the box. Looking at the dimension of the hinges here:

http://www.classichandtools.com/acatalog/pdf_JB-102.pdf

I have inset them by 0.306 inches (approximately!) since the full 0.485 would have prevented them from opening due to the square hinge rather than the traditional round hinge. What I will try next is going as deep as I can until the hinge will not open and this should reduce the gap between the carcass and the lid.

Steve.
I've not used these hinges before so am ponitificating here from a position of ignorance, but I'd do a trial on a couple of scrap pieces to see how far in you actually need to set them. However you do it, to get it just right is a pain in the aris of epic proportions :twisted: - Rob
 
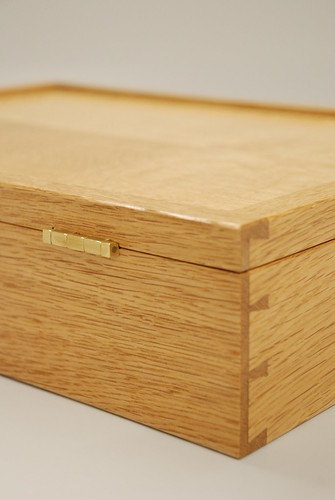
I have used JB-102's a few times. The furthest you can recess them in is to the centre line of the pin, I went slightly less on this one;

2853843610_e0b4316baf.jpg


Hope that helps, Ed
 
So Ed, are you saying that you have to have that gap? How did you deal with it at the front to make it even? (My SS hinges are the same model)
 
Thanks Ed, I have not gone anwhere as deep as the centre of the pin. Doing so will certainly reduce the gap to less obvious proportions I have concluded!

Steve
 
So long as the gap is even all the way round it should look fine.
You my need to add some kind of lip at the font to keep the gap the same.
 
I think there is some talking at cross purposes here.

The depth of recess I was referring to was how far the hinge sticks out the back, front to back, not how deep it was chopped in. You can chop it in deep enough so there is no gap - what appears to be a gap on the box I showed is a small bevel planed on the edge as I like the look of it. The instructions I found say that the hinge can be set in (front to back) as far as the centreline of the pin, although I found the lid binds slightly at that, so I went for a bit more sticking out as the pic. The hinges are so well made that to have a bit showing is fine by me.

Ed
 
Ed, I don't know if this is helpful, certainly hope so :)

I am making a box at the moment and used Sketchup to sort out the hinging. I think, this should allow the lid to open and stay open without falling over. If there is a tendency for the lid to fall shut I can open the bevel slghtly.

EDIT -- needs explanation. The bevel on both the lid and the box meets the closing surfaces in line with the centre of the hinge pin. Perhaps no better?


Nice box by the way, mine is a simple mitred corner jobby.

xy
 
The JB-102 hinges have an inbuilt stop in them, so you don't need to worry about that if using them.

Ed
 
Thanks Ed, Iam actually using some drawn brass butts I rescued from something or other way back. They do stop but at around 140 degrees or so, much too wide.

xy
 

Latest posts

Back
Top