siggy_7
Full time tool collector, part time woodworker
I don't often put my work on here, as I consider myself to be very much in the "all the gear and no idea" category of woodworking. But this has been a gradual project over the last 9 months or so, and I'm quite pleased (mostly) with how it turned out. It might give one or two people some ideas as well, so I've decided to share.
Background - the master bedroom in our house is quite small (10'8 by 8'1) which once you include a king size bed doesn't leave a lot of space for storing stuff. The brief was therefore to make a shallow built in wardrobe across the whole of the back wall. It would have to include a vanity unit as there is no space for a separate dressing table.
We settled on the front of the doors being about 550mm from the wall. There isn't the space for swinging doors so the whole unit is essentially a face frame for a set of four sliding doors, with the wardrobe built into the space behind and around 490mm deep. Due to the size, I decided to build the structure of the wardrobe from MDF panels attached to the walls/floor/ceiling rather than securing shop built carcasses. Whilst this maximised space, it did have some downsides as we'll come on to...
The sliding doors run on two tracks fixed to 25x75mm Oak, which is also used on the sides to frame them when shut. The doors are 18mm MRMDF, Oak veneered on both sides. One of these has a 6mm mirror glued to the front with mirror adhesive, which was made to the specific size and finished with a 10mm bevel. All wood was finished with Liberon finishing oil.
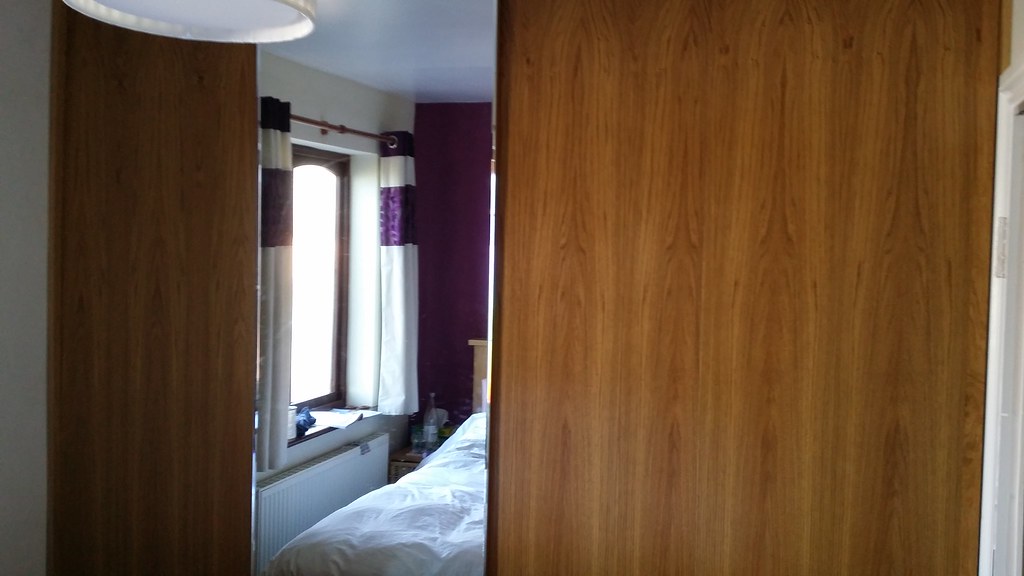
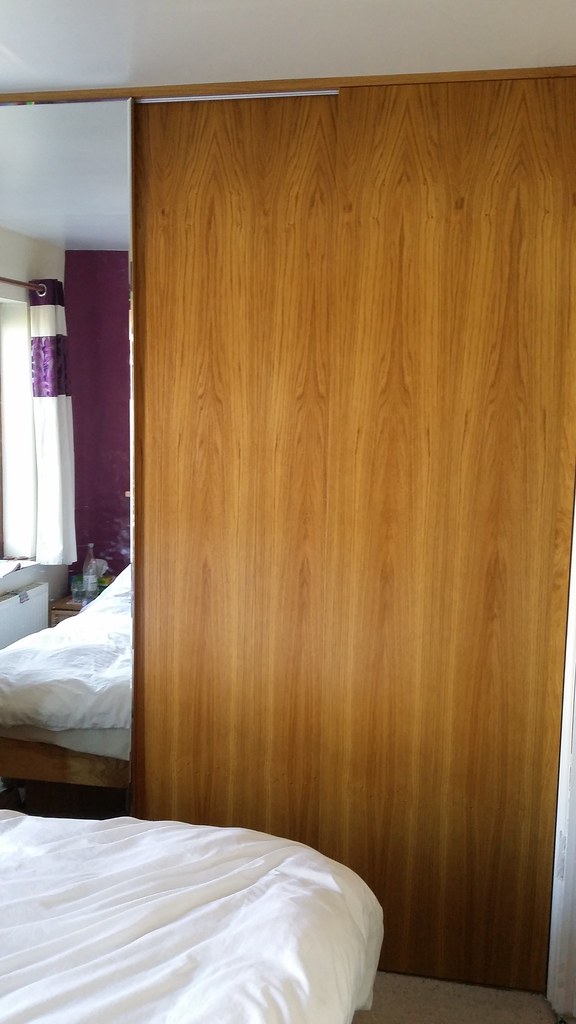
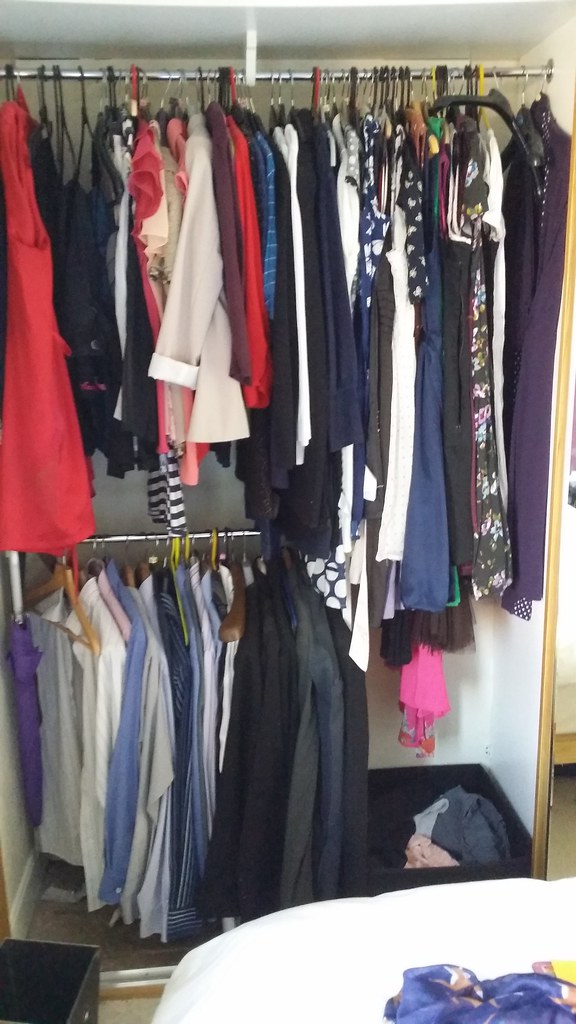
The left hand side is dedicated to hanging space. There is a full-height section for the Mrs' fancy outfits, and a shorter rail that sits below that for my stuff.
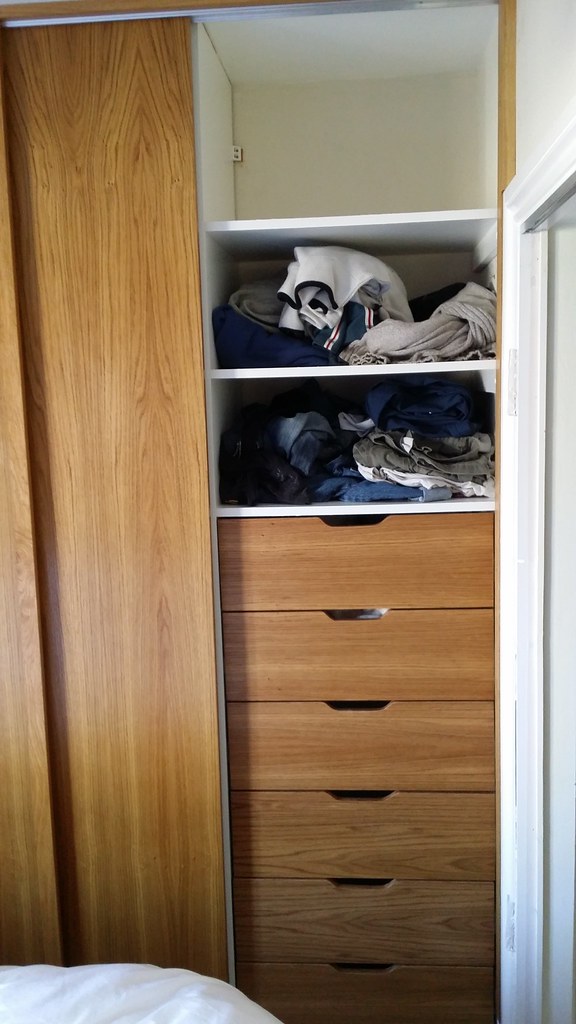
On the right, there is a mixture of drawers and shelves. The drawers are simple 12mm MDF construction with a 6mm base, I used a Wealden's drawer lock cutter for this and it's amazing how quick you can put a drawer together - I did them in batches and I think they took around 2 hours for a batch from starting on the cut list to clamping up with glue. The fronts are the same 18mm veneered MRMDF secured with two screws from inside the drawer, a handle profile was sculpted in with a jigsaw before the edge banding was ironed on. Drawers are on Motion 450mm full extension slides.
This is the central part of the wardrobe that contains the vanity unit. Like the drawers, the mirror table is on runners so it pulls out. The end of the bed functions as a seat at the right height. The drawer immediately beneath the mirror table has a double socket wall plate fitted to the front, which is wired in with flex to a fused 13A plug to a socket at the back of the wardrobe. This keeps all of Mrs Siggy's powered beautifying contraptions supplied with mains. There's enough flex to permit full motion of the drawer.
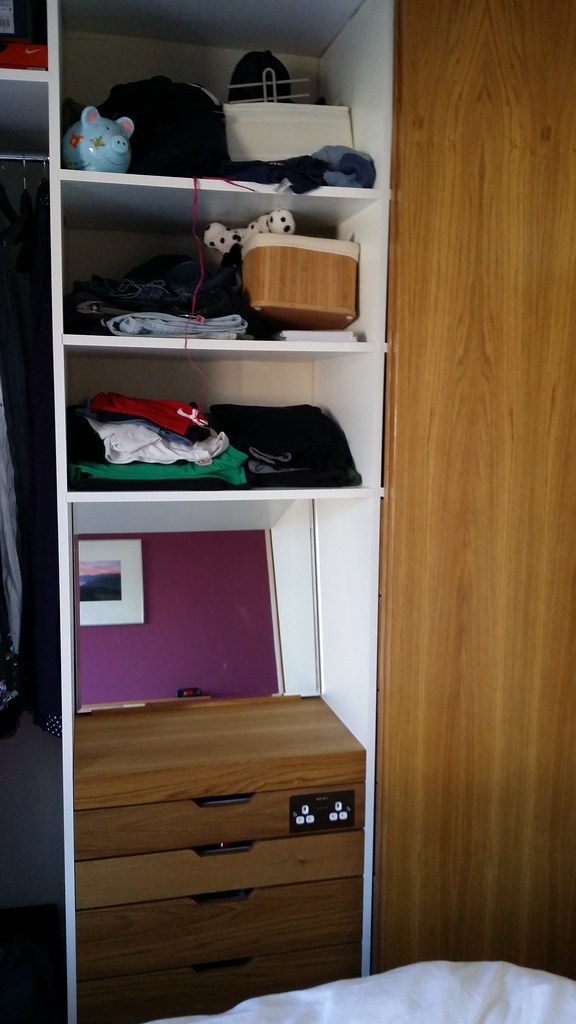
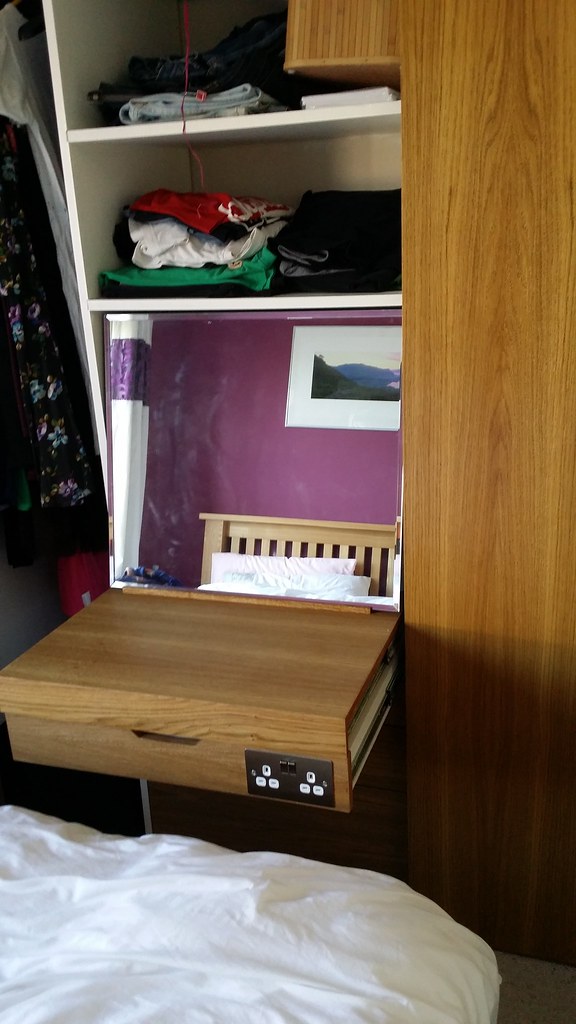
This section suffered from the biggest mistake in the build. The panel on the left side of this unit was aligned parallel with the left wall by taking measurements front and back with a tape measure. The panel on the right was similarly set up with the right wall. Unfortunately it didn't occur to me at the time that the walls might not be perfectly square and that this would cause geometry issues with the drawers. So the back of this section is about 9mm narrower than the front. This is the curse of not making the carcasses separately in the shop - if I was doing it again I would make the drawer units as a single piece and fit that into the structure. As it was, I salvaged the situation by cutting thin strips of MDF with a taper jig on the table saw, which made the gap uniform front to back to within approx. 1mm which is within tolerance of the runners, which now run fine. I also had to shim out the drawer fronts on one side here so that they are flush with both left and right panels when shut.
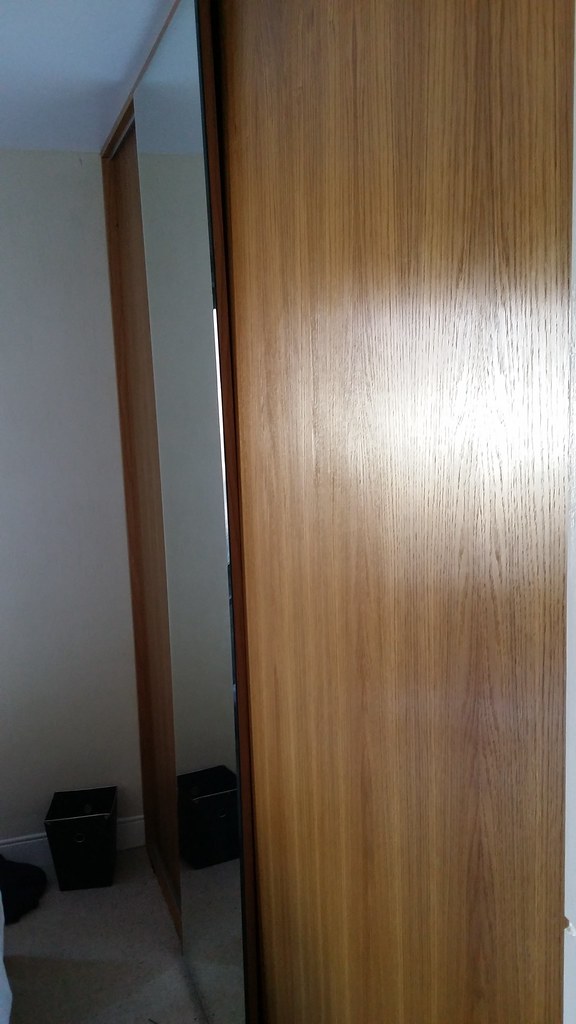
The other problem I've discovered since finishing the doors off is that MDF really can sag rather a lot, and that I should really have used veneered plywood instead for the doors. Notice in this image how the door with the glass is flat whilst the other doors have all bowed outwards in the centre, as the weight of the door rests on a wheel assembly running on the bottom track. I coated both sides with finishing oil so it must just be weight causing the sag. I'm currently trying to think of ways to pull this back given the tight clearance on the back of the door - any answers on a post card!
Hope this is all useful to someone. Comments flattering or otherwise welcome (but preferably flattering of course )
)
Background - the master bedroom in our house is quite small (10'8 by 8'1) which once you include a king size bed doesn't leave a lot of space for storing stuff. The brief was therefore to make a shallow built in wardrobe across the whole of the back wall. It would have to include a vanity unit as there is no space for a separate dressing table.
We settled on the front of the doors being about 550mm from the wall. There isn't the space for swinging doors so the whole unit is essentially a face frame for a set of four sliding doors, with the wardrobe built into the space behind and around 490mm deep. Due to the size, I decided to build the structure of the wardrobe from MDF panels attached to the walls/floor/ceiling rather than securing shop built carcasses. Whilst this maximised space, it did have some downsides as we'll come on to...
The sliding doors run on two tracks fixed to 25x75mm Oak, which is also used on the sides to frame them when shut. The doors are 18mm MRMDF, Oak veneered on both sides. One of these has a 6mm mirror glued to the front with mirror adhesive, which was made to the specific size and finished with a 10mm bevel. All wood was finished with Liberon finishing oil.


The left hand side is dedicated to hanging space. There is a full-height section for the Mrs' fancy outfits, and a shorter rail that sits below that for my stuff.

On the right, there is a mixture of drawers and shelves. The drawers are simple 12mm MDF construction with a 6mm base, I used a Wealden's drawer lock cutter for this and it's amazing how quick you can put a drawer together - I did them in batches and I think they took around 2 hours for a batch from starting on the cut list to clamping up with glue. The fronts are the same 18mm veneered MRMDF secured with two screws from inside the drawer, a handle profile was sculpted in with a jigsaw before the edge banding was ironed on. Drawers are on Motion 450mm full extension slides.

This is the central part of the wardrobe that contains the vanity unit. Like the drawers, the mirror table is on runners so it pulls out. The end of the bed functions as a seat at the right height. The drawer immediately beneath the mirror table has a double socket wall plate fitted to the front, which is wired in with flex to a fused 13A plug to a socket at the back of the wardrobe. This keeps all of Mrs Siggy's powered beautifying contraptions supplied with mains. There's enough flex to permit full motion of the drawer.


This section suffered from the biggest mistake in the build. The panel on the left side of this unit was aligned parallel with the left wall by taking measurements front and back with a tape measure. The panel on the right was similarly set up with the right wall. Unfortunately it didn't occur to me at the time that the walls might not be perfectly square and that this would cause geometry issues with the drawers. So the back of this section is about 9mm narrower than the front. This is the curse of not making the carcasses separately in the shop - if I was doing it again I would make the drawer units as a single piece and fit that into the structure. As it was, I salvaged the situation by cutting thin strips of MDF with a taper jig on the table saw, which made the gap uniform front to back to within approx. 1mm which is within tolerance of the runners, which now run fine. I also had to shim out the drawer fronts on one side here so that they are flush with both left and right panels when shut.
The other problem I've discovered since finishing the doors off is that MDF really can sag rather a lot, and that I should really have used veneered plywood instead for the doors. Notice in this image how the door with the glass is flat whilst the other doors have all bowed outwards in the centre, as the weight of the door rests on a wheel assembly running on the bottom track. I coated both sides with finishing oil so it must just be weight causing the sag. I'm currently trying to think of ways to pull this back given the tight clearance on the back of the door - any answers on a post card!

Hope this is all useful to someone. Comments flattering or otherwise welcome (but preferably flattering of course


