DBT85s Workshop - Moved in and now time to fit it out

UKworkshop.co.uk

Help Support UKworkshop.co.uk:

This site may earn a commission from merchant affiliate links, including eBay, Amazon, and others.
Hi

suprised your sparky is not running 4.00 mm radials and is still using 2.5mm rings!!
The whole lot just goes literally around the whole workshop so he was happy using a ring. I can't see a 4mm radial being a better option in this instance.
 
Just had a look at the listing of the table saw you bought and it looks good. I was interested in the Kity 1619 advertised on the forum as it also looks a good un but I already have a 619 in bits and in storage until I build my new workshop. If I decide to upgrade I think I will wait for one with a decent cast iron table so I'd be very interested in your review of the SIP once you've given it a good test. (y)
 
Just had a look at the listing of the table saw you bought and it looks good. I was interested in the Kity 1619 advertised on the forum as it also looks a good un but I already have a 619 in bits and in storage until I build my new workshop. If I decide to upgrade I think I will wait for one with a decent cast iron table so I'd be very interested in your review of the SIP once you've given it a good test. (y)
Yeah I'll be putting together a bit of a writeup on it in the tools section here as there isn't much out there for these saws. I've already lready started taking apart a bit further and detailing what I've found.

I was stunned that the main table alone comes in at 50kg before you add the side tables or motor mount! Wife was a bit narked that the scales were in the workshop though:ROFLMAO:.

I'm at work now for the weekend so no more on the workshop or the saw, but I'm going to work further on the progress videos. There are now about 4 that are 90% cut and just need the awkward VO done.
 
Last edited:
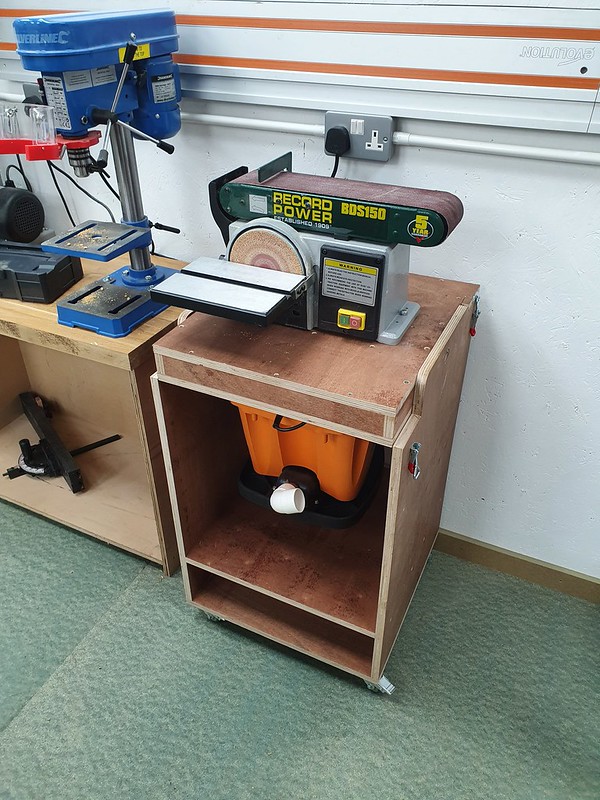
The flip cart for the sanders is on its way though I've had to abandon hope for the integrated DX. I was getting ahead of myself.

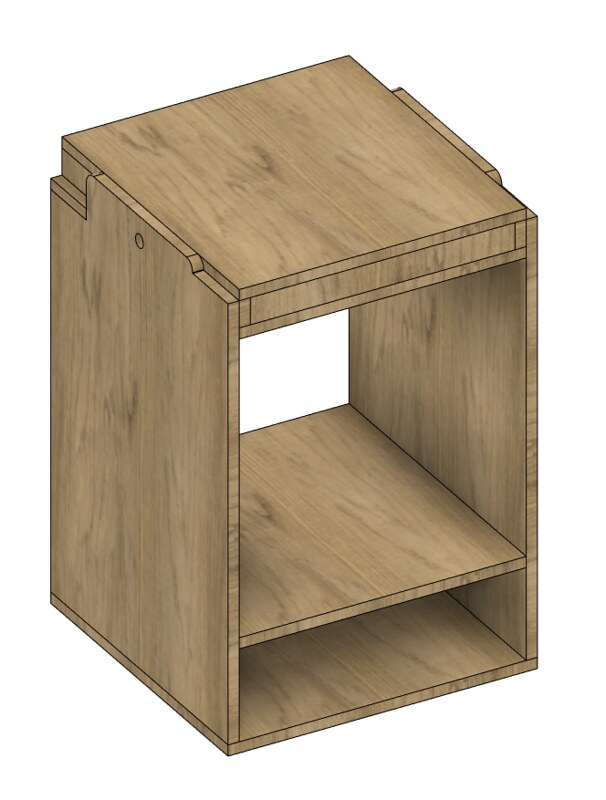
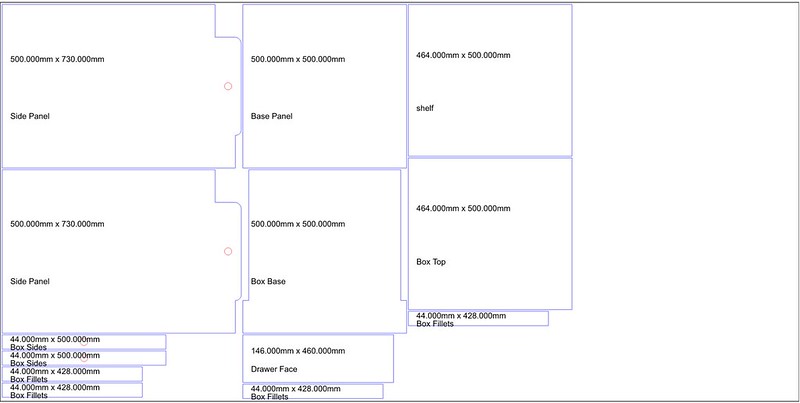
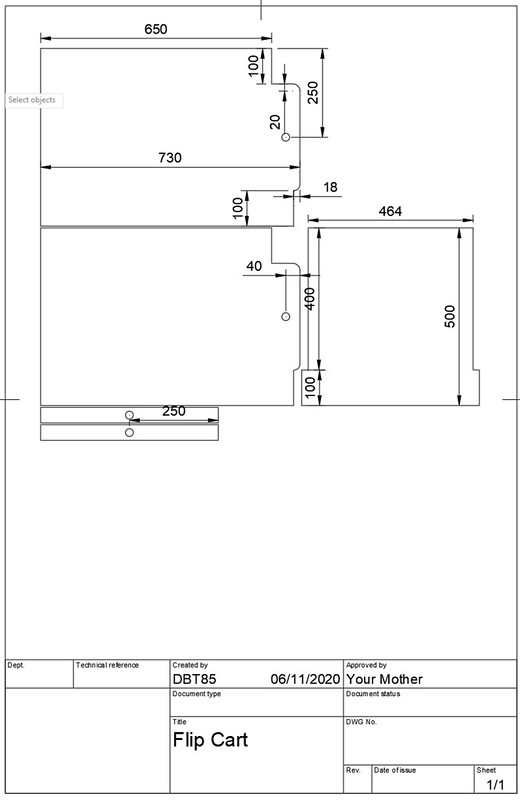
Plans drawn in Fusion, and then I used an extension called MapBoards to lay it out on a sheet of ply. I didn't entirely agree with where it placed things but it was my first time using it so maybe I did a dumb. I then used a Fusion Drawing to mark out dimensions for the twiddly bits. Both prunted it was time to head off t'shed.

The idea
50576651068_96163cff02_c.jpg


The cutsheet (not putting all of the box fillets together was weird to me so ignored it for that)
50576651043_dd313ecf1e_c.jpg


Twiddly bits
50577376331_dcec094b51_c.jpg


Anyway, a little time on the MFT and my first real use of the TS55 and my first real project in my new workshop. It was largely heaven. Bright, spacious, everything not piled up on the area I was trying to work. Bliss. The only pain in the backside was the vacuum hose snagging and falling out of the dust port on the TS55. Something to be partly remedied when a new hose arrives and partly when I make a boom. Dust collection in general will be nice to finally sort out, but not just yet.

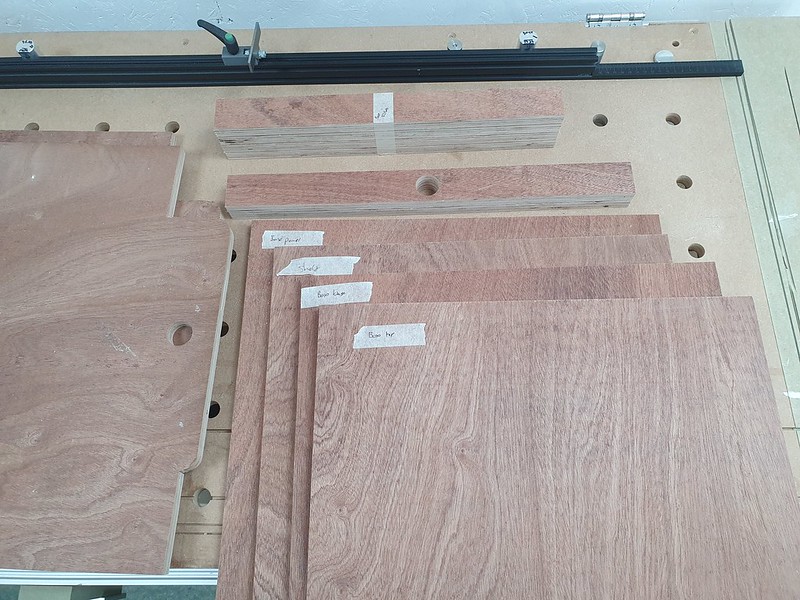
All the parts cut up and labelled, now on to the twiddly bits. My first screw-up came when using the tracksaw to cut the box base cutouts. I just went too far on one side, but not so far as to weaken it too much. Next up was cutting the notches in the sides, partly done with the tracksaw and then finished up with a wonky AF jigsaw. Next I needed to round 2 corners otherwise the flip top, won't. One could probably have been perched on the disk sander but the other wasn't going to work. Ah Ha, I remember what this hobby is all about now. So I made a little jig from a scrap of 6mm MDF with 4 different radius corners, double sided tape to hold it down and then used my little Bosch palm router. Done.

Now I needed a hole in each side panel to take the dowel and the same hole in the sides of the spinning platform. My random bit of curtain rail was ~28mm, I have a 29mm hole saw and a 30mm forstner bit, perfect. I'm also well aware that I struggle to drill straight. Given my uses, the 29mm hole saw was close enough so I cut a hole in anther bit of 6mm mdf and once again used it to route the holes required, first drilling out a 16mm hole with a spade bit to give my tiny pattern bit a little help and somewhere to descend into. Much less of a pain than trying to do it on my tiny bench drill, and much more accurate than me trying to do it with a hand drill.

Everything cut to size
50581174377_db863bf2f6_c.jpg


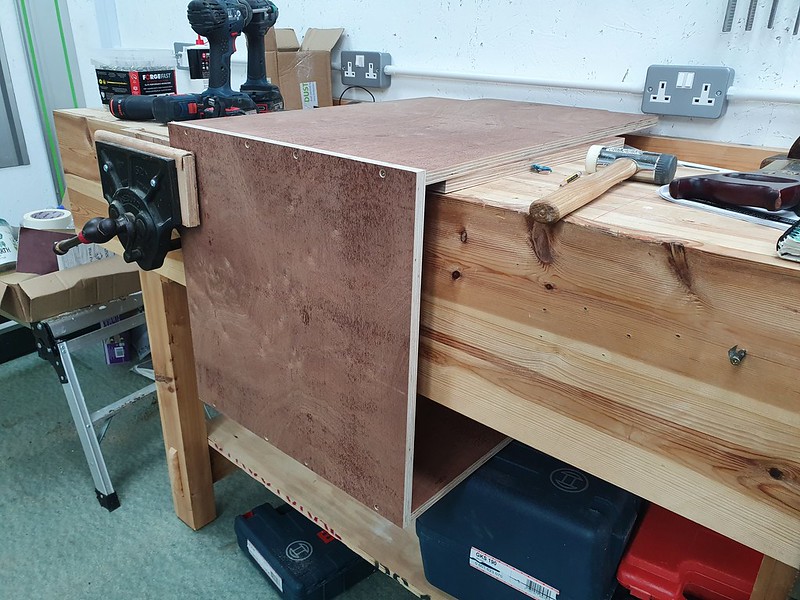
The joy of a vice. No need to try and hold these edges together by hand to drill and screw.
50581045751_51e359e953_c.jpg


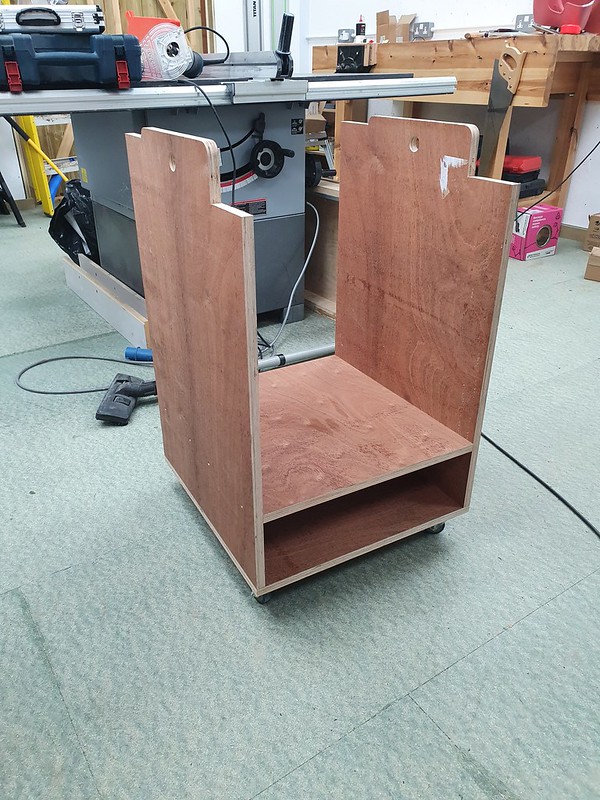
The main unit assembled and wheeled
50581045576_f739c9e1bd_c.jpg


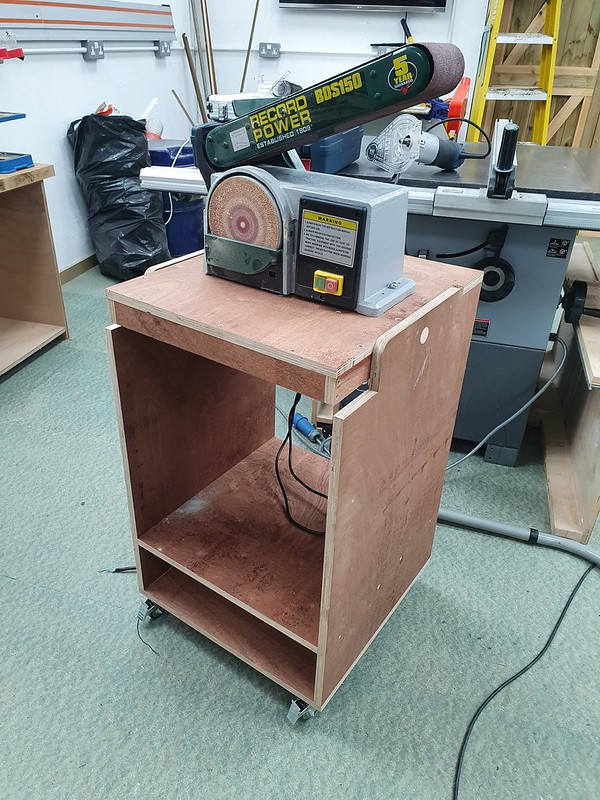
Flip base and disk/belt sander mounted
50580315548_69b6888dc5_c.jpg


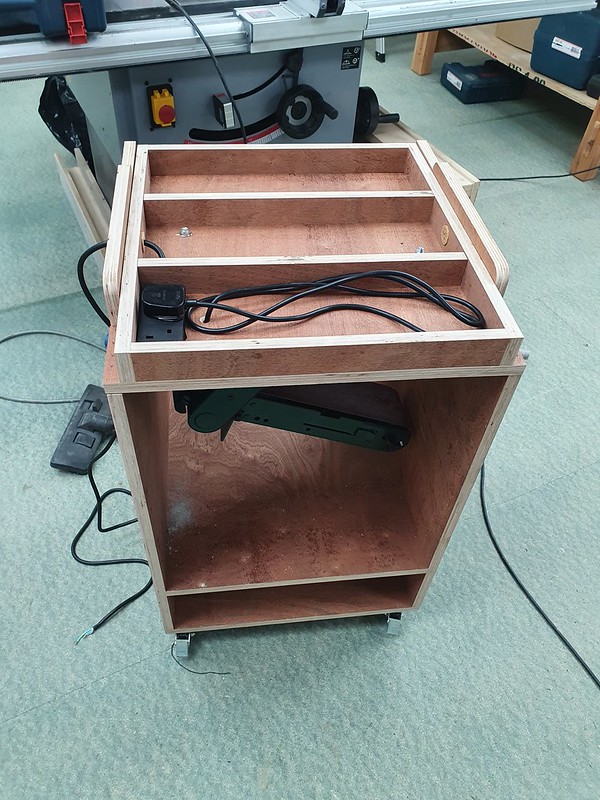
What the flip bed looks like
50581173632_aeb3719211_c.jpg


The bleary eyed among you may see a small issue. I didn't account for the belt part sticking out that far so like a *** I've mounted the unit it where it can't flip down unless I've lifted the belt up. I'll move that over tomorrow and finish up the last bit. Will be pleased to finally have these 2 off of my benches/floor and easily usable. But it works, it flips.
 
Thats the main unit done. I still need to sort a drawer out but have no hardware on hand so maybe I'll do it the old fashioned way.

50583236358_fc95d13be0_c.jpg


I re mounted the belt sander so that it could flip over without needing to be tilted up as it was yesterday. Apart from that it all came together ok. Might put some triangles on the back to help prevent racking, though once I put a back on the drawer area that will probably help.

Happy that thats done. No more bench space or floor space taken up with them getting in the way, and apart from dust extraction which will be done soon, they are now easy to get to and use.
 
Nice design, I've filed it away under 'fit out' (y)
Couple of questions:
Does the cabinet vibrate when a sander is on or is it solid?
Would you recommend the sanders?

thanks

Mike
 
Last edited:
Nice design, I've filed it away under 'fit out' (y)
I'd love to take the credit but it's just a clone of one done by a chap called Drew Fisher. You can buy plans but I just looked at his and worked it out which I'm sure most would also do. Though he does sell lots of plans for those that just want a cutlist.

Drawer will be sorted on Monday as its already cut, just not put together yet. Finally my disk sander and all associated sanding paraphernalia will have a home.
 
On that subject, I've just won a never used 3hp/2200w extractor on ebay for £205. least I can find them new for is over £350 and more often over £450. Have already asked a filter company about proper filters for it. @Inspector will be proud 🤣
 
glad to see ur making progress...hahaha.....nice one.....
how do u get on with the floor matting.....?
No floor matting in here at this point. Just the slab, 60mm of insulation and then a floating 22mm chipboard floor on top of that.
 
When you go and buy some BB drawer slides for your fancy new cabinet, make sure you get the right flippin length. 😬 I have a 500 deep cabinet and a nice 550 deep pair of slides to keep for a later project. Dolt.

At least I have the table saw to keep fiddling with and a new extractor to build to keep me honest. Was hoping to finish that drawer today though!
I have still got several pairs of 550mm runners 10 years on. The problem is they are an unusual size so unless you design them in to a project you will still have them in 10 years as well.
 
I have still got several pairs of 550mm runners 10 years on. The problem is they are an unusual size so unless you design them in to a project you will still have them in 10 years as well.
I'm fortunate that I only have the one pair and that that I have plenty of units to make and places I could use them indoors if needed!
 
Great video.

My roof is 'flat' and max 2.5m and it was still scary. Took a while to build up some confidence.

Could you have started at the bottom of the roof and put some battens on as you go?
Then you'd have something to stop you sliding off? Just a thought for others.

Also, why not insulate the window openings but without the foam? Easy to remove if/when you decide to install them and no cold spots this winter.

Hard work doing that single handed - but satisfying. Especially those boards.

When I started I didn't have the technique/grip/strength to carry 11mm boards let alone the 18mm ones. Eventually got the knack and was throwing them up on the roof. Found there's a board carrier gadget but too late by then.

Looking forward to P7 (y)
 
@DBT85 - a quick question if I may ...

It looks like you have used 18 or 22mm caberfloor - did you lay it straight on the concrete or does it need an underlay first?

Cheers
 
Back
Top