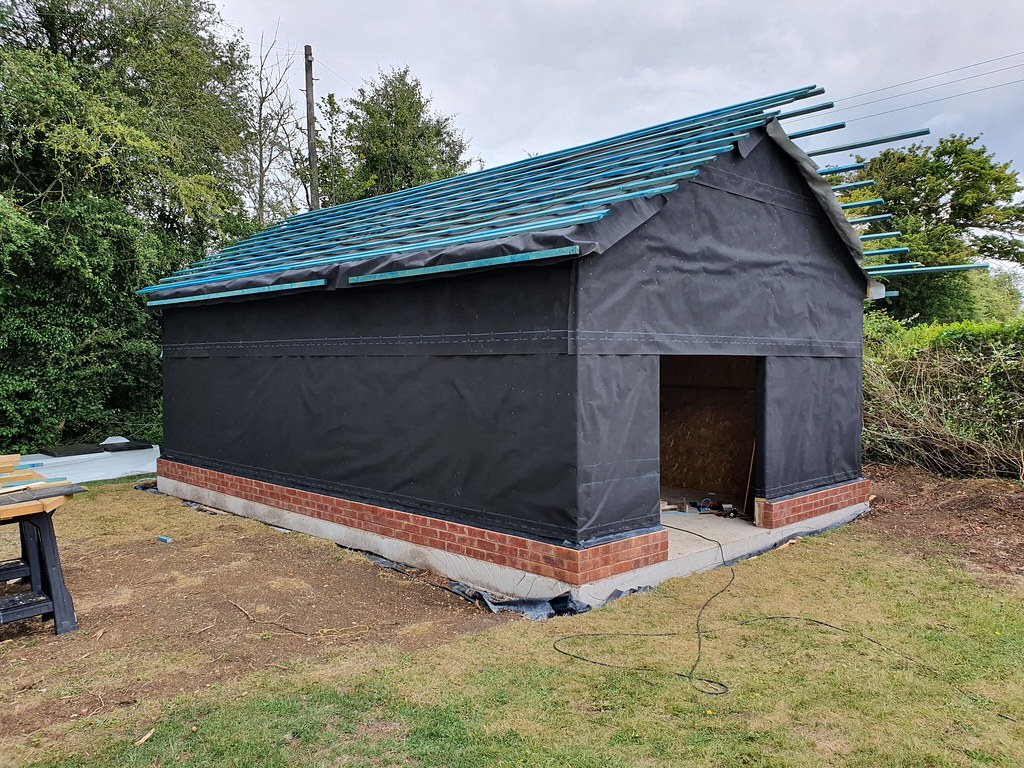
DBT85s Workshop - Moved in and now time to fit it out

UKworkshop.co.uk

Help Support UKworkshop.co.uk:

This site may earn a commission from merchant affiliate links, including eBay, Amazon, and others.
A 4mm hole all the way through. You'd easily assume its the hole to screw it to the ridge to if they didn't specifically state they it needs 4 screws put it different locations.

I'll wait for the correct ones to arrive on friday (these are 135 degree but I needed 120 degree) and see. Though ordered from a company online, these ones came direct from Cembrit so I doubt they are "wrong".


Anyway, another day that doesn't look like much. Just the roof battens done though not cut to length yet. It took a while with bits of tile and fascia in my hands and on a worktop to work out exactly what I was doing and where the first few needed to go, then measuring, checking, measuring, checking and finally doing.

So after all that its probably wrong anyway. :lol:

50064942903_696e5bfd04_b.jpg


More battens, 22x100 and 50x50 arrives tomorrow. A welcome surprise as I only ordered it at 2pm. Kellaways Worcester apparently have another truck on the go now so no longer is it a week wait for everything. Maybe by the end of tomorrow I'll basically be ready to tile/clad? I still haven't even thought about a colour for paint.
 
I use Barn Paint for all my outbuildings. I've used black, cream and green in the last few years. I wouldn't use any other finish on sawn timber.
 
DBT85":97ncts92 said:
Well half of the roof it battened apart from the last bits right at the ridge. Just taking stock of what I have and what I'll need so I can see if I can get a delivery in any reasonable time frame.

Anyway, the unvented Cembrit ridge tiles I have here have a hole in them just like this one. Its about 1/3 the way along the ridge.
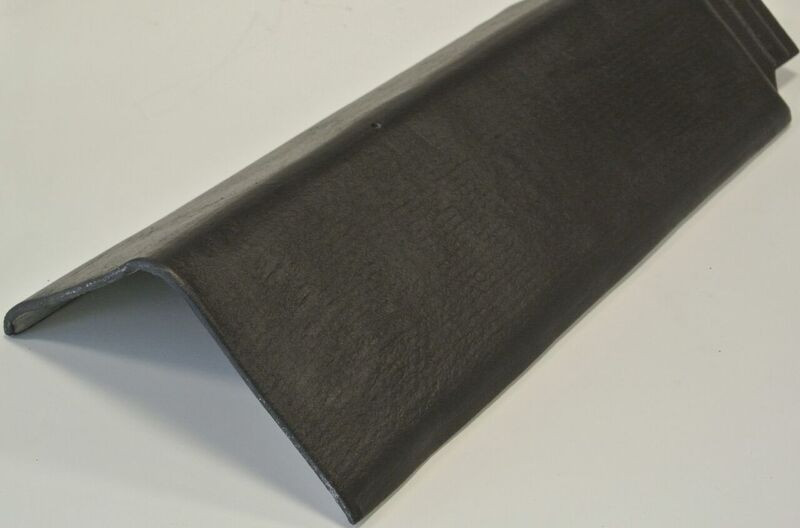
Berona_Black_Ridge_3.jpg


I can't fathom why, as they are supposed to be secured 75mm up from the bottom edge with 2 screws on each edge.

Any ideas?
My duo ridge are identical to that, except I don’t have any holes in the top. Hence I used four 60mm per tile.

These pictured are for use with the Marley dry ridge vent system. A roll of vent strip Is stuck to the slates, steel supports for a centre 2x1 batten, and then these ridge tiles screwed through the top to the 2x1. You won’t have a central 2x1 batten.

Cembrit supplied or not, they are the wrong ones.
 
How are you going to start tiling without putting the fascia on first? You’ll have nothing to carry the lower edge.

And the verge?
Have you worked out how/where that will finish, as it will be where you put your very first slate.

Your battens look right at the bottom, are you running a 245mm batten spacing, 110mm headlap?

Looks like you’ll have this little project wrapped up by the end of July. :shock: looking really good.
 
Cracking on nicely,
Re the door. GET ON WITH IT, if I can manage it you can definitely cope.
(Mind you I am having some shrinkage issues at the moment) :?
 
Sheptonphil":1ek33dcp said:
My duo ridge are identical to that, except I don’t have any holes in the top. Hence I used four 60mm per tile.

These pictured are for use with the Marley dry ridge vent system. A roll of vent strip Is stuck to the slates, steel supports for a centre 2x1 batten, and then these ridge tiles screwed through the top to the 2x1. You won’t have a central 2x1 batten.

Cembrit supplied or not, they are the wrong ones.

Hmm thanks Phil.

I'll see what turns up Friday and get on to Cembrit if its the same issue. It's no major issue if I have to make a change. I have to say the Marley documentation is way better than that offered by Cembrit.

Sheptonphil":1ek33dcp said:
How are you going to start tiling without putting the fascia on first? You’ll have nothing to carry the lower edge.

And the verge?
Have you worked out how/where that will finish, as it will be where you put your very first slate.

Your battens look right at the bottom, are you running a 245mm batten spacing, 110mm headlap?

Looks like you’ll have this little project wrapped up by the end of July. :shock: looking really good.
Won't start till a fascia is up. I have one bit here and more arriving tomorrow.

I know roughly where the end will be but the suggestion from the materials is to site the first tile in the middle and work out toward the verges. I need to ponder more before I begin.

255 spacing and 90mm headlap on these as it's a 30 degree pitch.

I don't know about the end of July. I hope so but I may end up back at work before the month is out which will eat into my time a little.

Regardless, the building might be done but there will still be so much to do. Sort the garden out, fill in the moat around the slab, sort the windows and the interior out etc etc. Feels nice to be at this point already though. Shame the weather has turned to crap again!

mindthatwhatouch":1ek33dcp said:
Cracking on nicely,
Re the door. GET ON WITH IT, if I can manage it you can definitely cope.
(Mind you I am having some shrinkage issues at the moment) :?
I shall I shall. I literally don't know where to start yet so need to have a read first.
 
I looked for my shed. Mrs repainted the front . Apparentlly the other three sides 'you cant see'.
Ok love.
I priced bedeck for the other three sides.
Ching!
Well ok! :shock:
 
DBT85":7zsiwkzo said:
[

I know roughly where the end will be but the suggestion from the materials is to site the first tile in the middle and work out toward the verges. I need to ponder more before I begin.
Work out from middle to the verges for setting out maybe, but not for laying them.
You would end up crawling all over the slates trying to do the middle ten rows!

If they could have been laid like that I wouldn’t have had such a trial at the end of my second side. You start at one end or the other, not the middle, makes no difference which end.
 
DBT85":26jg43a5 said:
Holy carp I've just seen the cost of Bedec (homer)

....and you need more of it than you think. Their coverage figures are optimistic. The thing is, you'll possibly never need to repaint. Put that into the equation and isn't quite so bad.
 
MikeG.":yznxry1f said:
DBT85":yznxry1f said:
Holy carp I've just seen the cost of Bedec (homer)

....and you need more of it than you think. Their coverage figures are optimistic. The thing is, you'll possibly never need to repaint. Put that into the equation and isn't quite so bad.
Did you paint both sides of your featheredge with the mist coat before fitting or just the visible parts and then a second coat when fitted?

I figured with the better part of 50m2 to cover it might be best to just bite the bullet and buy the big tin. Tho at that price you want to get the colour choice right!
 
DBT85":1nz53z9w said:
Yeah I'm firm on using bedec, just wondering how the "medium oak" one will look on treated wood.

I completed this a couple of years back and did it with medium oak. I like it which was just as well. My only issue was I decided to do the soffits and facias with it as well and the Barn paint has not lasted at all well on the planed wood. I need to sort this year so will be contacting Bedec to see what they suggest.

IMG_20170514_112228.jpg
IMG_20170514_112026.jpg
 

Attachments

  • IMG_20170514_112026.jpg
    IMG_20170514_112026.jpg
    227.1 KB
  • IMG_20170514_112228.jpg
    IMG_20170514_112228.jpg
    189.7 KB
Thanks for that Richard! It's probably a little darker than I was expecting so I'll keep thinking. I wonder why its not lasted as well on the planed timber.
 
Barn Paint is for sawn wood only. For planed wood you need Bedec Multi-Surface Paint. Barn Paint actually makes a good primer for MSP (and for their indoor water based gloss & eggshell paints), so I reckon they'll say just clean up the barn paint and paint over it with the MSP.
 
DBT85":2ydj96n1 said:
......Did you paint both sides of your featheredge with the mist coat before fitting or just the visible parts and then a second coat when fitted?......

A mist coat and a single proper coat all round before fixing in place (I also paint all cut ends with one heavy coat, and fit whilst wet). Then a final coat over the outside when the boarding is complete. You can spray it, but I just use a woolly 4" roller.
 
Ok thanks, It'll deffo have to be a 20l tin then.

It would be nice if Bedec actually had more photos of buildings with the various colours on.
 
I might be heading in a light grey with white trim kind of direction. I've literally done nothing on the workshop today yet.

MikeG.":3g3k3iki said:
DBT85":3g3k3iki said:
......Did you paint both sides of your featheredge with the mist coat before fitting or just the visible parts and then a second coat when fitted?......

A mist coat and a single proper coat all round before fixing in place (I also paint all cut ends with one heavy coat, and fit whilst wet). Then a final coat over the outside when the boarding is complete. You can spray it, but I just use a woolly 4" roller.
Ohh now for some ambiguity.

When you say all around, do you mean both faces and all edges, or just the face you see? Only while trying to decide on a colour I was reading your thread and someone asked the same question and you only said one face.
 
Back
Top