DBT85s Workshop - Moved in and now time to fit it out

UKworkshop.co.uk

Help Support UKworkshop.co.uk:

This site may earn a commission from merchant affiliate links, including eBay, Amazon, and others.
Fair enough, I have strapping left.

I'm going of fly the osb past the end of the short sides like you did, so I'll be sure to get plenty of fixings in all over.

Hopefully by the end of tomorrow I'll have them all bedded and at least materials cut for frames.
 
Thoroughly enjoying this thread, thank you DBT especially for the detailed explanations and photos
I only have a single car garage to play in and no interest in building a new workshop but am totally fascinated by all the steps you're going through especially the "learning how to do something yourself" for the first time jobs.
My point in posting: nothing really other than to say you've fast become my daily read over a morning coffee or evening tipple....and I'll be interested to see how you use one or two tools such as a mitre saw that I'm considering
Looking forward to reading more over the coming weeks.....
 
Thanks!

Mitre saw will get some use later today hopefully as I cut up my framework to size. Mines just a cheap Makita but I also have an even cheaper Evolution sliding one that does fine for jobs like this.

I got the bulk of the edit done for the bricks last night so just need to record a VO. I saved you all the pain of watching me do all of it by cutting out a bunch. The camera randomly turning off also helps there!
 
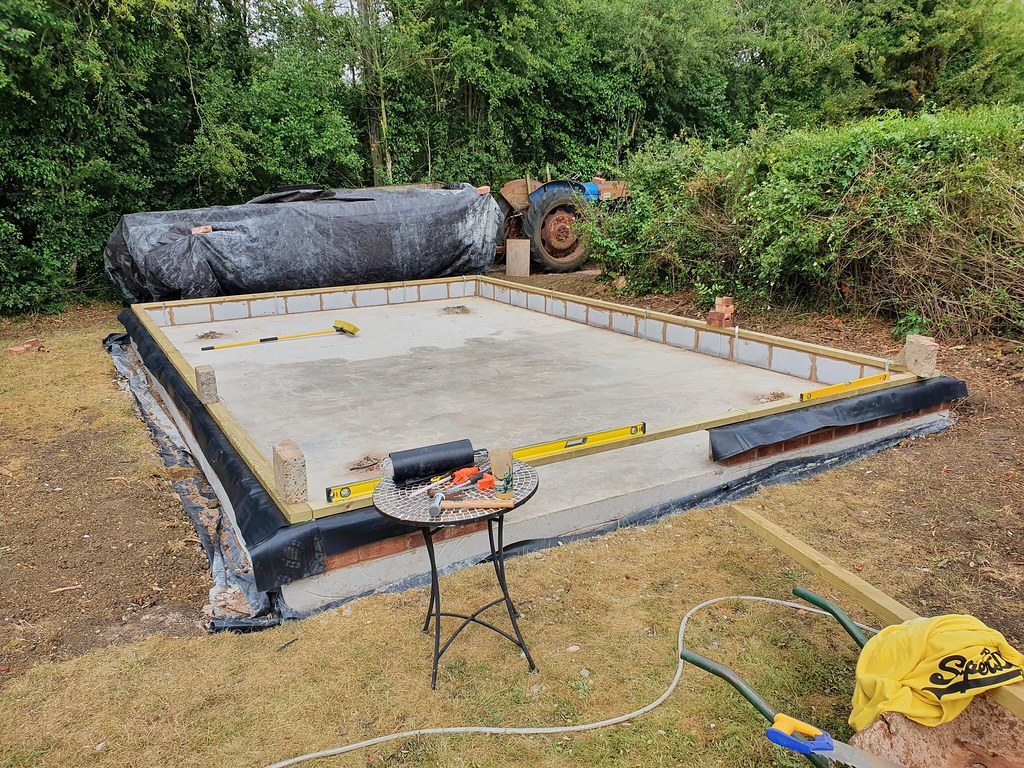
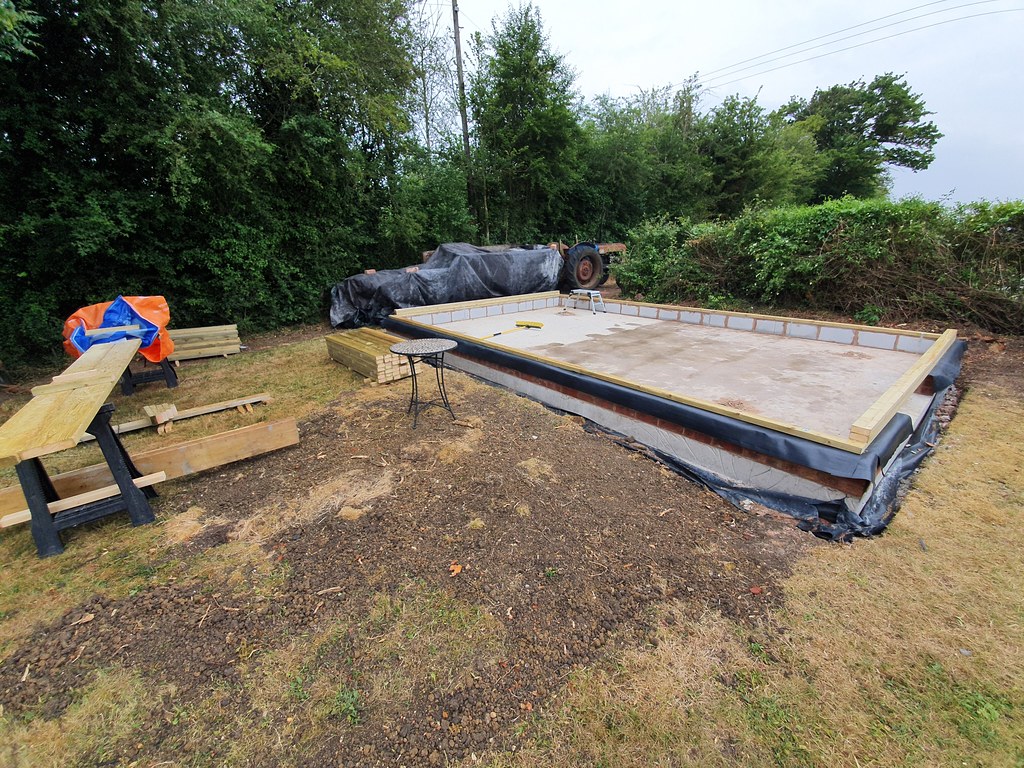
Well the plates are mortared down with DPC stapled to the underside. This was the first bit that actually went easier than I expected.

Like Mike have have used wider DPC so that it can roll back up and over an arris and up the studs behind the cladding.

49997491083_dd581d1425_b.jpg


A break for lunch and then I can chop up 45 odd studs to length.
 
After a tasty jacket spud and a bit of a tidy up I got the straps screwed down and started cutting up my framework. 43 studs to 1900mm, 3 more plates to 4361mm.

I have realised though that I have my first materials shortage. I made my cut list before finishing my plans for windows and obviously windows need more timber than just plain walls. :oops:

So I have enough to complete 3 walls, just not the more complicated wall with the windows in. I need 5x 3m lengths so not the end of the world but an annoyance. I'll go get some first thing tomorrow if I can. Annoyingly Travis are closed and I have a suspicion my timber yard will want to book me in for a collection. When I try and use their brand new website it wants me to collect in about 3 weeks!

Tish and pish.

A slightly earlier finish today as apparently I do have a family that likes to see me.

49998903447_4ddd0f1a3d_b.jpg
 
I missed the videos somehow. Nice! Just watched the above one. Are you left handed? It's interesting you lay the blocks in from right to left. Just wondering!
 
Bm101":3ljxsctg said:
I missed the videos somehow. Nice! Just watched the above one. Are you left handed? It's interesting you lay the blocks in from right to left. Just wondering!
Nope all right handed, just laid them based on where I'd finished the last one to be honest! I actually think I did both the bits of door wall from left to right but after that I just went along that back wall and carried on. I'm not sure at my speed if it really mattered!

If there are any suggestions for the videos by the way please do shout. I just plonk my time lapse in, cut out some of the bits of me looking gormless and then record about 70 voice over clips.
 
I headed out early doors with the sprog in tow to Kellaway to pick up the timbers I needed. Queued for the better part of 50 minutes only to pull in and be told "sorry we're all out till Monday...maybe".

With that and a BBQ afternoon all I got done was cutting down more timber for plates, lintels and whatever name is appropriate in your geography for the bits that hold lintels up :lol:

I did make one daft decision in that I ended up using 2 of my 2x6 boards for some lintels and had bits left over from each that would have served as another smaller lintel... which I'd already cut. So now I have 26 bits of 2x6 and 26 rafters to cut. Maybe I'll pick up a couple of spares just in case.

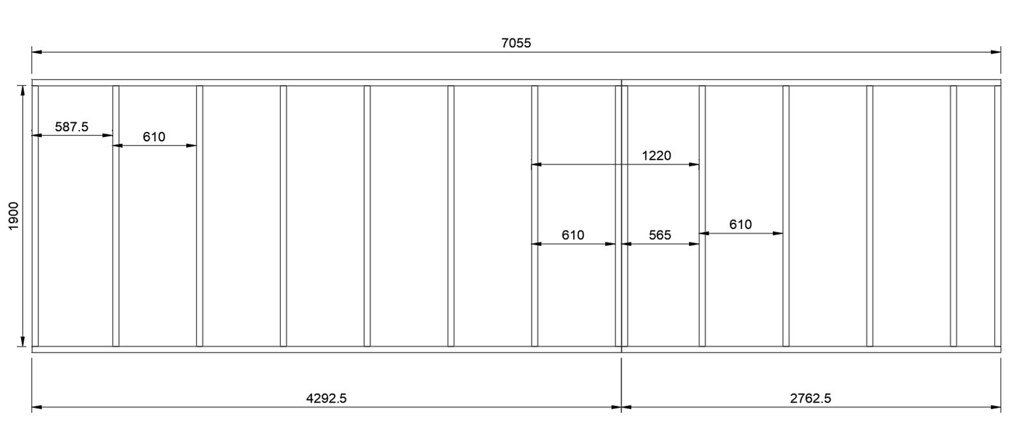
I also made one other mistake when planning my timber. My long 7055mm sides require two panels to complete. Once again I made my cut list before actually drawing the specifics (in my initial drawings its just one 7055mm long timber). That cut list was made along the lines of "I need 7.1m, I can get that from a 4.8m and less than half of 4.8m, so 3x 4.8m lengths will sort all my sole plates, and 3 more will do my top plates."

But when actually drawing it up the sections are 4292mm and 2763mm. The latter does not go into 4.8m twice!

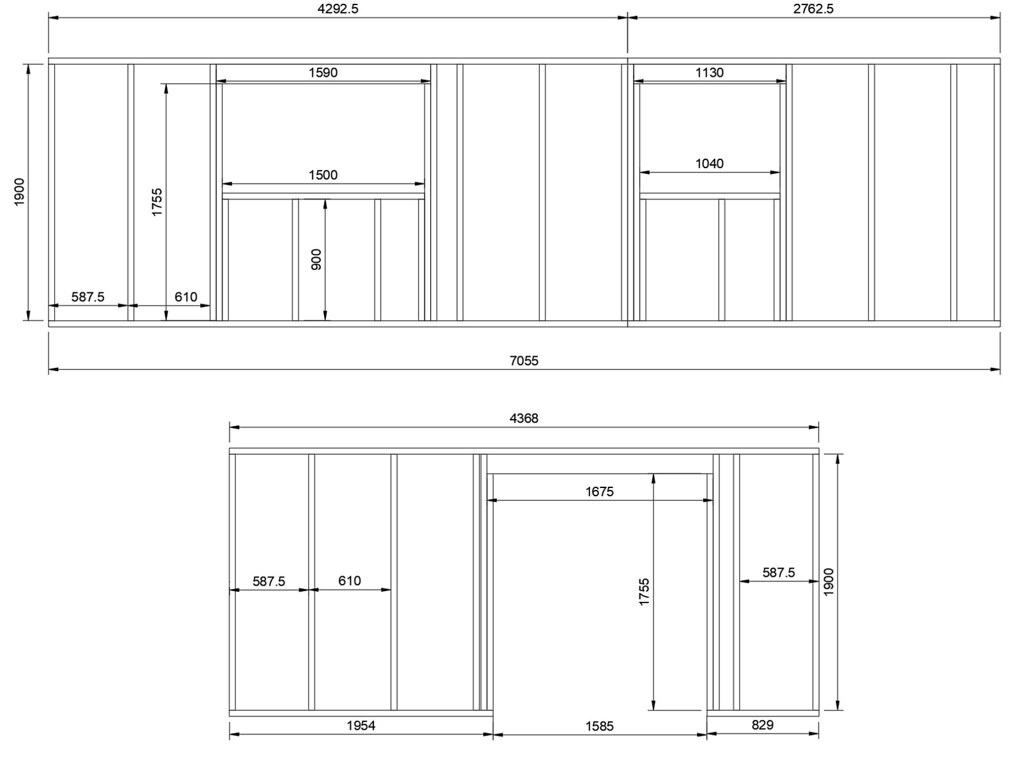
You may ask why not just use 4.8m and then a section to finish? OSB comes in at 1220mm wide, 4x 1220 is 4880mm. So either I faff and have extra studs in places they aren't needed (I'd need one at the end of the 4.8m, and then another at the start of the next section, and then yet another to support the edge of the sheets), or I cut the first plate down to 3.5 sheets of OSB, and then the next plate will join on and the OSB sheet will overlap. BUT I hear you cry, 1220 multiplied by 3.5 does not equal 4292. Correct. But the first stud will be entirely covered in OSB, rather than only half covered, so that extra 22mm needs to be added on.

This probably makes no sense.

Here are the drawings of my frames. OSB will cover the entire face of each stud, which is why not all studs are on 610 centres.

50002050553_a05c1321ba_b.jpg


50002570176_de62cc903b_b.jpg


Big question, do I measure for each stud location with a tape, or cut a couple of noggin sized bits and use those to mark out instead?

Also had a quick go with the Dewalt nailer. Sinks 90 ring shanks easily enough. Its a brute of a tool though. I'm going to look like hulk by next weekend. The 2 speed function just allows you to run in in a slightly lower power setting for nails under 70mm. I'm guessing less wear and tear and longer run time?
 
Can't say I have ever seen a wall done like that. In almost every case the top plate is doubled with the joint staggered from the one below, the top plate lapping the next wall to lock it. We wouldn't have a doubled 2 x stud with the top plate over each and the plywood meeting there too. It acts more like a hinge as you show where with the doubled top plate and the plywood laid horizontal and staggered with the seam landing on the midpoint of the stud edge they reinforce the joints. The plywood that runs long gets cut and trimmed if needed to take care of spacing to use on the next wall. Good framers here also put a bead of constriction adhesive on all the studs when the plywood is nailed to them for even more strength. Same on the roof.

Following threads like this point out how much differently we do things to achieve and end.

Pete
 
I don't claim for a second my way is the right way to do it Pete, and Mike is probably scratching his head wondering why I didn't just do something else!

A second top plate was always an option, just not a requirement.
These frames will be secured to the first sole plate (beded on the mortar and dpc and strapped down) so that will act like the second top plate to stop the hinge action.
 
We anchor the bottom plates too but that won't stop the top of the wall from bowing out. Or in for that matter. Most of it will be academic once the roof is all done.

Like I said different ways. ;) Same as you guys doing the slab and then bricking a small wall to frame onto. On the west coast where the climate is similar, totally different here :roll: , you usually see footings placed all around the perimeter and across if there are bearing walls and forms placed on 1 x 3 on top of the 2 x 6 or 2 x 8 footing forms. Forms are placed on those 1 x 3s for a wall a few feet high (to get above grade level) and then the concrete poured to make the footings and walls in one operation. The top troweled to a 1 x 2 nailed inside the form to a level line and anchor bolts pushed into the concrete to bolt the walls to. After is sets a few days the forms are stripped off and the framing begins. After framing is done the foundation will get waterproofed if needed and drain pipe and a drain rock layer and covered with dirt. Once any inside work is done the slab is poured and floated smooth. The only visible difference is the concrete foundation walls don't look as nice as the brick you end up with but are likely stronger and I think faster to put up.

Pete
 
Your drawing is too precise! there are several methods you could use for setting out, you could mark the cill plate to create a rod, which is a given, and will allow for any construction tolerances, setting out positions of openings that are required, then transfer the marks to your top and bottom wall frame plates, ganged together, leave a small margin on the end of the wall frame plates to stop splitting when you come to nail the first end stud, and mark off the stud centers, you could cut some noggins, but be aware regularised timber can differ slightly in size, then you can get marginal creep along the run.

Cant see any detailing for your frame corners, have you allowed for them.
 
Thanks hoj.

Corners are being done like Mike's. OSB on the long sides will butt up against the ends of the short sides. So the cladding is fully supported without adding extra studwork
 
DBT85":q3ihufsc said:
....... so that will act like the second top plate to stop the hinge action.

The purpose of a doubled-up top plate is twofold: to allow rafters to be positioned anywhere, not just above a stud, and, secondly, to tie multiple panels together to help stiffen up longer walls.
 
If I need a double top plate I need to know before I start nailing things together. Rafters will be on top of studs which is why I haven't had a double top plate until now.
 
Curious about the sole plate here.

It seems not all projects have a doubled up sole plate - Mikes workshop for example doesn't. But some of the projects I've followed along with do.

I'm at the last stage of my design but confused about when one is needed, or is this purely a preference thing? I assume that setting the sole plate up, and rigging with wedges over the DPC/thin bed of mortar makes life easier getting things level? If your frame is square then it's just a case of dropping it on and attaching?

Am I making my life harder if I don't have a second sole plate - my build will be about 2.6m x 6m, with the long sides of the frames split to about 3m. I wasn't planning on having a double top plate as the studs align with the roof, then nailing the studs together for the join.
 
mAtKINItice":21202f51 said:
Curious about the sole plate here.
If your frame is square then it's just a case of dropping it on and attaching?

Am I making my life harder if I don't have a second sole plate - my build will be about 2.6m x 6m, with the long sides of the frames split to about 3m. I wasn't planning on having a double top plate as the studs align with the roof, then nailing the studs together for the join.
Having a sole plates bedded and set on to the wall and DPC then strapped is far easier than trying to manhandle a 3m+ frame with studs and noggins on to the mortar bed. It is much more difficult Or even impossible to handle that weight with as much precision as a single piece of 4x2. Once the single sole plate is bedded and strapped, it is really easy to line up the walls. They can be corner clamped together, adjusted easily for perfect square and vertical alignment without affecting the true levels of the sole plate bed. I put up 3.6m wall panels on my own, if I had tried to bed those panels directly on to mortar, the pressures would have been all over the place, squeezing out all the mortar in places with the twisting motions that would inevitably have happened.

Horses for courses really.
 
Mike's doesn't, but his later house extension then did. I'm not sure if ideas just evolved or what, but that, this and Shepton Phil have all down the same. Bedding the bottom plate on the dpc and mortar alone is much easier than trying to do it with a wall on top of it. No need for the wedges then either.
 
Thanks for the update - I'll re-add the sole plate back into my model. At least I'm changing this now in SketchUp, rather than on site. Much easier.

Enjoying the thread - keep it up, though reading this one has made me add a £500 nailer to my list of tool purchases.

I'll repay the entertainment/education hopefully in a few months once my house move is complete.
 
Back
Top