Coffee table in cherry and ash

UKworkshop.co.uk

Help Support UKworkshop.co.uk:

This site may earn a commission from merchant affiliate links, including eBay, Amazon, and others.

MickCheese

Established Member
UKW Supporter
Joined
29 Sep 2006
Messages
2,468
Reaction score
13
Location
High Wycombe, Bucks
Hi

Finished this just before Christmas was a bit of a rush job and so didn't have any progress photos.

I really struggled with the table top. I would just get to the stage where it was flat and smooth and then it would tear out. Eventually I had to resort to a little bit of filler but I will refinish the top when I ave a bit more time.

The Cherry will darken with age and then contrast more with the Ash strips down the table top sides. I stole the idea for the Ash side from Brian MacKenzie's FaceBook group where someone had produced a small table in Cherry with an Ash edge. So as well as liking it it fulfilled a need to get this finished when I had run out of Cherry. It actually turned out quite well.

The drawers are hand dovetailed. the finish is Hard wax followed by wax polish. The drawers and the front rail are all cut from one piece to try to keep the grain running across the front but with the width of the table saw blade and cleaning up it doesn't match exactly.

The frame is all traditional mortice and tenons.

The small drawer handles are beech stained black and polished.

As a guide to size that is an iPad sitting on the top. That is not a crack down the leg but some black streaks in the wood that I quite like (spalting?).

What do you think?

Table1.jpg


Table2.jpg


Table3.jpg


Table4.jpg


I enjoyed making it. Learnt a lot as usual. The most difficult bit was hand planing the top and avoiding tearout, this I did not manage but through doing it I worked out that I had to keep my planes really sharp and waxing the bases made pushing them easier. I also learnt to be more careful with glue squeeze out. Even though I thought I was being very careful I had to strip and refinish the side rails twice and I can still see traces of glue if I look really carefully.

And finally

I should have paid more attention to the knap of the boards as I glued them up for the table top. I went for what I deemed to be the most attractive but found that the grain run was a bit wonky so as I traversed across the boards flattening and smoothing the top it was almost impossible to prevent the tearout.

So, I appreciate your comments and don't hold back. Any good tip on how to get a really smooth table top with hand planes would be really useful. (Or is it just a really sharp blade).

Thanks for looking and sorry about the poor pictures, will take some better ones with my proper camera not my iPad.

Mick
 

Attachments

  • Table1.jpg
    Table1.jpg
    60.6 KB
  • Table2.jpg
    Table2.jpg
    59.5 KB
  • Table3.jpg
    Table3.jpg
    51.3 KB
  • Table4.jpg
    Table4.jpg
    93.3 KB
Mick I like it a lot - quite like a dining table in cherry I made recently - the drawer construction is similar
English cherry is a right bug*er to avoid tearout - eventually I think with my dining table I had a 45 degree bevel blade on a bevel up low angle plane with the mouth closed right down and very finely set going across the grain at about 60 degrees - that got it very close then I finished it with a card scraper - not sure there are any short cuts there!. Took ages as the table top was 2200 x 960mm! Drum sander maybe the answer but then sandpaper is the devil's own invention isn't it?
Lovely table
Mark
 
That looks good with the contrast, I am just about to make a coffee table in cherry also so will post a wip as I go
Dave
 
MickCheese":22l921ip said:
I should have paid more attention to the knap of the boards as I glued them up for the table top. I went for what I deemed to be the most attractive but found that the grain run was a bit wonky so as I traversed across the boards flattening and smoothing the top it was almost impossible to prevent the tearout.

So, I appreciate your comments and don't hold back. Any good tip on how to get a really smooth table top with hand planes would be really useful. (Or is it just a really sharp blade).

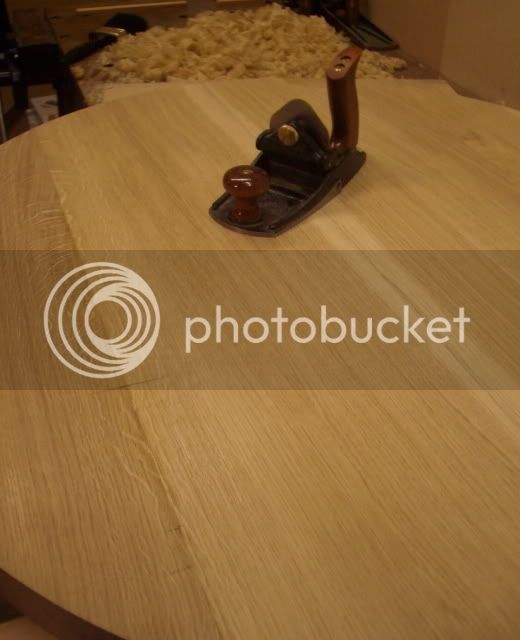
Nice table. With regard to the tearout, I would always recommend a scraper plane for finishing - particularly with something like a table top which you want to keep flat. I finished this large, oak table top entirely with one


Once you've used one and got the hang of adjusting it properly, it really is a revelation. You can use it in any direction and never have to worry about tearout again. The Veritas version is particularly good in my experience - I prefer it with the thin blade which you can bow just like you do with a #80 style scraper or a card scraper.

Some people have had good results with low angle planes honed to a steep angle but I prefer the scraper plane.

And when preparing the boards, if you have a lot of material to remove a toothed blade will guard against tearout.

Cheers :wink:

Paul
 
I hone the blade at 45 degrees and then add a burr with a burnisher. I wrote a piece about it here viewtopic.php?p=296427&highlight=#296427

There seems to be a lot of mystique about scrapers but they really are straight forward to prepare and use. Blimey, even I can do it :shock: :lol:

The easiest one to use is the #80 style scraper. There's a bit more of a knack in setting up a scraper plane but once you get it, it's straight forward also.

Hope this helps.

Cheers :wink:

Paul
 
I would like to second Paul's love for scrapers, can work magic is sharp and well adjusted. Very nice table by the way, I do think the legs would have looked sleeker if there was a taper it just depends on the look you were aiming for.

Matt
 
That's novel...and it works! Well done for trying something different and pulling it off. The relative proportions of the cherry to the ash looks right too. But if you do it again I'd definitely swap the leg bead for an internal taper on the legs commencing about 20mm below the rail. All the visual interest is towards the top of the piece and I think tapered legs take the eye upwards. The other thing I'd consider is two woods that are different in colour but texturally more similar, like cherry and sycamore.
 
Nice looking work Mick - you've shown some good skills there and plenty of perseverance too by the sound of things. I too suffered problems with tear out on the Burr Elm dining table I completed before Christmas - very sharp planes and a card scraper ended up solving the problem for me as I didn't have the time to bugger around fine tuning the veritas scraper plane I'd bought second hand to tackle the job (note to self don't buy tools that take time to master to use on work that is for delivery against a hard deadline!). Your hand cut dovetails look great. Top marks for a well executed piece by all accounts.

Beauty is in the eye of the beholder, so I personally would have adopted custard's suggestion for an internal taper on the legs, and would probably have flared them outwards from vertical too to draw the eye upwards as he says. It would also have "lightened" the very solid/sturdy look that the table has from front on. That said your elevation photo gives a somewhat distorted perspective, as the only way you would see the table from that point of view is if you had your eye level at seat height on the opposite side of the room! Tapers and flared legs would also add visual interest for someone standing looking down on the table as in the first 2 photos. I hasten to add these thoughts are not criticisms in any way, what you've produced is really good, but I find it's always interesting to hear how other people might change/modify things - it helps challenge/inspire me in my approach to new designs, there's a grave danger of getting stuck in a rut else!

Great work all the same, you should be very proud of what you've created. Good luck with your next piece

Cheers

John
 
Thanks for all the comments. It is always interesting how we all see something different and have different tastes. Be boring if we were all the same.

I will look into the scraper plane, I do need to refinish the top so will need some practice.

I really fought with the notion of tapered legs. The plans I drew had them but the full size plan I drew did and then did not. I'm still not sure. The front rail looks heavier in the photo's than in the flesh. I will live with it for now and see how it goes. I suppose adding the taper is easier than replacing one! :D (Not that easy as I would have to do it by hand, lots of opportunity to mess it up)

As the Cherry darkens I think the colour contrast will show more, I would like to say the ash was a conscious decision but in fact it was all I had at the time.

Mick
 
Really like this Mick, everything looks right to me. The contrast of Ash/ cherry is a good choice. To me it looks like cherry with sap wood either side of it. :)
 
Metal_Gazza":1ehhc6mj said:
Nice work Mick... How many hours did you put in?

Difficult to say as it was fitted in around work and home life. Seemed to take forever! :D

I did it over an extended period of time, an hour here and an hour there.

As a guide dimensioning the pieces probably too a good half a day. The top took at least half a day. and the drawers took probably the best part of a day so quite a lot of hours. But I am terrible for getting distracted, I am not a professional, when I see how quickly some of the professionals on here work I am staggered and I am not as organised as I really need to be.

So as usual learnt a lot and one of the things I did learn is be better prepared and have a good plan. This time I had a full sized basic drawing on lining paper and that was very useful.

Mick
 

Latest posts

Back
Top