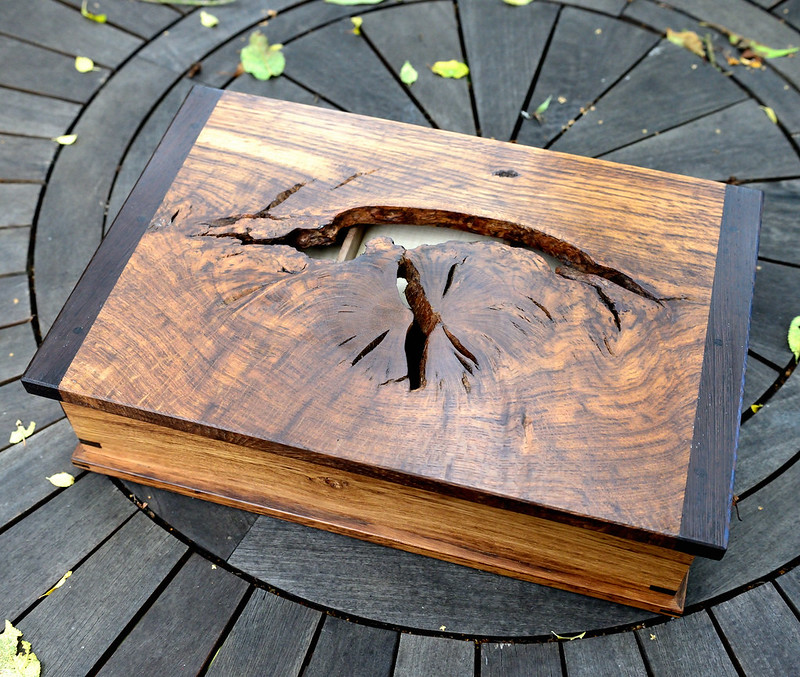
Brass powder and epoxy resin infill on burr oak

UKworkshop.co.uk

Help Support UKworkshop.co.uk:

This site may earn a commission from merchant affiliate links, including eBay, Amazon, and others.

Glynne

Established Member
Joined
18 Mar 2007
Messages
1,478
Reaction score
15
Location
Sutton Coldfield
Being primarily a box maker, I'm always on the look out for different timbers, effects etc to use as box lids so having bought some amazing burr oak, I was a bit stumped as to how to build this into a box given that many of cavities went right through the wood.
image001.jpg

Having seen a lot of coloured infills on Facebook, Instagram etc. (sources for ideas rather than posting) I put out an enquiry to http://www.easycomposites.co.uk/#!/resin-gel-silicone-adhesive and received an amazingly detailed and helpful reply within the hour about using brass powder which I thought would work well with the burr oak and the brown oak for the rest of the box.
The advice is that for metal powders, you need to use at least 50% by weight of the powder to the resin mix but in practice, I used about 300% - the only restriction being that your resultant "sludge" has to be sufficiently liquid to flow and settle. As the powder will settle in the mixture, you need to "overfill" any cavities so as you can sand off the cured resin surface to reveal the metal infill.
You also need to seal any through cavities so as the resin / powder mixture doesn't seep through - obvious now, but it was only when I thought I was using an awful lot of mixture on a test piece did the penny drop! Once cured, the filler can be sanded as normal.
The end result where you can see the through cavities: -
IMG_2277.jpg
IMG_2281.jpg
IMG_2284.jpg
IMG_2279.jpg
In terms of the rest of the box, brown oak and with steamed beech trays (dovetailed). Hinges are Neat Hinges (no longer sold - I did contact Ian Hawthorne), Button catch (Ian Hawthorne), brass inlay (Original Marquetry). Lined with pig suede (Andrew Crawford) and finished with sanding sealer and wax only.
I will post on Instagram in due course only the box is a present for someone who follows me so I have to wait for a couple of months!
 

Attachments

  • image001.jpg
    image001.jpg
    94.3 KB
  • IMG_2277.jpg
    IMG_2277.jpg
    192.1 KB
  • IMG_2281.jpg
    IMG_2281.jpg
    191.6 KB
  • IMG_2284.jpg
    IMG_2284.jpg
    196.6 KB
  • IMG_2279.jpg
    IMG_2279.jpg
    183.5 KB
A very nice box Glynne, the brass inlay looks superb. I use brass powder on pieces i turn, they are usually splits and i do as you say about mixing. The finish looks good, i do say tongue in cheek that it is a gold tree it came from.
 
Thats a superb box Glynne. The resin infill is the sort of thing I am about to get into, so perhaps I can pinch some ideas and at the same time, take you up on the offer of Router info.
Malcolm

..............the box is a present for someone who follows me ........................ do you mean a stalker?
 
Another nice box, but if the voids are that size, is it OK to fill them, but perhaps be more adventurious with a couple of colours, streaking them somewhat? Or even adding itens, such as pebbles etc.?

Malcolm
 
wow impressive box, I need to get some suede for my next one, looks amazing Glynne
 
Alexam":26tdt8eh said:
Thats a superb box Glynne. The resin infill is the sort of thing I am about to get into, so perhaps I can pinch some ideas and at the same time, take you up on the offer of Router info.
Malcolm

..............the box is a present for someone who follows me ........................ do you mean a stalker?

Happy to share the little I know on resins Malcolm.
Give me a shout if you want to have a look at a few routers and a play on the router table.
Coincidentally I found an article from John Lloyd (cabinetmaker) on a very basic router table he used for many years. It also explains how he upgraded to a new small homemade table and uses a Router Raizer and Xtreme Extension (both of which I have) so if you PM me your address I’ll post you a copy.
 
Nice to visit you again today Glynne and to spend time chatting about the wonderful world of your workshop. Many more tips obtained and a chance to get 'hands on' with that superb new box with the brass inlay. Such a pleasure to see such workmanship and that box will certainly be a family heirloom to pass on through the generations of your family.

The other boxes you have completed make me want to do more and try and get up to your level.

As always, open house here whenever you are near and perhaps by then I will have the router set-up you have helped me to select.
All the best mate

Malcolm
 
Being primarily a box maker, I'm always on the look out for different timbers, effects etc to use as box lids so having bought some amazing burr oak, I was a bit stumped as to how to build this into a box given that many of cavities went right through the wood. View attachment 63710
Having seen a lot of coloured infills on Facebook, Instagram etc. (sources for ideas rather than posting) I put out an enquiry to Materials, equipment and training for advanced composites with next-day shipping and expert technical advice. - Easy Composites and received an amazingly detailed and helpful reply within the hour about using brass powder which I thought would work well with the burr oak and the brown oak for the rest of the box.
The advice is that for metal powders, you need to use at least 50% by weight of the powder to the resin mix but in practice, I used about 300% - the only restriction being that your resultant "sludge" has to be sufficiently liquid to flow and settle. As the powder will settle in the mixture, you need to "overfill" any cavities so as you can sand off the cured resin surface to reveal the metal infill.
You also need to seal any through cavities so as the resin / powder mixture doesn't seep through - obvious now, but it was only when I thought I was using an awful lot of mixture on a test piece did the penny drop! Once cured, the filler can be sanded as normal.
The end result where you can see the through cavities: - View attachment 63711 View attachment 63712 View attachment 63713 View attachment 63714 In terms of the rest of the box, brown oak and with steamed beech trays (dovetailed). Hinges are Neat Hinges (no longer sold - I did contact Ian Hawthorne), Button catch (Ian Hawthorne), brass inlay (Original Marquetry). Lined with pig suede (Andrew Crawford) and finished with sanding sealer and wax only.
I will post on Instagram in due course only the box is a present for someone who follows me so I have to wait for a couple of months!
Hi, Glynne - Andrew Crawford here. I've only just joined UKWorkshop and I'm trawling through to see what's here and came across your post. Just a quick correction - the hinges you've used here are smartHinges, not neat hinges.
Being primarily a box maker, I'm always on the look out for different timbers, effects etc to use as box lids so having bought some amazing burr oak, I was a bit stumped as to how to build this into a box given that many of cavities went right through the wood. View attachment 63710
Having seen a lot of coloured infills on Facebook, Instagram etc. (sources for ideas rather than posting) I put out an enquiry to Materials, equipment and training for advanced composites with next-day shipping and expert technical advice. - Easy Composites and received an amazingly detailed and helpful reply within the hour about using brass powder which I thought would work well with the burr oak and the brown oak for the rest of the box.
The advice is that for metal powders, you need to use at least 50% by weight of the powder to the resin mix but in practice, I used about 300% - the only restriction being that your resultant "sludge" has to be sufficiently liquid to flow and settle. As the powder will settle in the mixture, you need to "overfill" any cavities so as you can sand off the cured resin surface to reveal the metal infill.
You also need to seal any through cavities so as the resin / powder mixture doesn't seep through - obvious now, but it was only when I thought I was using an awful lot of mixture on a test piece did the penny drop! Once cured, the filler can be sanded as normal.
The end result where you can see the through cavities: - View attachment 63711 View attachment 63712 View attachment 63713 View attachment 63714 In terms of the rest of the box, brown oak and with steamed beech trays (dovetailed). Hinges are Neat Hinges (no longer sold - I did contact Ian Hawthorne), Button catch (Ian Hawthorne), brass inlay (Original Marquetry). Lined with pig suede (Andrew Crawford) and finished with sanding sealer and wax only.
I will post on Instagram in due course only the box is a present for someone who follows me so I have to wait for a couple of months!
Hi, Glynne - Andrew Crawford here. I've only just joined UKWorkshop and I'm trawling through to see what's here and came across your post. Just a quick correction - the hinges you've used here are smartHinges, not neat hinges.
 
Yep, like a good fruitcake, there should only be just enough binder to hold the good bit together. I struggled to get a decent shine when using epoxy but filling with powder/filings and dripping low viscosity cyanoacrylate worked really well, though on a huge bit it might not be strong enough.

Aidan
 

Latest posts

Back
Top