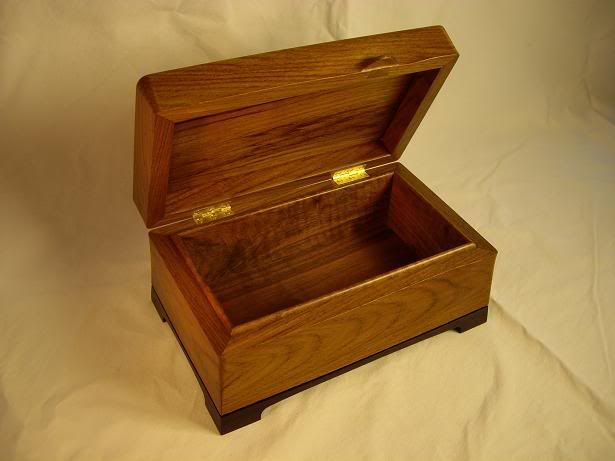
box and hinges

UKworkshop.co.uk

Help Support UKworkshop.co.uk:

This site may earn a commission from merchant affiliate links, including eBay, Amazon, and others.

stef

Established Member
Joined
16 Jan 2007
Messages
383
Reaction score
0
Location
Normandy
I am designing a box, and trying to make it "makeable"
it will be a "smart box" in stained and waxed pine, made of 18mm thick panels. the box is 600mmx 360mm x 150mm tall.
the plan is to make the box, and use a saw to cut it open and form the box itself and the lid.
so far, so good.

now for the hinges...it's a smartish box, not a rough chest, so the hinges cant be screwed on the rear face, with screw heads showing.
the hinges have to be placed between the lid and box edges, at the back, in the usual fashion. This is how i'd do it:

with the box open, screw one half of the hinge to the box edge, then to the lid, and with some luck, the lid with close.
problem is, last time i tried this type of setup, i just couldnt make it work.
a small placement error on the hinge means the lid is out of line at the front of the box. especially with largish boxes.

is there some trick other than trial and error to screw the hinges in ? (trial and error usually doesnt work when pine and screws are involved)
 
As you DON'T want surface hinges I would suggest marking the positions of the hinges before yoy cut the lid off, that way they should at least be aligned in one direction.

If you do as you say and just screw the hinge to the cut edges then it will not close at the back, you need to rebate one or preferably both edges to take the thickness of the hinge.

If you have a router then use this with a simple home made jig which will ensure that the hinges are recessed to the same depth and equal distance from the back edge.

Always fit with just one screw and test how the box closed, if it's off you can reposition and use teh other screw holes.

Jason
 
Derek Willis.":ptxyci2j said:
If you have a job with alignment with a small box, you could try surface hinges, ones that sit on the back face with round head srews, much the usual way with this sort of thing.
Derek.

Derek - I suggest you read again what Stef wrote...surface hinges are not acceptable - Rob
 
jasonB":1t19tzom said:
As you DON'T want surface hinges I would suggest marking the positions of the hinges before yoy cut the lid off, that way they should at least be aligned in one direction.

If you do as you say and just screw the hinge to the cut edges then it will not close at the back, you need to rebate one or preferably both edges to take the thickness of the hinge.

If you have a router then use this with a simple home made jig which will ensure that the hinges are recessed to the same depth and equal distance from the back edge.

Always fit with just one screw and test how the box closed, if it's off you can reposition and use teh other screw holes.

Jason

i didnt mention it, but of course, the hinges will be recessed on the edges.
and failing anything else, i'll try the one screw tip !
thanks !
 
I've got to do this for the first time, with some very expensive hinges. So thanks also from me for the above advice.
 
What I would do is as follows;

1. Cut the lid off the box, then clamp the 2 bits back together again.
2. Mark the position and width of the hinges on the back of the box with small knife marks - use the hinge as the width gauge.
3. Open the lid up and transfer the small knife marks onto the inside edge and set the width with a cutting gauge.
4. Clamp the lid onto the back of the box in its open position, i.e.rebate to rebate, then rout out the waste within the knife lines and remove the final bit with a paring chisel.
5. Fit the hinges - I also use the 1 screw method Jason suggests

Assuming the lid and box are square then I find this a very reliable method.

Cheers, Ed
 
EdSutton":1p4iy67a said:
What I would do is as follows;

1. Cut the lid off the box, then clamp the 2 bits back together again.
2. Mark the position and width of the hinges on the back of the box with small knife marks - use the hinge as the width gauge.
3. Open the lid up and transfer the small knife marks onto the inside edge and set the width with a cutting gauge.
4. Clamp the lid onto the back of the box in its open position, i.e.rebate to rebate, then rout out the waste within the knife lines and remove the final bit with a paring chisel.
5. Fit the hinges - I also use the 1 screw method Jason suggests

Assuming the lid and box are square then I find this a very reliable method.

Cheers, Ed
no problem up to 5.
when you fit the hinges, to you still have lid and box clamped together (in the opened position?
dont you leave a gap, in the open position ?
this may be where i am going wrong !
 
No you have to separate them to put the hinges in, clamping them is just for convenience when routing the waste out.

You need to work out how far the hinge needs to stick out the back when you mark the depth with cutting gauge, this in turn generates the gap when the box is open.

Cheers, Ed
 
The way I tackle this problem is to screw the hinge to the bottom half of the box with one screw, then put double sided tape on the top of the hinge. Put the top on and press above the hinge, you may need to pack between the hinge leaves to make sure it sticks. Carefully open the box, resting it on packing piece so that its level, and fix with one screw. Check if everything is ok and then fix the other screws. If the tape doesn't stick securely put an extra piece on the box top
 
Fitting hinges to a box or cabinet is really fiddly :x ...takes me ages to get it spot on. I use the one screw fixing method as well, but it's still tricky to do and I've never, ever get it right first time. Fixing hinges on this:

34350ggd7-1.jpg


took ages 'cos the sides are concave - Rob
 
Did you ever consider barrel hinges?
Over here in my shop I have doweling pin sets ( A disk with 2 points ,one on top and another on the bottom of disk ).If you place the disk where you want it,you just match the other side even.
They come in 4 sizes....
 
Mass produced boxes from factories dont seem to suffer from the problem of badly fitted hinged lids, so what are they doing?
 
devonwoody":hi82e7qm said:
Mass produced boxes from factories dont seem to suffer from the problem of badly fitted hinged lids, so what are they doing?
Tolerances (or lack of it) probably...'lay on' surfaces hinges as well - Rob
 
When Spring and better weather arrives I shall have to have another go myself.

Perhaps a former to drop base into, then closed hinges with a contact glue put on, then drop the lid down.
Take out of former open lid gently, pop some screw holes, try the one screw trick.
Remove screws and cut out hinge positions, put screws back.

I think I will stick to my drop on lids.
 
Hi Rob,

I had to chuckle at this language of ours and the way we interpret what forum members are saying.

To me, Steph was saying surface hinges just don't look smart.

Like Derek, I beg to differ. There is nothing wrong with a quality 'H' Hinge of brass or even silver. Fitted properly they do the job well and they do away with the need for housing.

On the other hand, I would never consider surface mounting a butt-hinge. (Which I have seen).

So, Steph, some hinges are designed to be surface mounted and they look quite smart, especially if you use dome-headed or cheese-headed screws and take the time to align the slots properly.
:)
 
Benchwayze":2864c7qv said:
Hi Rob,

I had to chuckle at this language of ours and the way we interpret what forum members are saying.

:)

Hi John - indeed the language on the forums is generally always going to be a problem, but Stef said..."it's a smartish box, not a rough chest, so the hinges cant be screwed on the rear face, with screw heads showing.
the hinges have to be placed between the lid and box edges, at the back, in the usual fashion
"...which I interpreted to mean that surface mounted hinges usually fitted with domed heads were not acceptable for this project - Rob
 
Derek Willis.":1pvrbo4y said:
John,
Just remember that big brother Rob, is watching you and only too ready to correct you, so be very careful lest you fall down.
Derek.
If it's me you're referring to Derek, and I assume it is, I do take slight umbrage :wink: at being compared to anyone or anything to do with BB in all it's connotations. As I said earlier, language in it's written form, is always difficult and open to mis-interpretation on a forum like this (and I've made some ghastly errors in the past :oops:) so IMO it's beholden to us all to try interpret the information as accurately as we're able, which in the first instance means reading and understanding the post or thread in question - Rob
 
Derek Willis.":1p5knid3 said:
John,
Just remember that big brother Rob, is watching you and only too ready to correct you, so be very careful lest you fall down.
Derek.

I have to say Derek that in the short time i've been around i've found the opposite to be true. Possibly you have misunderstood Rob's comments?
 

Latest posts

Back
Top