Axminster TS250-2 modifications.

UKworkshop.co.uk

Help Support UKworkshop.co.uk:

This site may earn a commission from merchant affiliate links, including eBay, Amazon, and others.
Oh I looked at the Incra :) For about the time it took to scroll down the page to the price :)

Thanks for the suggestions. Regarding the fence not going past the end of the blade. Yeah exactly, I read something like that but I took it further, mine stops at the half way point of the blade, the thinking being the cut has finished then and it's kickback zone from there on? It's this which is making me think my cuts are push and hope as the material goes past that. I don't like it. I need to make more measurements to know how much it actually matters.

Maybe I just need to try moving the fence to the back of the blade instead of the middle.
 
Kick back can happen as soon as you introduce the workpiece to the blade, its when the workpiece gets past the centre of the blade and can be pinched by the fence that the problem is more prone, if your fence is set up absolutely parallel then the danger of kick back is reduced, as you know I fitted the JessEm stock guides to my fence and these almost completely eliminated any chance of kick back.
 
MikeJhn":2cdlhx19 said:
If I remember correctly, its a recommendation from the HSE that a table saw fence does not protrude beyond the end of the blade, this is to help prevent kick back on a badly set up fence ensuring that the gap from the blade to the fence is not narrower beyond the blade and cause a pinch point.

My Ts250 came with a sub fence so you can adjust where it finishes, it’s slightly too long in my opinion as it finishes at the end of the riving knife, so I have mine pulled forward so it sticks out the front and finishes just after the centre of the blade, probably should cut a chunk off it...
 
Sounds like mine, which finishes about centre of the blade. I just feel like I'm losing control during the final third of pushing some wood through. I'll have to take some more measurements as it might be more in the mind. Could be I need to move the sub fence 10mm or so forward to make it "feel" better to me. Cheers.
 
That's the beauty of the JessEm stock guides, you don't every have to use the sub fence, the first guide holds the stock against the fence and the second guide holds the stock after the blade, they really are very good, in fact I bought the guides for my router table as well, very impressed with them.
 
If I remember correctly, its a recommendation from the HSE that a table saw fence does not protrude beyond the end of the blade, this is to help prevent kick back on a badly set up fence ensuring that the gap from the blade to the fence is not narrower beyond the blade and cause a pinch point.
Some authorities recommend a fence face goes no further than the front tooth meeting the wood. Their reasoning seems to be that, beyond the first tooth, the wood has a cut/kerf, and is free to allow released stresses to bend the wood 'outwards' toward the fence. This would 'expand' the original wood width dimension, forcing the billet being cut sideways, into the side of the spinning blade...= kickback.
My old Elliott had just such a short fence and it behaved impeccably, wheras my more modern Wadkin, and before that, an original TS200, had the ability to put the heart crosswise in me.
Short fence faces are an absolute necessity - especially for weekend woodworkers, they just don't get enough experience to develop 'a sixth (safety) sense', compared to jobbing chippies.
Sam
 
I'm going to check all alignment of blade and fence before looking at a fence upgrade then. Maybe the short fence is not the problem. Cheers all.
 
My conversion of the Axminster crown guard shown previously wasn’t very good, mainly due to the extraction point being at the wrong place and the airflow being too small. After forgetting to close the front of my overalls and filling them up with dust after a ripping session something had to be done...

Nothing very original here although I’m really pleased with how the support turned out. I was looking for a rigid piece of pipe and ended up at my local performance exhaust company looking for a stainless off cut. After chatting with the fabricator who was making up a new exhaust for an DB7 he welded up a bend and a couple of pipe lengths for £30. I chose 44mm as it fits with the solvent waste I often use for dust extraction.
3EF39D6F-D601-489A-9F37-76BD84CF2545.jpeg


I also changed the port on the machine to one with a 63mm outlet. To reduce to the solvent waste size I use a mini downpipe adaptor (grey bit) which is a snug fit on the waste fitting.

0D3A97C9-A9C1-42F1-A28E-1A4BB6CF0DE5.jpeg
 

Attachments

  • 3EF39D6F-D601-489A-9F37-76BD84CF2545.jpeg
    3EF39D6F-D601-489A-9F37-76BD84CF2545.jpeg
    326.5 KB
  • 0D3A97C9-A9C1-42F1-A28E-1A4BB6CF0DE5.jpeg
    0D3A97C9-A9C1-42F1-A28E-1A4BB6CF0DE5.jpeg
    364.2 KB
Hope you don't take this as criticism, but if the two parallel arms where spaced further apart the guard could be lifted higher to allow blade changing without having to move the arm, I have a hole drilled below the arm's of my own version and insert a bolt to keep the guard lifted when I need too, the bolt sits in a hole on the pivot block.
 
MikeJhn":jg309r5a said:
Hope you don't take this as criticism, but if the two parallel arms where spaced further apart the guard could be lifted higher to allow blade changing without having to move the arm, I have a hole drilled below the arm's of my own version and insert a bolt to keep the guard lifted when I need too, the bolt sits in a hole on the pivot block.

No such thing as criticism just incorrect observation :D I just undo the clamps and it swings up and out of the way, I need to do this for the 45 degree cuts but I’d like to sort out a wider version as I hate using the saw without a guard, but like riding in a car without your seatbelt on! Fair point though, there will be a mk3 at some point....with a wheel at the front and 45 degree support. The main thing a the moment is that is now leaves my overalls empty.
 
I thought about a wheel at the front, but came to the conclusion that it would obscure the path of the workpiece and negate the usefulness of the perspex crown guard.
 
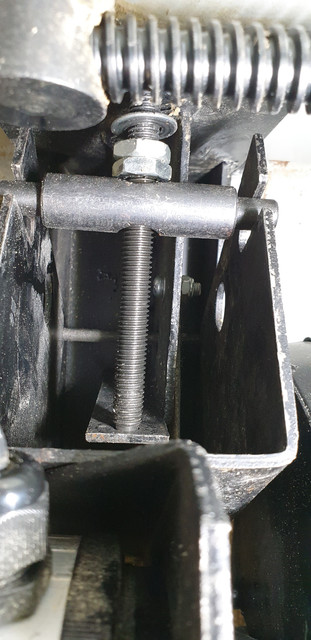
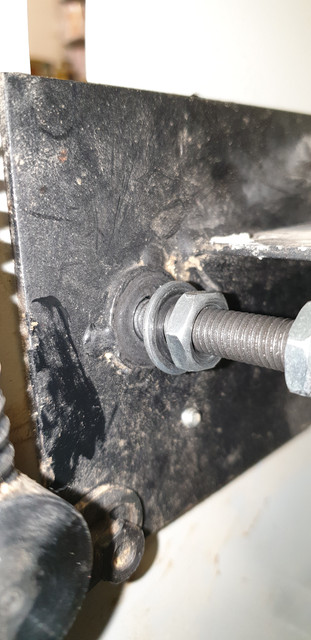
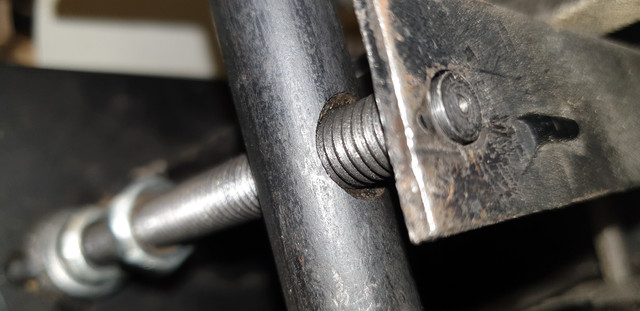
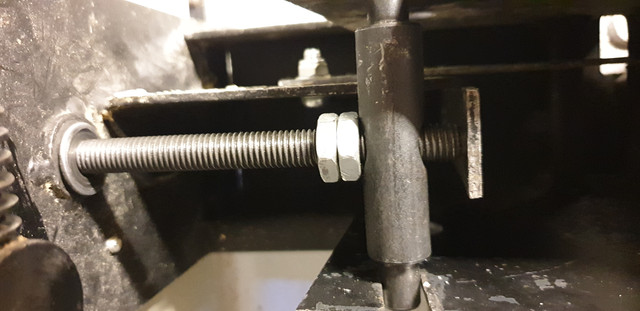
I have been having some issues with the alignment of my table saw and have run into an issue with the height adjustment. I am unsure on the position of the 2 nuts on the height adjusting threaded bar - where should they be on the threaded bar. From what I understand the end of the height adjusting thread should locate in the hole with the aid of the nuts stopping it from falling out - this allows the threaded bar to effectively push the saw blade frame and motor up and down while staying in the hole. Do the 2 nuts have to be a certain number of threads along the bar ie when the saw blade is at its highest/lowest position? Currently the locator keeps falling out.


If anyone has any knowledge about this or have a picture of what it should look like, I would be very greatful.
 
Thanks for the reply! - Looking at page 32 of the manual, number 6 on the parts list is a pin - there doesn't seem to be a hole for one on the end of the threaded bar on mine
 
As this unit has not been made or sold for some time, I am assuming that it did work when it was bought, I would suggest a really good look at the threaded bar to see if the hole is obscured by the plate it pass's through, I am not at my workshop and will not be for the next five months, so unfortunately I can't look at mine for you, but I am sure someone with one will be along and can help, there have been occasions where advice has been given by those who don't even own or ever had one, hence the "Bold, italicised and underlining" above.
 
Have you had this assembly to bits, it just looks to me as if the nuts ought to be on the other side of the trunnion to keep the shaft length constant, which would keep the shaft in place, this is only a suggestion from not being able to look at my saw as I am in the UK at the moment and the saw is in France.
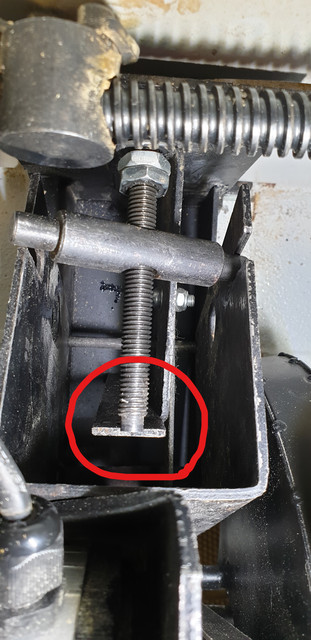
 
Just had another look today. After trying the washer and nuts on the other side of the arbor/trunnion, I'm fairly certain the washer and 2 nuts are the correct side due to there being a surface for the washer to press up against on the one side. Here are some more photos:

By the looks of it the small hole on the end of the threaded bar is just part of the manufacturing process - I am thinking of drilling and tapping in the end of the threaded bar and adding a large washer and screw to stop it from falling out of the locator. Still yet to have a response back from Axminster :x


photo host[/img]
 
I think the two nuts ought to be locked together against the thrust washer, the shaft then would hold it's length and the trunnion would travel up and down the rod?
 

Latest posts

Back
Top