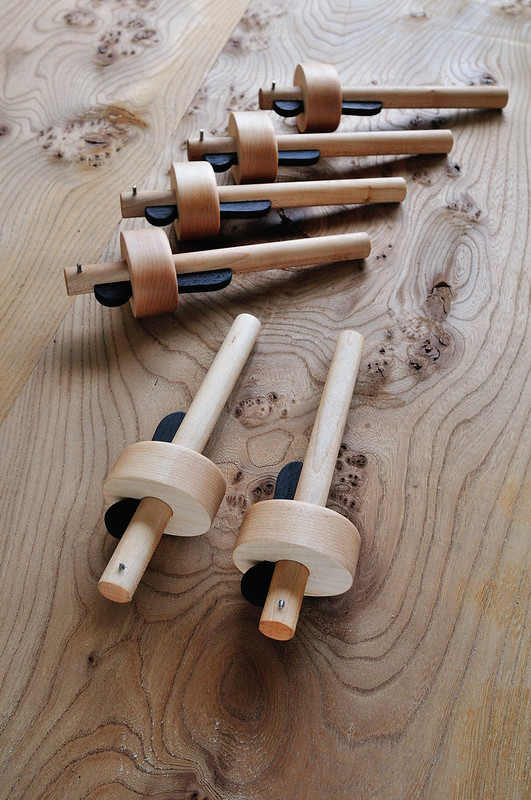
A new model of marking gauge.

UKworkshop.co.uk

Help Support UKworkshop.co.uk:

This site may earn a commission from merchant affiliate links, including eBay, Amazon, and others.

Andy Kev.

Established Member
UKW Supporter
Joined
20 Aug 2013
Messages
1,364
Reaction score
127
Location
Germany
I stumbled on this this morning while wandering about in the internet:

https://www.youtube.com/watch?v=LuckBFDUdMg

It doesn't do anything new of course but it does look as if it might do it well. Mind you at US $99 for the marking gauge, it wants to do it well!

I have to admit that I like the look of the panel gauge variant because if there's one tool I really have difficulty with, it is my traditional wooden panel gauge - obviously down to me and not the gauge but there it is.

Do you reckon this will be popular or is it just too dear/too complex or a solution looking for a problem?
 
It's too dear, too complex and it's a solution looking for a problem.

I think it's designed to appeal to people who approach woodworking like engineering and assume that they need to make quantities of interchangeable parts.

In traditional practice a panel is generally fitted into a frame, so the exact numerical dimensions don't matter, how one piece of work lines up with another does matter.

PS. Try a scribble of candle end on your panel gauge.
 
Looks like it takes three times as long in merely setting it all up, as it would to just mark everything by hand!!

Also, if these are one-time tools, how come there are so many of them in different sizes? :D
 
For that price I'd expect them to come out in person to help me find the little bit that would inevitably fall off it and roll under the tool cabinet.

Note too that, although very pretty, it's anodised aluminium, which doesn't respond well to being rubbed by abrasive materials such as hard endgrain. I don't expect it would stay "pretty in pink" for very long, and aluminium threads are another issue - they bind, horribly. And how long would that pencil lead last on my cluttered workbench?

It's bad, inadequately thought through design, and poor use of materials. For a start, make it in brass (or bronze) and stainless steel, and design the fiddly bits out of it.

I have a couple of the really cheap wheel gauges, a traditional marking+mortice gauge, and a rule stop for my 600mm SS ruler. That's quite enough complexity.

If I get a complex enough project I may get a third wheel gauge: You can't beat setting one and leaving it set until the end of a project, just in case.

E.

PS: I found a trick with a wheel gauge for difficult-to-mark wood: rub some soft pencil lead (say 4B) over the area you want to mark, before using the gauge. After marking, rub your fingertip across the line a couple of times. You push graphite into the mark, making it show up really well, and it even lubricates the saw slightly. any excess comes off easily with a bit of eraser afterwards, as long as it actually is soft pencil.

I did this yesterday on a bit of chipboard (of all things) - I could feel the cut line with a fingertip, but not see it easily because of the particles. It worked rubbing a pencil over the cut after making it, but it was better if I cut the line after using the pencil, as just described.
 
Gadgets for shopaholics.
Not worth having even as a gift - the trad wooden gauges work brilliantly.
Pete'e gauges above look good but I'd prefer a wood or plastic thumbscrew rather than a wedge
 
In a moment of madness I bought one of the wheel-style gauges a little while back. It is a thing of beauty, with lovely engineering, but is absolutely useless. I used it for a few days before reverting to my old wooden cheapie. The thing is, there is only one reference face: the fence against the edge of the wood. The height of the cutter wheel thing, minus the depth it penetrates the timber, is the depth that the main shaft is left hovering above the timber, with the obvious impossibility of keeping it parallel above the face being marked. The old wooden ones don't suffer this, because the shaft bears on the face of the wood, rendering them much easier to use, and much more accurate.

The old wooden ones aren't perfect, of course. Mine wore a little such that there was some play between the fence and the shaft/ handle, and eventually, the brass screw ate the thread in the fence. I had to drill another one on the opposite side, so it is restored, but obviously at least half way through its working life. Nonentheless, even an worn wooden one proved more accurate and more useable for me than the beautifully made wheeled one, which is now chucked in the back of a drawer somewhere for emergencies only.
 
Andy Kev.":18hrkqh7 said:
I stumbled on this this morning while wandering about in the internet:

https://www.youtube.com/watch?v=LuckBFDUdMg

It doesn't do anything new of course but it does look as if it might do it well. Mind you at US $99 for the marking gauge, it wants to do it well!

I have to admit that I like the look of the panel gauge variant because if there's one tool I really have difficulty with, it is my traditional wooden panel gauge - obviously down to me and not the gauge but there it is.

Do you reckon this will be popular or is it just too dear/too complex or a solution looking for a problem?

Put the money towards a decent 24"/600mm combination square, that's a tool for life.

Use it as a panel gauge as per the photo (ignore the brass weight, it's just there to keep the blade of the combi square flat on the workpiece), you hold the stock of the combi square firmly against the workpiece, then slide it along with a pencil against the tip of the blade.

Panel-Gauge.jpg


It's re-settable to a smidgeon better than 0.5mm. Pretty much every cabinet maker I've ever met does it this way, you'll make a wiggly mess the first few times but practise makes perfect. If you're making the same thing over and over (like say a standard kitchen cab) you'd have two pieces of ply screwed together that does the same job but to a fixed distance. For shorter distances use a 12"/300mm combi square or show you're a proper craftsman by making up half a dozen top quality gauges like Pete's, but with holes sized for the pencil that lives behind your ear. Why half a dozen? Because once set you don't change it until the job's finished and out the door, so you need a separate one for each measurement.

If anyone produced that Woodpecker thing in a proper cabinet making workshop there'd be much sniggering and chortling.
 

Attachments

  • Panel-Gauge.jpg
    Panel-Gauge.jpg
    44.4 KB
I'd do the same thing by making two pencil marks with a tape measure and laying on a straight edge for the line.
 
MikeG.":3bvbwvue said:
.......
The old wooden ones aren't perfect, of course. ..........
Nah - the old wooden ones are perfect! :lol:
 
I think there is defiantly a place for the wheel marking gauge.
Here is an example I recently found really useful using it, although it isin't something you'd normally be
doing, I suppose...

I am thinking of switching the cutter around so I can reference off one face only, has anyone done this ?
I've heard that when set normally, it helps pull the work against the stock...
If I switch it around I wonder will it make a difference, gonna try later, I think.

These mortises are all different widths, so making a block to rest the chisel on to enter the cut is not
happening, although it would standardise the filler blocks, maybe I'll do it like that another time :roll:
What do the nay sayers do in this situation, as I'm finding the lovely crisp, flat reference face to be
fantastic, since I was taking ages trying, and making a mess doing so.

I did toy with the idea of making some sort of jig, but this seems adequate enough
 

Attachments

  • SAM_2196.JPG
    SAM_2196.JPG
    217.7 KB
Er not sure what problem is but with normal pin gauge you reference from one side or face always (with rare exceptions). The workpiece is marked with face and edge marks - that's what they are there for, amongst other things.

PS is that a haunched mortice above? Normal practice is to leave the stile over length, cut the mortice and haunch etc, join up, glue, etc then only cut the extra length off when finished. Much easier than what you seem to be doing, perfect finish possible and protects the corners whilst work in progress.

I've heard that when set normally, it helps pull the work against the stock...
The normal way to use a gauge is to push it away from you and against the workpiece at the same time.
I've never used a metal gauge - they seem pointless to me, and bloody expensive.
 
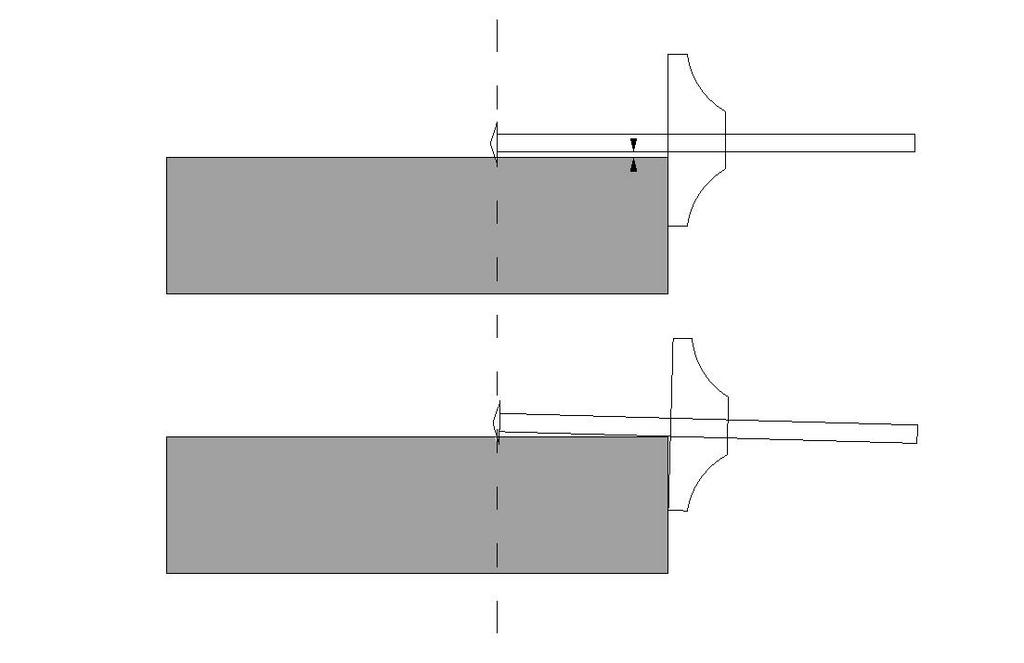
This is what I meant. With the wheeled gauge, the idea is to keep the gauge in the position shown in the upper diagram, but there is nothing at all to prevent it slipping down to that shown in the lower diagram, pulling the marking wheel closer to the edge of the board:

mWqU43l.jpg


This doesn't happen with a wooden gauge as the stem sits on the top face of the wood you are marking. Oh, and I generally pull the gauge towards me. It works for me.
 
Jacob":1y8iuicx said:
Er not sure what problem is but with normal pin gauge you reference from one side or face always (with rare exceptions). The workpiece is marked with face and edge marks - that's what they are there for, amongst other things. quote
A normal pin gauge would make for a hard time registering a chisel on a line that's so close to the edge.

PS is that a haunched mortice above? Normal practice is to leave the stile over length, cut the mortice and haunch etc, join up, glue, etc then only cut the extra length off when finished. Much easier than what you seem to be doing, perfect finish possible and protects the corners whilst work in progress.
I'm not making joints, I'm just filling up these mortises to make useful timber

I've heard that when set normally, it helps pull the work against the stock...The normal way to use a gauge is to push it away from you and against the workpiece at the same time.
Jacob":1y8iuicx said:
I've never used a metal gauge - they seem pointless to me, and bloody expensive
[/quote]
I was referring to the bevel on the gauge, I don't know if you have used one Jacob, but I do feel it to
self register against the stock.
I think this marking gauge was around 20 pounds from Axminster
I really like this particular one and wish they'd sell it again.

Tom
 
MikeG.":4476eve5 said:
This is what I meant. With the wheeled gauge, the idea is to keep the gauge in the position shown in the upper diagram, but there is nothing at all to prevent it slipping down to that shown in the lower diagram, pulling the marking wheel closer to the edge of the board:

mWqU43l.jpg


This doesn't happen with a wooden gauge as the stem sits on the top face of the wood you are marking. Oh, and I generally pull the gauge towards me. It works for me.

I get what you are saying, but I never have that problem. I'm not sure why -- I'd be the last person to use anything "properly," as my fingers are far from straight these days.

I really like the disc type gauges - mine are the really cheap ones (one was a tenner, the other, IIRC about 12 quid). I"ve got a trad gauge sitting by my elbow, waiting to go back out in the workshop, but the goto ones are the two wheel gauges I have. As delivered, I had to mod them so the screw holding the cutter recessed completely (inside the cutter), basically turning down the screw to a smaller diameter and flattening its domed head. That lets me use them as depth gauges too. I even use them on non-ferrous metals.

I just grab and mark, without any fuss, and I really like the way they don't like to follow wandering grain (very much). I also get a better line than with a traditional gauge - that's not to say I don't still use it for mortices, etc., just that I prefer the wheel ones (and yes I do use candle wax).

Each to their own, I guess.

E.
 
MikeG.":1ts89xtp said:
This is what I meant. With the wheeled gauge, the idea is to keep the gauge in the position shown in the upper diagram, but there is nothing at all to prevent it slipping down to that shown in the lower diagram, pulling the marking wheel closer to the edge of the board:

mWqU43l.jpg


This doesn't happen with a wooden gauge as the stem sits on the top face of the wood you are marking. Oh, and I generally pull the gauge towards me. It works for me.

The diameter of the wheel in your diagram is double or more the diameter of the stem. But that's not accurate, in truth the wheel is only slightly wider than the stem. If the wheel is sharp (and they're a breeze to keep sharp) it's virtually fully engaged in the work piece from the get go, so the stem does ride on the workpiece.

wheelgauge.jpg


I like wheel gauges, in particular I like the way they can be quickly rolled around an arris. I like traditional gauges too, both pin gauges and knife gauges, and keep several of each for when they're most appropriate.

Horses for courses.
 

Attachments

  • wheelgauge.jpg
    wheelgauge.jpg
    9 KB
Back
Top