Recess for a 2100mm hinge.

UKworkshop.co.uk

Help Support UKworkshop.co.uk:

This site may earn a commission from merchant affiliate links, including eBay, Amazon, and others.

SGKent

Established Member
Joined
3 May 2015
Messages
26
Reaction score
0
Location
Mid Kent
Hello!

I can do normal sized door hinge accurately and neatly and it is the same principle for fitting this beast of a hinge I have to make a fold down worktop. I am not working with expensive timber or anything, I just want to be as careful as I can since it will take a bit of effort and time to cut out two recesses of this size.

At the moment I plan on going down the standard method which is marking and grooving (with a knife) the length, width and depth of the hinge onto the target timber and then chiseling it out.

Just want to pick some brains... Using hand tools, how would you go about doing this (what other methods can I use and precautions etc can I take)?

Many thanks!
 
For that size, can't you borrow a router?
Yes you can do it by hand but I'm not sure why you would want to.
 
I have thought about it but I am not too experienced with power tools and not really liked the videos showing recess cutting for hinges with routers.
 
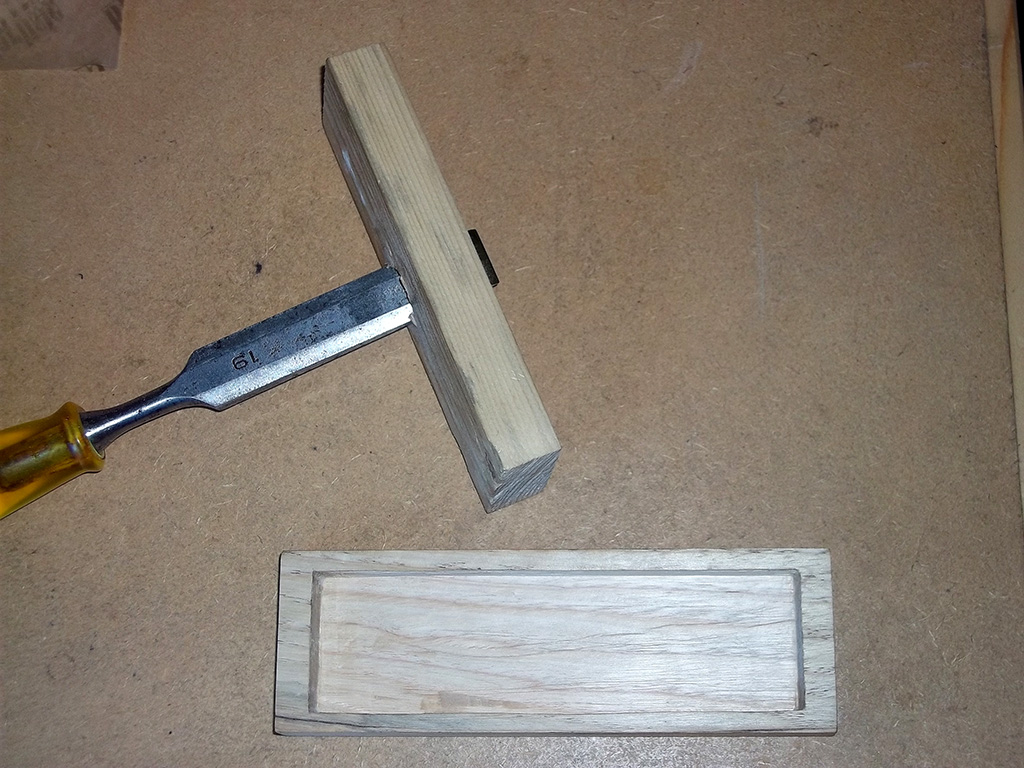
SG, you probably have this done by now but just in case not, are you familiar with a chisel router, what is often called the "poor man's router" these days after Paul Sellers? It's basically just a chisel stuck through a drilled hole in a piece of wood and despite this they work surprisingly well.

It's been a while since I used one but I made one up quickly a couple of weeks ago for the final flattening of the recesses for an oilstone box and I was impressed again by just how well they work:

4yoQcxi.jpg


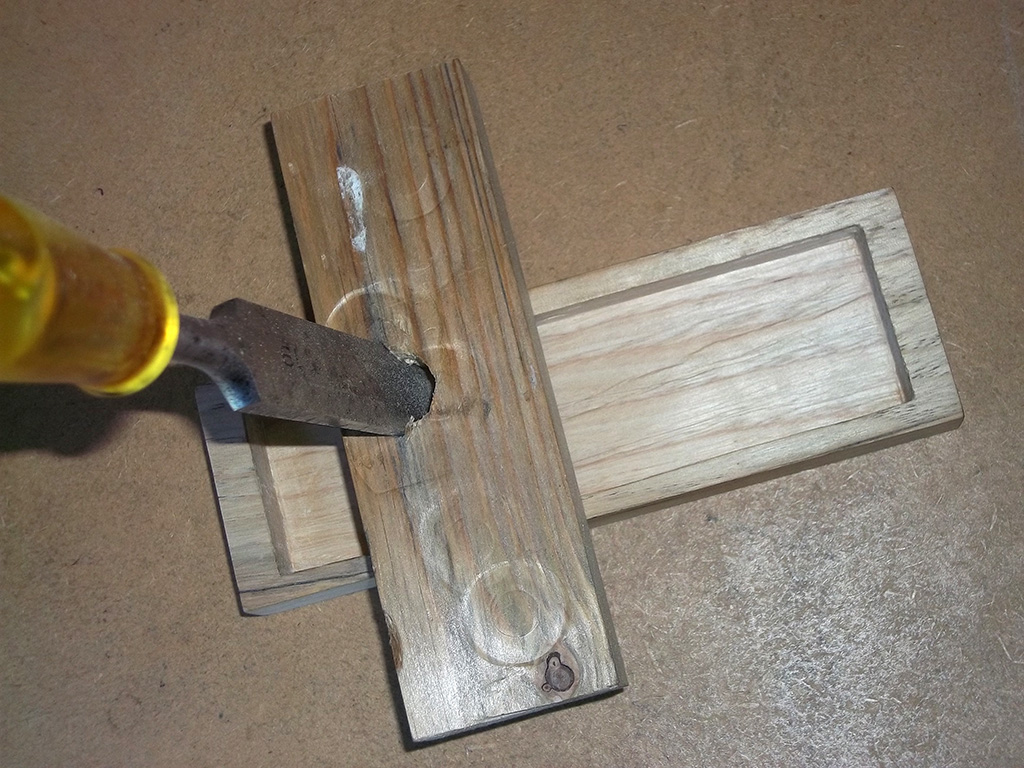
You can make a semi-permanent one but as you can see in the next image I literally just grabbed a scrap of pine I'd already used as a backer for drilling and as a clamp pad, drilled a fresh hole roughly in the middle with a brace and auger bit, stuck in a recently refurbed chisel and it worked fine.

SjZA74p.jpg
 
With due deference to Springwatch, there are many ways for a Pine Marten to get its lunch.

If I understand you correctly, you're using piano hinge. Rather than cut a rebate, why not fix a thin batten or a lipping on the edge, alongside the hinge, to achieve the same effect? Yes you need something of the required thickness, but you have the advantage of being able to choose contrasting wood if you wish, or something especially hard wearing. I'd make it slightly oversize on the outer edge of the worktop (top and ends), so you can trim it to be exact. That's assuming it folds down to stow (so the hinge pin is on the bottom edge). There's less risk of a mistake that way, as you only need a square and true edge to work with, rather than the possiibility of one slip (with whatever tool you use) over 2.1m distance.

Even if you really must have a rebate, I'd still be keen on the idea of a lipping, as you can do a lipping strip with the necessary rebate quickly and easily on a router table with good accuracy.

Out of curiosity, how is this going to fold up and down? If it has enough rigidity to be a worktop, it will, presumably be heavy, no matter what it's made of. Are you using gas struts or something?

E.

PS: apologies if I've misunderstood what you're trying to do.
 
I haven't proceeded yet as the timber is to be delivered on the 14th and have a few jobs to do before I can work on the furnishings.

Very innovative Ed, like it.

Very good suggestion also Eric... Will consider it strongly.

In terms of how I plan to do this, I have taken the plunge and got a decent router, which I will invariably use a lot going forward. I have designed the workbench in my head. The main structure will consist of 3 ~ 200mm x 70mm planks joined together by tongue and groove + glue. There will be 70x40 changeable rim on the outer edge. The inner edge will host the hinge which will attach to another strip of timber fastened to the uprights in the wall (which adds to the depth of the bench). There will be 3 pairs of legs which will be attached to the underside of the bench using conventional heavy duty hinges. The legs will unfold into housing to hold them steady and held in place with barrel bolts when folded.

The hinge is not what I'd call a piano hinge. It is much chunkier and heavier duty, easily capable of supporting the weight of the workbench.

My only concern is about unfolding the bench and then the legs, given that it will be pretty damn heavy!

Regardless, will post pics of the end result.
 
Whan I fit hinges (semi-professionally) I usually chisel out most of the waste and then smooth the bottom of the recess using my home made hinge recess plane. Now I have recently bough my first ever router and may start using that in the future.

For your piano hinges I suggest using a rebate plane and making the recesses full lenght.
 
Thank you. The advice on making the recess full length is good. I just made the bench last week (had a ton of other stuff to do before it) and the first foldaway leg. I guess I will be on to doing the hinge this week.

I invested in a router for other reasons and I will use it here. Although the wood is construction pine (which I planed the crap out of to straighten) asnd quite soft under a sharp chisel - worst comes to worst if I do it manually it will be with a chisel and block plane.

The next problem will be attaching the thing to the wall :D it weighs a metric crapton.
 
If it's pine, get some teflon spray or similar before you start - it really gums up router cutters! If you have variable speed on the router, experiment at a low speed and turn it up to the _lowest_ speed that cuts well.

The resin in the wood encourages burning, which makes the gumming-up worse, which makes the cut worse and encourages burning, which...

... And watch the grain direction for tearout - it takes no prisoners in that regard...

... yup it's a right pain to try to get a good finish and/or detail in cheap pine with a router (or any edge tools for that matter). It's not just you. It's me too, at the very least...
 
Just to be clear - you spray it on the cutter, not the workpiece!

I had an aerosol can that was Freud-branded which was basically a lacquer with teflon in it. That did work nicely - spray the sawblade or cutter and let it dry thoroughly. It gets knocked off the edges, but the places where you'd otherwise get build-up keep a slippery coating.

I've also got some in a yellow aerosol, that just coats the cutter (no lacquer in the spray - the solvent flashes off). That doesn't seem to be quite as good (but it was cheaper). I think it was advertised as a "dry" lubricant, but it is definitely teflon - the residue dries white.

I wouldn't use anything like bicycle chain lube if you're going to put a finish on the material.
 
Yea pine gets all pasty really quick on rotating bits. Good tip.

I am cutting the recesses today and the wall mounted timber is quite warped.

My biggest routing job to date has been cutting a plate recess in my router table... I managed to pull that off after a few hiccups and two part wood filler. Biggest problem was my template moving, this time will focus on getting that right.

Hopefully will be able to share some pics tonight!
 
OK< here are the pics. Sorry about the wacky order, not sure how to re-order them.

The router cur far too deep, my inexperience with it largely at fault, but I am not happy with the depth gauge on the router either, it feels really flimsy. It just so happened that my scrap hardboard brought the hinge perfectly flush. I was also lucky that one edge of the wall bracket (timber) was not warped.

My workshop is quite small, so I wanted the option of getting this thing out of the way if I needed the space.

I can't actually believe how well I pulled it off and it came out exactly how I imagined it would
 

Attachments

  • 14079554_612588324326_5523930885532512732_n.jpg
    14079554_612588324326_5523930885532512732_n.jpg
    93.4 KB
  • 14102206_612588369236_6570901692037819855_n.jpg
    14102206_612588369236_6570901692037819855_n.jpg
    136.7 KB
  • 14117679_612588284406_1539946356285220884_n.jpg
    14117679_612588284406_1539946356285220884_n.jpg
    85 KB
  • 14212077_612588319336_4878811620754707227_n.jpg
    14212077_612588319336_4878811620754707227_n.jpg
    84.8 KB
  • 14225396_612588374226_5665163491846606919_n.jpg
    14225396_612588374226_5665163491846606919_n.jpg
    146 KB
  • 14233113_612588249476_1952069682191047675_n.jpg
    14233113_612588249476_1952069682191047675_n.jpg
    80.1 KB
  • 14225355_612588239496_4646772290305028850_n.jpg
    14225355_612588239496_4646772290305028850_n.jpg
    51.3 KB
Back
Top