AES
Established Member
I've got the problem with my Chinese Mini Lathe (metal lathe) shown below. And I'm not sure how to fix - indeed, I'm not sure if I should even try to fix it!
In a word, the cross slide lead screw is bent.
DETAIL:
I stumbled the other day while carry a fairly heavy/bulky machine in my workshop. The only thing that finally stopped me from collapsing in a heap on the floor was my lathe - specifically I and the machine I was carrying landed full-tilt on the handle shown at the bottom of the pic below (the lower bright silver handle):

PHOTO A
This is the lathe after disassembly to get to the problem. To show the actual position of the subject handle I just loosely re-assembled everything onto the saddle (no gibs), then placed it on the ways, but with the complete apron and the threading/longitudinal traverse lead screw half nut and its engaging lever removed for clarity.
At the time I thought I'd just bent the M6 machine screw that retains the handle, or at worst, bent the handle itself. (At risk of teaching granny, this is the handle used to apply the depth of cut in normal turning operations).
But after stripping I found out that neither the handle retaining screw nor the handle itself were bent at all - it's the smallest turned diameter integral to the lead screw on which the handle is mounted that's bent! (Hereafter, the "handle mount"). See Photo B below - dowel added to show the real deflection - I guess it's about 15 degrees off line:

PHOTO B
The whole cross slide lead screw is retained in the saddle casting (steel?) by means of a machined aluminium block (in the pic, just to the right of the vee block). That housing block contains an internal plain bearing which looks like it's pressed into the housing block. The housing block is bolted to the front face of the saddle casting (2 x 6mm machine screws). The depth of cut indicator, which is normally also mounted on the smallest diameter of the cross slide lead screw ("handle mount"), is shown separately (it's just above the now bent out of line lead screw "handle mount").
With some difficulty (and with minimum damage thank goodness), I was able to get the indicator off the lead screw "handle mount" using two custom-cut ply wedges cut on the scroll saw! Gentle tapping with a mallet on the wedges managed to force the indicator over the now bent "handle mount".
But as I see it, getting the housing off the lead screw in its present condition is going to be virtually impossible without damage; I) because of the amount the handle mount is bent out of line; AND II) because the ali lead screw mounting block is about 3 times the "length" of the indicator (see Photo B above).
For obvious reasons (2 dissimilar metals); the relative mass of the (steel?) main saddle casting; and the pressed-in plain bearing in the (ali) housing; I don't see that the use of heat, however carefully applied, will do anything but cause damage.
But please correct me if you think that I'm wrong, but note I only have a couple of small & medium blow lamps, no induction heater coil unfortunately.
So without using heat to me the obvious thing to do is to scrap the complete lead screw/housing assembly and either make new - or buy new.
BUT:
I can't buy new (but see the lathe info at the end for why not, and any inputs on that welcome too).
And as I don't have a working lathe now I can't see me being able to make a new assembly, bearing in mind that the housing and indicator are aluminium, are both marked with accurate calibrations - not to mention that plain bearing in the housing. So I can't see it being all that easy to make WITH the lathe, but I would probably have a go anyway - IF my lathe was working!
ALSO, to add insult to the above injury, not only is the lathe currently disassembled for this problem, but after serving me very well since 2005, the electronics control box will "soon" be now on its way to the USA to get fixed - a complete coincidence, but the control electronics have developed fault/s which I can't fix myself.
So NO lathe, and the only "machine tool" now left to me is my vertical pillar drill (which fortunately is fairly accurate).
So instead of making new, I've come up with the idea of the "straightening tool" (Item A) as shown in the Sketch below:
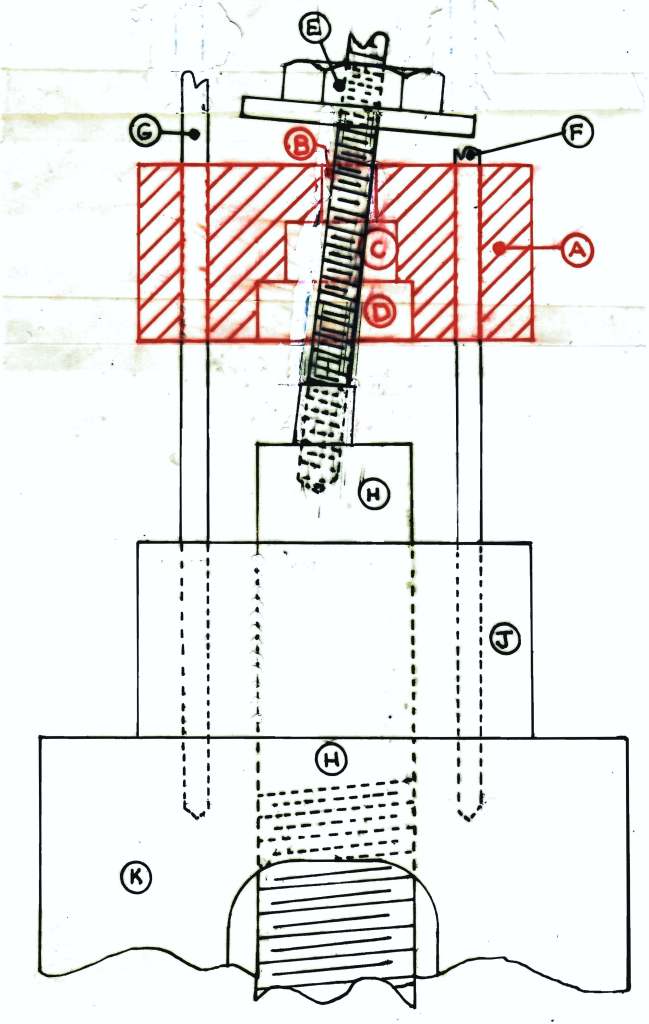
SKETCH:

LEGEND:
The "plan" is to make the straightening tool shown (Item A) from a suitable MS block or rod from my scrap box. As noted, the above sketch is not to scale, so: the bend angle; the "height" of the straightening tool; and in particular the "steps" between each of the three holes (B, C, & D above) will NOT all be exactly as shown of course.
When making the straightening tool I'll obviously need to take some care, not only with positioning the holes E, F, & G on the block/rod, but also with the depths of holes B, C, & D. But with careful marking out I should be OK with that ("hope springs eternal").
Also, I'm not sure if the 2 additional bolts (Items F & G above) will initially line up with the appropriate holes in the saddle casting or not - but if not initially, then they would be brought into use as soon as the handle mount starts to straighten up enough to allow bolts F & G to be inserted.
But the basic idea (I hope the above sketch makes it clear) is to slowly and equally tighten nuts on bolts E, F, & G, (say half a turn each at a time) thereby slowly "graunching" the straightening tool downwards, so causing the cross slide lead screw handle mount to be forced back into line. This will then allow the cross slide mounting block to be slipped off the cross slide lead screw - just as the lathe designers originally intended.
Well, that's my theory anyway. YOU may well have a better idea! If so "answers on a post card"(or better yet, on this thread!) please.
OTHER IDEAS?:
1. I HAD also thought of just not bothering and leaving the wonky handle alone until I can find a complete new assy to buy. But there the problem is that having forced the cross slide depth of cut indicator off the lead screw, (those custom ply wedges) I seriously doubt I'll be able to get the indicator back where it belongs without serious damage. And I don't fancy trying to use the lathe with little or no indication of the depth of cut I'm actually putting on!
2. I can't yet find any company who can supply spares for this particular lathe (but details are below in case anyone can come up with a possible supplier);
LATHE DETAILS:
Badged "Einhell MTB 3000". (Einhell is a German "badge engineering" firm). Unlike most Chinese mini Lathes, the OEM of this machine is NOT SEIG of Shanghai. The OEM is believed to be either a Chinese company called "Red Dog" or called "Big Dog" - now believed to be out of business.
E-mails to possible Chinese manufacturers have so far produced either "not us" answers, or just NIL replies. Considering Covid I'm not surprised.
The basic lathe spec is "7 inch x 10 inch" as so many of these lathes say they are (actual numbers for mine are approx 6.25 inch dia swing X about 11.75 inches between centres).
As checked with my thread gauges, the cross slide lead screw is 10.0 mm x 1.00 mm pitch (ISO Metric Fine). When the present situation eases I shall contact possible UK and US suppliers for spares.
Meanwhile, if any one has a better method than the above to suggest, or any improvements to the "tool" suggested, I'd very much appreciate a comment. After all this idea IS a bit of a "brute force/mechanical graunch" method - something I've always been taught to avoid unless there's absolutely no other alternative!
I know full well from other posts that there are quite a few members here with far more experience of lathe work than I have, so by all means "have at it".
Thanks in advance
In a word, the cross slide lead screw is bent.
DETAIL:
I stumbled the other day while carry a fairly heavy/bulky machine in my workshop. The only thing that finally stopped me from collapsing in a heap on the floor was my lathe - specifically I and the machine I was carrying landed full-tilt on the handle shown at the bottom of the pic below (the lower bright silver handle):

PHOTO A
This is the lathe after disassembly to get to the problem. To show the actual position of the subject handle I just loosely re-assembled everything onto the saddle (no gibs), then placed it on the ways, but with the complete apron and the threading/longitudinal traverse lead screw half nut and its engaging lever removed for clarity.
At the time I thought I'd just bent the M6 machine screw that retains the handle, or at worst, bent the handle itself. (At risk of teaching granny, this is the handle used to apply the depth of cut in normal turning operations).
But after stripping I found out that neither the handle retaining screw nor the handle itself were bent at all - it's the smallest turned diameter integral to the lead screw on which the handle is mounted that's bent! (Hereafter, the "handle mount"). See Photo B below - dowel added to show the real deflection - I guess it's about 15 degrees off line:

PHOTO B
The whole cross slide lead screw is retained in the saddle casting (steel?) by means of a machined aluminium block (in the pic, just to the right of the vee block). That housing block contains an internal plain bearing which looks like it's pressed into the housing block. The housing block is bolted to the front face of the saddle casting (2 x 6mm machine screws). The depth of cut indicator, which is normally also mounted on the smallest diameter of the cross slide lead screw ("handle mount"), is shown separately (it's just above the now bent out of line lead screw "handle mount").
With some difficulty (and with minimum damage thank goodness), I was able to get the indicator off the lead screw "handle mount" using two custom-cut ply wedges cut on the scroll saw! Gentle tapping with a mallet on the wedges managed to force the indicator over the now bent "handle mount".
But as I see it, getting the housing off the lead screw in its present condition is going to be virtually impossible without damage; I) because of the amount the handle mount is bent out of line; AND II) because the ali lead screw mounting block is about 3 times the "length" of the indicator (see Photo B above).
For obvious reasons (2 dissimilar metals); the relative mass of the (steel?) main saddle casting; and the pressed-in plain bearing in the (ali) housing; I don't see that the use of heat, however carefully applied, will do anything but cause damage.
But please correct me if you think that I'm wrong, but note I only have a couple of small & medium blow lamps, no induction heater coil unfortunately.
So without using heat to me the obvious thing to do is to scrap the complete lead screw/housing assembly and either make new - or buy new.
BUT:
I can't buy new (but see the lathe info at the end for why not, and any inputs on that welcome too).
And as I don't have a working lathe now I can't see me being able to make a new assembly, bearing in mind that the housing and indicator are aluminium, are both marked with accurate calibrations - not to mention that plain bearing in the housing. So I can't see it being all that easy to make WITH the lathe, but I would probably have a go anyway - IF my lathe was working!
ALSO, to add insult to the above injury, not only is the lathe currently disassembled for this problem, but after serving me very well since 2005, the electronics control box will "soon" be now on its way to the USA to get fixed - a complete coincidence, but the control electronics have developed fault/s which I can't fix myself.
So NO lathe, and the only "machine tool" now left to me is my vertical pillar drill (which fortunately is fairly accurate).
So instead of making new, I've come up with the idea of the "straightening tool" (Item A) as shown in the Sketch below:

SKETCH:

LEGEND:
The "plan" is to make the straightening tool shown (Item A) from a suitable MS block or rod from my scrap box. As noted, the above sketch is not to scale, so: the bend angle; the "height" of the straightening tool; and in particular the "steps" between each of the three holes (B, C, & D above) will NOT all be exactly as shown of course.
When making the straightening tool I'll obviously need to take some care, not only with positioning the holes E, F, & G on the block/rod, but also with the depths of holes B, C, & D. But with careful marking out I should be OK with that ("hope springs eternal").
Also, I'm not sure if the 2 additional bolts (Items F & G above) will initially line up with the appropriate holes in the saddle casting or not - but if not initially, then they would be brought into use as soon as the handle mount starts to straighten up enough to allow bolts F & G to be inserted.
But the basic idea (I hope the above sketch makes it clear) is to slowly and equally tighten nuts on bolts E, F, & G, (say half a turn each at a time) thereby slowly "graunching" the straightening tool downwards, so causing the cross slide lead screw handle mount to be forced back into line. This will then allow the cross slide mounting block to be slipped off the cross slide lead screw - just as the lathe designers originally intended.
Well, that's my theory anyway. YOU may well have a better idea! If so "answers on a post card"(or better yet, on this thread!) please.
OTHER IDEAS?:
1. I HAD also thought of just not bothering and leaving the wonky handle alone until I can find a complete new assy to buy. But there the problem is that having forced the cross slide depth of cut indicator off the lead screw, (those custom ply wedges) I seriously doubt I'll be able to get the indicator back where it belongs without serious damage. And I don't fancy trying to use the lathe with little or no indication of the depth of cut I'm actually putting on!
2. I can't yet find any company who can supply spares for this particular lathe (but details are below in case anyone can come up with a possible supplier);
LATHE DETAILS:
Badged "Einhell MTB 3000". (Einhell is a German "badge engineering" firm). Unlike most Chinese mini Lathes, the OEM of this machine is NOT SEIG of Shanghai. The OEM is believed to be either a Chinese company called "Red Dog" or called "Big Dog" - now believed to be out of business.
E-mails to possible Chinese manufacturers have so far produced either "not us" answers, or just NIL replies. Considering Covid I'm not surprised.
The basic lathe spec is "7 inch x 10 inch" as so many of these lathes say they are (actual numbers for mine are approx 6.25 inch dia swing X about 11.75 inches between centres).
As checked with my thread gauges, the cross slide lead screw is 10.0 mm x 1.00 mm pitch (ISO Metric Fine). When the present situation eases I shall contact possible UK and US suppliers for spares.
Meanwhile, if any one has a better method than the above to suggest, or any improvements to the "tool" suggested, I'd very much appreciate a comment. After all this idea IS a bit of a "brute force/mechanical graunch" method - something I've always been taught to avoid unless there's absolutely no other alternative!
I know full well from other posts that there are quite a few members here with far more experience of lathe work than I have, so by all means "have at it".
Thanks in advance


