Autumn Challenge.Place ONLY your entries here. (no comments)

UKworkshop.co.uk

Help Support UKworkshop.co.uk:

This site may earn a commission from merchant affiliate links, including eBay, Amazon, and others.
Status
Not open for further replies.

Grahamshed

Established Member
Joined
14 Apr 2012
Messages
3,066
Reaction score
3
Location
Oxfordish
Time's up ladies and gents.

The Autumn Challenge was for a ‘Pierced turning’. Paul Hannaby has kindly agreed to judge this quarter’s Challenge,

Challenge Requirements:

The Autumn quarter’s rules were:-

1. The Challenge is open to anyone and everyone.
Entries must be new and made specifically for the Challenge.
2. Entries must be made of wood which must be turned on a lathe using woodturning tools.
3. The object made can be of any type, size or shape and for any purpose but must be pierced with multiple holes.
4. Carving, colouring, pyrography and texturing are allowed for this challenge. However, the judge must be able to see your turning and piercing skills!

Please post three images of your work together with details of the wood used, the tools and methods used to make it and any key dimensions.

1 showing a general view of your entry .
1 top view of your entry
1 view of the bottom of your entry
A fourth picture may be added (but is not compulsory) if needed to show any other interesting details of your entry.

Image size - please use image size 640 x 480 0.3mp, as in previous challenges

Please upload your pictures and description here’ between 10pm on Friday the 23rd September and 10pm on Sunday the 25th September.

Please also send me a PM giving me your own opinions of 1st, 2nd and 3rd places amongst the entries (other than your own) between 10pm on 25th September and 10pm on 27th September (for me to compile the entrants’ scoring).

Good luck to all.
 
Here is my entry.

It is a lidded box with a pierced lid made from a 76mm square of lime. I turned the box on my Axminster AWSL1000 lathe using a roughing gouge, spindle gouge and two scrapers, 1 square and the other round nose.

I drew what I hoped would be a pleasing pattern on the lid and pierced numerous holes with a drill to facilitate my scroll saw blade. I then cut out the pattern with the scroll saw and then used a Peter Childs pyrography iron to make the leaves come alive.

I sanded down to 240 grit and then went to Yorkshire grit before giving it a coat of Liberon Black Bison Wax.

Size height 45mm dia 72mm
 

Attachments

  • pic3.jpg
    pic3.jpg
    50.7 KB
  • pic4.jpg
    pic4.jpg
    30.2 KB
  • pic2.jpg
    pic2.jpg
    46.7 KB
  • pic1.jpg
    pic1.jpg
    65.5 KB
My entry is an earring stand made out of Yew, it measures 195mm tall x 125mm at its widest, the tools used were a 1" square end scraper, a 3/4 skew chisel and a 3/8 th spindle gouge, The finish was cellulose sanding sealer and microcrystaline wax. The green baize is stuck to the base to protect the base but also to cover the screw chuck hole which was plugged. This stand was made in 4 parts, first the base which had a hole drilled in the top to receive the tenon on the column which was turned second, then the earing shelf was turned, then the finial which had a tenon on to go through the earring shelf and into the column.
earing 1.jpg

earing2 (528x640).jpg

earing3 (492x640).jpg
 

Attachments

  • earing 1.jpg
    earing 1.jpg
    178.5 KB
  • earing2 (528x640).jpg
    earing2 (528x640).jpg
    207 KB
  • earing3 (492x640).jpg
    earing3 (492x640).jpg
    179.2 KB
Sorry to disappoint on the quality, Bobajobob.

My effort is two things;

1. A rush to get something done before emptying and dismantling the garage/workshop ready for a rebuild, and
2. My first ever 'pierced' work.

A Magnolia bowl, 130mm x 45mm. Part turned fresh from felling, then returned to final shape. I used my bowl gouge for all shaping and spindle gouge to make the chucking point. Parted off with parting tool. Sanded to 400 grit. 'Pierced' using all I had - several sized drill bits, set out using the lathe's indexing to try to get at least a bit of interest.

No finish as yet, because the finishes box was already packed away - Grrr!

No expectations, just pleased to have actually completed something in time.
 

Attachments

  • pierced bowl 2.jpg
    pierced bowl 2.jpg
    43.6 KB
  • pierced bowl 1.jpg
    pierced bowl 1.jpg
    61.8 KB
  • pierced bowl 3.jpg
    pierced bowl 3.jpg
    52.4 KB
A platter turned from a piece of old oak kitchen worktop.

13'' diameter. 105 'piercings'

The 'piercing' was done on the scroll saw.

Not sure what else to add except I love that that you can see the finger-joints in the original worktop.

platter_1.jpg


platter_3.jpg


platter_2.jpg
 
Chancing my arm with this one, but I think it still falls within the rules.

I made this after a FB friend showed me a photo of one.

Fruit bowl from another piece of recycled oak kitchen worktop (yawn).

9¾'' diameter.

The piercing was done BEFORE the turning - with a Forstner bit.

Then it was hot-glue mounted on a scrap piece and turned.

... the top
fb1.jpg


... and the base
fb2.jpg


... it was set out by printing a circle template with 24, 18, 10 and 5 divisions.
fb3.jpg


I finished it with coconut oil, which has proven to be perfectly ok.
 
a bowl for potpourri in butternut and rosewood. started this morning and here it is. 8" by 6" high,bottom turned on a screw and then remounted on the chuck and hollowed . lid turned with the bottom mounted on the screw,then turned, then drilled the vent holes and the hole for the finial. took the chuck off, roughed out the finial between centers, including the 5/8" tenon to go into the lid, remounted the chuck and glued in finial with tightbond 2, had lunch, remounted the roughed out round finial in the spigot jaws and finished the inside of the lid. changed spigot jaws for cole jaws and remounted the lid in them and turned the finial. everything sanded to 320 and 6 coats of rattle can laquer. left the inside unfinished as always with potpourri thingies.the blonde came home from work and claimed it.
sorry bout the sideways pic, its not like that and is correct when enlarged. thx
 

Attachments

  • IMG_2150.jpg
    IMG_2150.jpg
    70.9 KB
  • IMG_2151.jpg
    IMG_2151.jpg
    76.1 KB
  • IMG_2149.JPG
    IMG_2149.JPG
    41.9 KB
  • IMG_2152.JPG
    IMG_2152.JPG
    33.7 KB
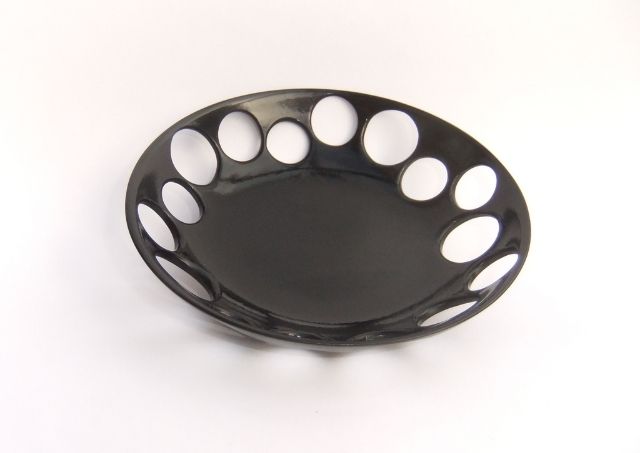
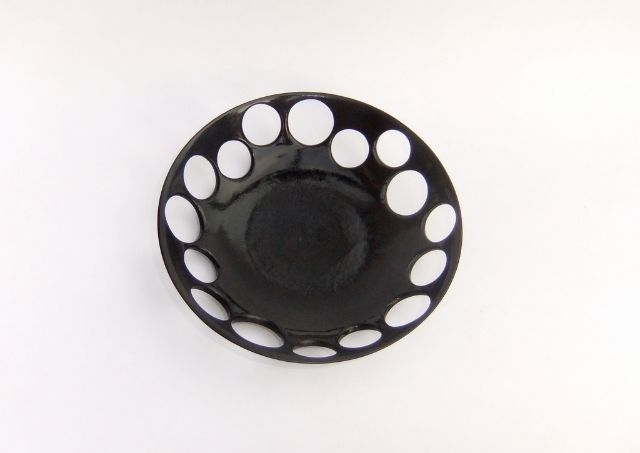
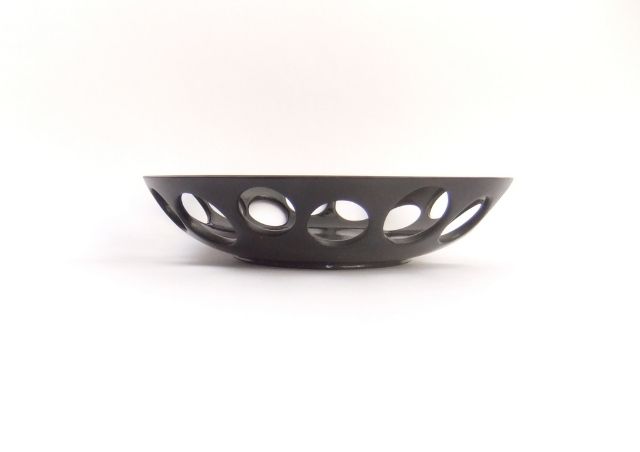
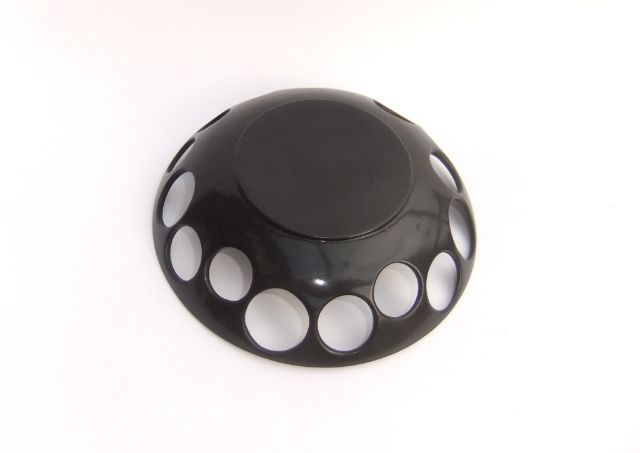
Turned from Tulip wood using bowl gauge and sanded to 400grit then marked out using coins of different sizes once happy I used a multi tool to cut out the holes and then hand sanded down to 400 grit for a second time then given a coat of sander sealer before ebonising with a spray and finally three light coats of a gloss finish with a gentle rub between each(thank goodness for quick drying finished)

DSCF6747202_zpsk5brybub.jpg


DSCF6743202_zpsl3owufce.jpg


DSCF6744202_zps9fs7b5pi.jpg


DSCF6745202_zpshakffkwu.jpg
 
Status
Not open for further replies.
Back
Top