How to print on wood

UKworkshop.co.uk

Help Support UKworkshop.co.uk:

This site may earn a commission from merchant affiliate links, including eBay, Amazon, and others.
Joined
13 Jul 2015
Messages
2,924
Reaction score
148
Location
Wales
Alexam":v9xdfdhj said:
but what about inkjet printers? Is there a 'good' way to transfer?

There are loads of different techniques on youtube, but I haven't tried any of them as I dont have an inkjet printer.

I guess it depends on what you're trying to achieve though. Most people are after one of two :

- A rough transfer for carving or burning over
- A permanent transfer for decoration

I'm only after the first at the moment.

Other techniques I've tried :

- Tracing paper. Works well, but is tedius and not very accurate
- Ironing (toner only). This works well and is very easy, but only if the wood is *completely* flat.
- Acetone (toner only). Could not get this to work at all.
 
Ok - having let the varnish dry, I then started the peeling process. I'm able to remove most of the paper, but there is still a fine layer that is quite apparent that I can't remove without also then rubbing off the toner? is that normal? or should I be able to remove *all* the paper?
 
I have tried lazer and inkjet.

The inkjet had far superior results for me. The wood absorbed the ink and gave a perminent set to varnish over.

The lazer toner seemed to lift when I varnished as it sits on top of the wood.

For the inkjet you need some sticky label paper, like the avery ones but cheaper. Remove all the sticky labels from the backing paper. It's the backing paper you want to print onto (print onto waxy side) then just place carefully onto the wood for a few seconds and hey presto.

I made a magic box and put loads of wizards and stuff onto it. Looked really good.
 
transatlantic":3652dql5 said:
Ok - having let the varnish dry, I then started the peeling process. I'm able to remove most of the paper, but there is still a fine layer that is quite apparent that I can't remove without also then rubbing off the toner? is that normal? or should I be able to remove *all* the paper?
When I did it I used loads of the varnish and set the Picture into it, I left it for 2 hours to make sure the varnish had gone hard, I then gave it a good dollop of cold water on the paper and left it to soak in for around 10-15 mins and then I did the same again but instead of waiting I just started to rub the paper off. There was no residue left behind and when I then re-varnished it. The end result was quite good
 
transatlantic":3ju3x231 said:
- Acetone (toner only). Could not get this to work at all.

At work (don't ask) we were making a lino printing block of our logo,
and we looked up technique on the 'net. We found "solvent transfer".

We use the acetone technique with a laser printer, although we didn't have
acetone, and used MEK.

It was actually too volatile a solvent - it softened the ink to a liquid
like water, and then evaporated back to complete dryness in around 5 seconds!

We managed by having one person dabbing with MEK soaked
cotton wool, and another person rubbing down with the back of a spoon.

We did around a square inch at a time and "got the job done."

The recommended acetone might be a little less frantic!

BugBear
 
To the people comparing laser to inkjet; they're COMPLETELY different!

A laserjet uses powdered pigments in a thermoplastic medium.

https://en.wikipedia.org/wiki/Toner

Inkjets typically use a water soluble ink.

They have almost nothing in common, so any process designed for one
is going to be pretty much a total fail with the other.

BugBear
 
Having now found a few videos on this, it seems that Laquer Thinner method seems quite good, so may try that as well and see whats best.

Thank's to all.
 
Alexam":25uoh5na said:
Having now found a few videos on this, it seems that Laquer Thinner method seems quite good, so may try that as well and see whats best.

Thank's to all.

Do get back with your results :)
 
This is similar to one used in video
Amazon link
Can you manually adjust the temperature or is it just one setting?


Answer:

One setting I'm afraid. And it gets very hot. Having said that I'm not using it for the purpose for which it is intended. I don't use it for "hot carving." I use it to transfer graphics and text to timber and it needs handling very carefully or it will burn the paper and the timber. Good luck...
By Barrie Furminger on 23 November 2015
 
I know a little bit about both laser and inkjet technologies, having worked for a major US manufacturer of both for some years. That said, technology moves on, so don't assume what was right in the 1990s still necessarily applies!

Transfer with a Laser

Mechanically, lasers print in a two-stage process.

1. The toner is a fine carbon-based dust and it is transferred to the final surface by contact (or very nearly contact). The drum (with the reversed image on it) comes very close or touches the surface and toner moves across. at that stage the toner isn't bound to the paper (or whatever), and if you remove a paper jam from that part of the machine, you'll see you can literally blow the toner away (don't - it's slightly hazardous, similar to MDF dust).

2. The paper then goes through a fuser unit. This applies heat and pressure to bind the toner into the surface.

Why mention all this? Because on most good lasers, you can alter the behaviour of the fuser unit* to optimize printing on different materials. Usually that's limited to altering the temperature it works at, because some media, e.g. cellulose transparency film, need less heat than others (e.g. rough, vellum-type papers) to fuse the toner onto the surface.

At a guess, for transfer to wood, you want the fuser to stick the toner in place just enough to get the paper out and turn it over onto the wood. That's hardly at all.

So the trick would be to tell the laser printer it has the wrong type of medium ("paper"), and actually use something that needs high heat to fuse properly. A few experiments will show what works best, but my guess would be using heavyweight, rough paper (not shiny card) and telling the laser you're printing onto transparency film. The 'economy mode' might also have an effect, but I'm not sure if that'll be good or bad! You'll never get extreme detail this way - forget 300 DPI etc. Print on the laser at it's highest resolution and highest 'quality' setting (probably! - 'quality' also affects the crucial fuser temp.). That should get you the most toner on the paper and the highest contrast result on the wood. The transfer to wood, though, will inevitably blur the result a lot (microscopically, at least), so expect a loss of sharpness.

I can see no reason why it shouldn't work (theoretically) with a colour laser, too, BUT I think they glaze the paper in the fuser system, and thus may well fuse the toner too well for transfer. I have no direct experience of them (other than as a user). Obviously, too, if it works at all, you'll get a significant colour change on the wood, as they're intended to print onto a specific white paper.

An idea about fixing the image to the wood:

For years, I've done a party trick with my big photographic flashguns to demonstrate the physics of them to children: All decent flashguns emit a HUGE amount of power (watts), albeit for a very short time.

My biggest portable flashgun will do around 300,000 watts. Really. No exaggeration. But that's for only 1/10,000 of a second (with 30 Joules of energy emitted). It is plenty, however, to make a piece of black laser-printed paper start to smoke, if you hold it in front of the flashgun and fire at full power.

The more toner, the more smoke. DO try this at home folks, but eyes tight shut until after the flash! (Much like a nuclear detonation really.). It doesn't work half as well with inkjet paper.

My point? Do the transfer, then fire a flashgun on the surface of the wood (will probably need a few flashes each doing a small area at a time, and ON the wood, not close to it). You'll cook the toner you've transferred, and hopefully the wood itself will reflect enough energy not to scorch.

Caveats: 1. You need a powerful flashgun (my biggest reliable one is about 45J). The on-camera things won't cut it or even come close. 2. It's mechanically hard on tube and reservoir capacitor, so you may kill the flashgun if you do this too much (hint: speed isn't important, so leave some time between full flashes for the system to 'heal' itself). 3. Don't even think about doing this with normal AA batteries in the gun - they won't last. Even NiCd and Li-ion will heat up significantly.

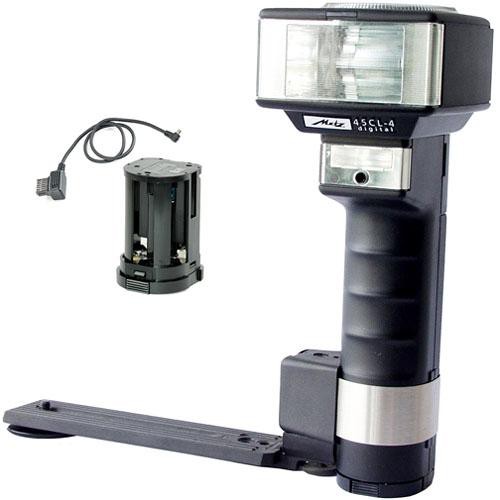
FWIW, I use these:
metz-45-ct-1-professional-flash-set-29.99-8312-p.jpg
Metz_MZ_45140_mecablitz_45CL_4_Digital_TTL_1236092473000_602998.jpg

Both are about 45J officially, but it depends on how you're using them. 30J is a more realistic figure.

regards,

E.

*The service manual for my printer is several hundred dense pages I'll look when I remember where I put it!
 
Claymore":1o4cqak1 said:
Tried the Acetone on my laser prints and it was rubbish........others have used something called Mod Podge but haven't tried that yet

Did you use actual acetone or did you use nail varnish remover which might have acetone in but also has perfume and water and who knows what else?

Did you burnish the back of the paper or just wet it with acetone?

Eric The Viking":1o4cqak1 said:
So the trick would be to tell the laser printer it has the wrong type of medium ("paper"), and actually use something that needs high heat to fuse properly. A few experiments will show what works best, but my guess would be using heavyweight, rough paper (not shiny card) and telling the laser you're printing onto transparency film.

I can see no reason why it shouldn't work (theoretically) with a colour laser, too, BUT I think they glaze the paper in the fuser system, and thus may well fuse the toner too well for transfer. I have no direct experience of them (other than as a user). Obviously, too, if it works at all, you'll get a significant colour change on the wood, as they're intended to print onto a specific white paper.

I've had limited success with this method with my colour laser printer. It's not as easy as I've seen in some videos, but it's definitely doable. I had one disaster where a bit too much acetone dissolved enough toner for it to sit around on the surface of the wood and smear about a bit, which at least tells me that there's enough toner dissolving off the paper! In retrospect I also wonder whether the choice of wood makes a difference - planed-to-a-gloss sycamore probably doesn't wick the acetone away so fast as something like pine would!


Edit: Also, maybe I'm missing something, but is there any reason a simple heat gun wouldn't work just as well as a fancy camera flash?
 
JakeS":2qexzhip said:
is there any reason a simple heat gun wouldn't work just as well as a fancy camera flash?

Obvious answer: try a heat gun and see - you may get a good surprise!

More techy answer: A flashgun might work well for two reasons:

1. toner particles are very black and non-reflective. They absorb all light wavelengths readily. A flashgun has little effect on white paper, only black print, and it radiates up into the ultraviolet*, which is probably what you want.

2. As I said, a flashgun dumps a HUGE amount of energy in a very short time, compared to a heat gun. One Joule is one Watt-second. So 30J is 30 Watts for one second, or 1W for 30 secs, or, as I said, 300,000W for the 1/10,000 sec it takes to fully flash. That is a lot of power for the toner to absorb, albeit for a very short time, but it's not surprising smoke comes off. The difference being that an awful lot of the flashgun energy is going just where you want it (the toner), and is reflected off the wood/paper. There's no discrimination with a heat gun, everything will be warmed up, pretty much.

Big flashguns aren't very fancy typically, they're pretty crude, and anything chunky from the oddments bin of a camera shop, or ebay or a car boot would probably be worth experimenting with.

On full power, mine go off with an audible "thwack", which is (mostly) the noise of the heat shock wave from the tube. You'd want an old-ish one (1980s-2000s) rather than the complex computery things available nowadays - those actually don't have as much power. I really, really wouldn't hold my hand next to a big flash gun when it fires, unless I wanted to brand myself with sunburn (and/or boil some small blood vessels).

Be careful about modifying them though, or trying to repair one. There's enough energy stored in the reservoir and at high enough voltage for even the little ones built into disposable cameras to be lethal (electric shock). The capacitors used are quite special and very hard to obtain. In the big studio kit, they do actually wear out, as they're being asked to work in a pretty extreme way. Quite a few old flashguns used to have the option of mains power, as well as batteries. As long as they work, they'd be ideal, as compared to an endless supply of AAs, mains is cheap. Safety is down to the purchaser, though.

I'll do some experiments when I get a moment. But next time you're car-booting, see what's out there.

E.

*sometimes there's a UV blocking coating or filter on the tube, for safety.
 
Back
Top